Showing posts with label card challenge. Show all posts

He Has Made Everything...

Happy Sunday!
I hope you've been having a wonderful weekend!

As I am scheduling this blog post today, the sun has decided to shine all day!  This week has been extremely cold and we've had snow and rain!  May is just around the corner and our family is looking forward to camping season so we are quite ready to be done with this crazy mix of weather...but it isn't up to us is it?  Nature has a way of reminding us that we're not in charge, doesn't it?  We know that God tells the wind where to blow, the rain where to fall and the sun when to shine.  I find that spending time in the great outdoors often leads me to praising and worshipping God.  To look around and take time to soak in His creation is a humbling experience.  God our creator has created everything....from light to darkness, water and land, animals and humans...to sit and ponder all that He has created makes you realized how big He really is!  And, what creativity!  

You can find the whole story of creation in the Bible in the first few chapters of Genesis.  I'm often amazed that people think that this could have all come together through an explosive bang, or that we evolved from monkeys...all has been planned out perfectly by our Creator.  To look around nature, to hold a new born baby really makes you realize that we are here on this earth for more than to just exist with no purpose.   

 This week on Mustard Seed Faith Challenges we want to meditate on God as our Creator. 
Jeanne came up with this idea through the praise and worship song by Big Daddy Weave called "Overwhelmed"...and that is exactly how I feel when I think of all that God has created and done for me when I wasn't deserving.  

Here's the link to the video of this song...we had a chance to see Big Daddy Weave live last summer at the praise and worship time with them was amazing!

So, take a few minutes to listen to this beautiful song...rest and allow your spirit to soak in the lyrics and reflect on all God has created...


While our theme this week for the challenge is God as Creator and creation, we have made it simple for you to create by including a sketch challenge!

Here's a peek at the sketch...

No automatic alt text available.
I've kept my project very simple this week!
I had a few images in my Silhouette library and thought they would be perfect for this challenge.
I love my Silhouette and it's print and cut features...it makes creating very quick and easy!

Here's how my project came out...


I've always loved Precious Moments and I just couldn't resist using one of the print and cut images from the Silhouette Design Store.  I'd owned these files for quite some time and just hadn't had the time to use them.  I printed the coordinating background from the Precious Moments collection as well.  I've popped it up off the card base.  I've adhered the sun and little girls image onto a simple oval die cut and popped the oval up off the card base as well.  Don't they just look like they are admiring God's creation of flowers!  I've stamped the sentiment (which comes from one of my Illustrated Faith stamps) onto white card stock, trimmed it and inked the edges with a light pink and adhered it to the card.  Not exactly as shown in the sketch...but that's the beauty of a sketch challenge...you don't have to follow it exactly!  Some glitter and a few yellow sequins and this little creation came together in about a half hour, including print and cut time with the Silhouette.

I do hope you'll join us in our new challenge!  Following a sketch allows for freedom of interpretation and also helps you out when your creativity has taken a hike!
We'd love to see your favorite project featuring some of your favorite creations God has blessed us with!

Until next time...

Guest Designing with Country View Challenges...

Welcome Everyone!
I'm here today with a special share!
A few months ago I was lucky enough to have one of my creations chosen to be one of the Top 3 at Country View Challenges, and was invited to be one of their guest designers for September.

When I found out the theme for the challenge was "numbers", I knew exactly what I was wanting to create...or more so decorate!  I've recently jumped on the planner bandwagon and decided that what holds more numbers than a planner...dates, times, etc.

Here's the planner spread that I designed for a week in August...


I dug into my Scarlet Lime PlannerSociety July planner subscription kit, along with Jillibean Soup "Chilled Cucumber Soup" Collection and started to get creative.  I've used the gorgeous paper from the Scarlet Lime PlannerSociety Collection to fill in some of the time blocks, added stickers and several die cuts.  I've also used some of the journaling cards, die cuts, papers and of course the decorative number blocks from the Jillibean Soup "Chilled Cucumber Soup" Collection.  Some fun washi tapes and MAMBI stickers completed the look! Planning is such a fun and creative way to keep your life organized!

Here's a closer look at each of the pages...


Don't you just love the flamingo stickers!
I Love Flamingos!

Here's a closer look at the second page as well...


I love the messages on both of these journaling cards!  And, I thought the MAMBI stickers fit in with the messages perfectly!

I do hope that you will check out the challenge at Country View Challenges and play along!
Get creative with the number theme and be sure to link up your creation!

Until next time...

Lighthouse...

Hello again!
It seems this is the week of posts for guest designing!

Recently I was acknowledged for one of my creations at Through the Craft Room Door...it was actually my Peacock treat box that was highlighted as a favorite.  Well, along with that came a chance to guest design for them....so here I am!

I was lucky enough to be given the chance to pick my digi stamp from the very talented Oak Pond Creations.  Since I had been just working with the more masculine line of paper at Heartfelt Creations I decided to keep going and create a masculine card to showcase.  
I chose the Lighthouse digital stamp!

I wanted to keep it more clean and simple this time....


I've colored the image with my new Chameleon markers!  They are super fun...although I will have to spend a little more time with them to learn how to use them to their fullest potential!  Here's a small tip for you though...always use a scrap paper under the image when coloring...my kitchen table has a new mark and thin layer of paper adhered to it.  I'm really hoping it will fade out after a bit more cleaning!  LOL

I've then inked the edges of all of the papers with Rich Cocoa Memento ink.  Using a distress ink tool, I've added in some distress ink in Vintage Photo and Antiqued Linen to the image.  I've also sprinkled some stone colored distressed embossing powder over the image and set it with my heat too.  I've die cut the ornate die and anchor from my Heartfelt Creations Everyday Heroes dies.  The image has been matted on black card stock and then adhered to the ornate die, which has then been popped off the card with 3D pop dots.  I've added a few pieces of washi tape to the area where the anchor has been applied and the sentiment stamp comes from one of the stamps in my Stampin Up collection. 
A touch of baby blue stickles on the waves to give a little shimmer and the card was completed.  

Now you have a chance to link up a creation with Through the Craft Room Door.  Their challenges are always "Anything Goes" so its super easy to play along!  
You never know...you may just be their next guest designer!

Until next time...

Project Supply List and Instructions
Oak Pond image - Lighthouse
Chameleon Markers
Heartfelt Creations "Everyday Heroes" paper collection
Heartfelt Creations "Everyday Heroes" die
Tim Holtz Distress Inks - Antique Linen & Vintage Photo
Ranger Distress Ink Tool
Ranger Distress Embossing Powder - Pumice Stone
Memento Ink - Rich Cocoa
Stickles - Baby Blue
Stampin' Up Sentiment stamp
washi tape
3D pop dots
Big Shot die cutting machine
scor tape
heat tool

Finished card size is 4.25"x5.5".  Cut a piece of teal patterned paper just slightly smaller than that of the card base itself.  Cut a black patterned paper just slightly smaller than that of the teal colored background paper. Cut a small strip of teal patterned paper (the same as you used for the background) to place vertically on the side of the card on the patterned black card stock behind where the image will be place.  Print off and color digi image.  Using a distress ink tool, work some of each the distress inks onto various parts of the image giving it an aged and weathered look. Ink all edges of the image panel using brown ink. Sprinkle some Pumice Stone distress embossing powder to various parts of the card and set using a heat tool.  Mat the image onto a plain black cardstock.  Die cut the ornate die using a brown patterned paper and a manual die cutting machine.  Ink the edges of the die cut using a brown ink.   Adhere the ornate die cut to the back of the matted image.   Apply washi tape horizontally on the side of the card opposite of where you have applied the strip of teal patterned paper.  Adhere image to card using 3D pop dots to create dimension.  Die cut the anchor in solid black card stock and adhere over washi tape.  Stamp sentiment and ink all edges in brown colored ink.  Adhere to card using 3D pop dots on one end and some scor tape on the end that will lay flat against the image.    For the finishing touch add some baby blue Stickles to the waves around the lighthouse.  You now have a masculine card ready to use for the next occasion you are needing one!

This card has been shared in the following challenges...
Cards in Envy..."When Nature Calls"

Clean and Simple Vintage Fun

I'm back today with my last post for Pile it On Challenges.
I have enjoyed working with this wonderful group of ladies so much and this was such a tough decision to leave.

We have a fabulous challenge for you today...

"Vintage"

One of my faves of course.
I didn't have a lot of time to create this week, so I decided to go with more of a CAS style vintage.  The stamp set I received from Rogue Redhead Designs was just fabulous!  A big Thank You!
The ladies in this stamp collection reminded me of days gone by catalogue or pattern ads.
I wanted the image I chose to be the centre of the design.

Here's how it came out...


I've stamped her and the sentiments in black ink.  Once dried, I applied brown ink on the paper to give it an aged feeling.  I've chosen patterned papers that I felt represented eras gone by and that were quite feminine and complimented the gorgeous image.  I've added just a bit of color to the image, not coloring too perfectly as I wanted it to appear old.  All of the layered edges have been roughed up around the edges.  The final touch was the metal flower which so reminded me of a brooch from years ago when it was fashionable to be wearing them.

Our sponsor for the challenge this week is Rogue Redhead Designs!


They have some fabulous new stamps out for Christmas as well...be sure to stop by and check them out!

That's it for me today!
Hope you'll enjoy what's left of your weekend!
Be sure to take the time to check out the other wonderful creations at the Pile it On blog!
While you're at it, maybe take some time to play along!
I'd love to see your vintage creation!

 Until next time...

This card has been shared in the following challenges...


Spread a Little Cheer...

Welcome!
Sit, relax and stay awhile!
This is the second posting for me today!
That doesn't happen very often anymore does it?
A quick reminder that today is also the mid way blog post for our current challenge at Unstampabelles.  Please scroll down to see the details for that challenge and to see the unique creation I've made.

Getting back on track...
...we have a new challenge starting today at Pile it On!
It's a terrific one!
Ready?

"Cheerful/Uplifting Message"

We all have days where we could use a smile from a stranger, a face to face visit with a close friend or ladies night out with a bunch of friends...you know something positive to lift our spirit.
Well, this week you have a chance to create a card to do exactly that for someone.

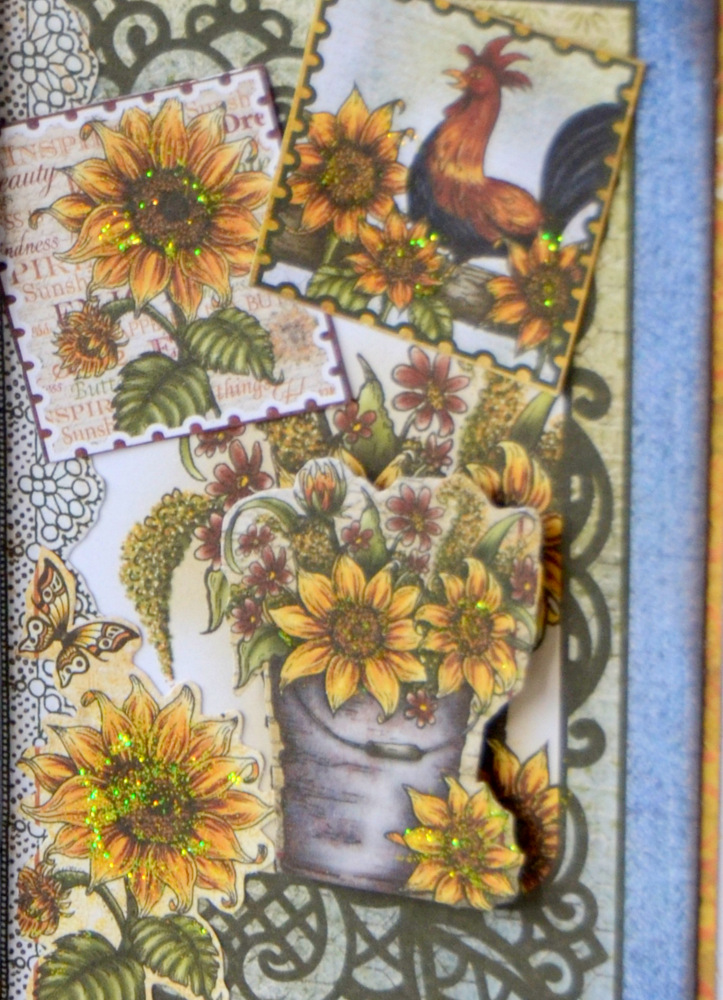
I was working with some beautiful sunflower papers from Heartfelt Creations the other night and decided that the uplifting sentiments they had included in the Classic Sunflower Collection paper pack would be perfect for this challenge.  I came across a sentiment that read "Sending you Sunshine"...and got to thinking that the bright and cheerful rays from the sun are one of the fastest ways for one to feel great about life.  It always amazes me how on a cloudy day you can feel nothing but doom and gloom...but bring on the sun and the whole world just becomes a better and brighter place!  Throw in a beautiful flower garden with those rays of sunshine and life is good!

Here's how I used the sentiment and some sunflower florals to create my cheerful and uplifting card!


I've done some fussy cutting of various elements and have popped up the bucket over a larger version of the same image with 3D pop up dots, giving the card some dimension.  
I've added some yellow Stickles to the sunflowers to give the card an extra dose of cheer!
 

I've also popped up the sentiment on the card to add further dimension.

 Before I go, a few housekeeping tid bits about this weeks challenge.
We are sponsored by...


...who is offering one lucky winner 3 single digis of their choice!

I hope I've been able to inspire you to create a cheerful and uplifting project for a friend or loved one. 
Wouldn't it just brighten your day to receive a card of encouragement in the snail mail...so go ahead and make that feeling happen for someone!
We all need encouragement from time to time.
Then remember to link up with us at Pile it On!

Until next time...

This card has been shared in the following challenges...

Time for an Unstampabelles Challenge Reminder...

I'm back today with a mid way reminder for our current challenge at Unstampabelles...the challenge blog where we encourage you to create a project without using any type of stamps!
Don't be afraid...it's easier than it may seem!

I missed joining in at the beginning of the challenge as I was super busy with life, and busy creating my semi finalist project for Heartfelt Creations!
One of these days I will have to get down to blogging what I created and give you all a little peek!

If you've kept up with checking out the Unstampabelles blog, you will know that our current challenge is...

"Shabby Chic with the twist of Time!"

The Belles have made some very lovely creations you must check out if you haven't already, and more have been added to the blog today...so be sure to check those out as well.  You will also notice some new names and faces there, as there was recently a DT call and we have added new members to the team.  Be sure to give them a welcome! 

I had the idea of creating a 3D mantle clock for my project.  I didn't think it would be a problem finding an SVG cutting file for this...but it proved to be much harder than I thought....that is until I came across a blog post done by a designer for SVG Cuts that sparked my interest and imagination.  You really have to check out this post featuring the grandfather clock that this designer used several SVG Cuts cutting files to create.  It is amazing!
 You can find it here.
I decided that the Juke Box file would be perfect to turn into the mantle clock piece that I was envisioning.  I got busy cutting the pieces with my Silhouette Cameo that I knew I would be needing and started assembling. I used an Elizabeth Crafts Design metal die for the clock face and the hands. I then dug through all of my flowers and laces, etc. to see how I could shabby chic this project up.  

Ready?

 
...here's another peek from a different angle...


...and a few photos of the details...


I found these beautiful lace stickers at Michaels a few shopping trips ago and was just waiting for the right project to use them on.  I thought the added a nice touch of elegance to the clock.  


I loved having the chance to play with all of my pretty flowers again!  I added a chipboard swirl to the side of the creation.  I looped some lace in several spots among the flowers and for my finishing touches I used a hat pin and an antiqued button.  If you look very closely in this last photo, you will also see that I've used some transparency paper in the clock body.  I embossed it using an embossing folder and my BigShot.  There is an opening in the back of the clock to place a battery powered candle inside...so the whole creation is able to glow and have light shine through that transparent window.  I created this mantle clock with my upcoming craft show in mind.  I think it will make an elegant prop for on my vintage style table display!

Before I go, I should make mention that we are sponsored by...

Website Banner 

Check out the Unstampabelles blog to see the prize being offered!

I hope I've been able to inspire you today!  
And, did you take note...not one stamp was used on the entire project!
Told you it wasn't that hard to do!
I hope to see you joining in with us at Unstampabelles.  Remember that you have until the end of October to play along with this current challenge!

Until next time...


Metallic Beauty

Hello again!
I'm glad you're here!
I have something super fun to share with you today!

We have a new challenge beginning today over at Pile it On!
This week we are looking for projects that are...

"Shiny"

Oh what fun!

We have a wonderful sponsor this week...


and they are offering one lucky prize winner a $25 gift certificate.

The design team members were sent thin metal sheets from the sponsor for this challenge.  When I received them I knew that they would be so much fun to emboss.  I chose a silver colored sheet to work with.

Here's how the project came out...


I embossed the metal sheet with a snowflake embossing folder and my BigShot.
I then inked the metal with a brown ink and again a black ink, wiping off the excess and just leaving the ink in the cracks in and around the snowflakes to give the card and aged and more vintage feel.


The die cuts are from Kaisercraft and came in a premade package.
I wanted to make sure the shine and the metal were the wow factor on this card so I chose just to use a few of the die cuts and keep it simple. 
I inked all of the edges brown and matted the metal sheet on a dark red card stock.
Quick and simple...but totally different and stunning.

Now it's up to you to look around and find something shiny that you can use in your creation.
Remember that you have one week to link up with us Pile it On before we begin a new challenge.

Until next time...

This card has been shared in the following challenges...
Add a Little Dazzle..."Home for the Holidays" 
Christmas at Sweet Stampin'..."Christmas Critters" 
ABC Christmas Challenges..."Something Festive" 
Hobbybook Designer Challenge Blog..."Embossing"
Penny's Paper-Crafty Challenge Blog..."Embossing"
Ruby's Rainbow..."Anything Goes"
Word Art Wednesday..."Anything Goes" 
Crafty Girls Challenge Blog..."Anything Goes" 
A Creative Romance..."Anything Goes" 
Sister Act Card Challenges..."Anything Goes" 
Inky Chicks..."Anything Goes" 
Through the Craft Room Door..."Anything Goes"
Crafts Galore Encore..."Make a Card"
Ladybug Crafts..."Anything Goes"
Natalie and Amy Challenge Blog..."Things with Wings"
Sparkles Monthly Challenges..."Things with Wings"
Sisters of Craft..."Anything Goes"


Pick up Your Pencil...

The kids have done a bit of pencil pushing already in their first few days of school.  I'm happy to report that they have been enjoying themselves and their new teachers.  
Now that they are back into routine, it's time for me to jump back into routine as well...which means I have stepped back into my design team position with Pile it On once again!
And our theme for this weeks challenge couldn't be more fitting for the kiddos going back to hitting the books.

This week we are challenging you to...

"Use a Pencil"

The possibilities are endless...color with pencils, incorporate a pencil die cut into your creation, feel free to even sketch with a pencil.  

We are welcoming back one of our wonderful sponsors...


...who are offering one lucky winner a prize of 2 digis.

I decided to go a different direction than a card for this challenge.  I fell in love with a pencil shaped box I found in the Silhouette online store and knew I wanted to work with it. I got the Cameo humming and began assembling the box.  I decided I would use the sponsor image to create a tag to attach to the gift box.  I used pencil crayons to color it...trying to stay true to our challenge theme.

Are you ready to see how it turned out?


and here's another view from a different angle...

 
...and a view of how the eraser slips off the box for you to add your special gift...


...and lastly a close up view of the tag and sponsor digi I used...


I know my daughter's teacher mentioned to them that she loves diet Coke, and I'm hoping one will slip into here perfectly.  I think it would be adorable presented in this pencil box.  I'm actually thinking I may make some of these to put on my craft table when I'm at my show in November.  I think these would make awesome teacher gifts...throw in a few erasers, pens, pencils, small sticky notes and some chocolate and you're done!

The rest is up to you my friend.  I hope after seeing this those crafty gears are churning and you're ready to do some creating.  Be sure to check out the Pile It On blog for more inspirational ideas from my fellow design team members!  You have one week to play along!

Until next time...

This card has been shared in the following challenges...


School Humor

Good Morning, Afternoon, or Evening...

Has school started in your area already?  Our kids are going for their "meet the teacher/transition day" this coming Tuesday.  One will go for and hour, and the other for the afternoon.  These days always kinda make me chuckle.  The teachers meet with about 1/3 of the class for three days.  Then, after these three days, the entire class starts school together.  Now, I may be dating myself, but when I went to school we all started on the same day. None of this getting to know the teacher/student first!  You may have been called by the wrong name for the first week or so, and the seating plan changed from time to time that first week depending on various personalities...but it all worked out in the end!  LOL

You may wonder what school has to do with the new challenge over at Unstampabelles this month...let me explain!

Our challenge this month is to...

"Use Humor with the twist to Frame It"

Well, I thought "Back to School" would be the perfect theme to design around.  
I started browsing the Silhouette store and came up with some cute images, sayings, etc.  
I decided to make the design quick and easy,  I would use the print and cut setting on the Cameo to create.  

Here's how it turned out...


As I said, the entire card has been printed and cut out with my Silhouette...with the exception of the days of the week washi tape in the upper right hand corner.  Some of the files I needed to color digitally and then turn them into a print and cut version in the Silhouette studio...but it's really quite quick and easy! I've popped up the school house with 3D pop up dots to make it the frame for the humorous sentiment.  I've also popped up the little boy as well to give the illusion of him standing in front of the school.   To give the card some sparkle I've added some red Stickles to the heart in the list of reasons to love school!  

When all was finished, I had a good chuckle as I could totally see my son saying these things ont he list!  He loves school...but I do have to say that recess is one of his favorite "subjects"!  LOL
I may have to save this card and give it to his teacher sometime during the year!

Before I forget to mention, we do have a sponsor this month over at Unstampabelles.
It's our very own Susan and The Wood Fellow...aka, her hubby!
Be sure to check out the challenge blog to see the wonderful prize they are offering.  

Now before I go, let me take care of a few reminders...
You will have until September 26 at midnight to link up with us with your creation.  
Also, your creation cannot have stamping of any kind on it...no rubber stamping, no
digital stamping, etc.  We are a "stamp free" challenge blog where we encourage you to think outside of the box and use different elements on your creations.  It's really not as hard as it sounds.  For a list of ideas, be sure to check out the "Ideas for Creations" tab on the blog.
That's all for today folks!
Can't wait to see what kind of creations you come up with!

I Could Have Danced All Night...

Welcome!

Are you ready for an update on the challenge running over at Unstampabelles this month?  
I was away when the first posting of this challenge went live, so I will be showcasing my card for this challenge today...along with some of the other DT members who have had the spunk, time and ambition to create a second project for this challenge. 

Before I move ahead into showing you my creation, I just want to take a brief moment to remind you about the rules at Unstampabelles.  True to our name...we do not use stamps to create our creations on this challenge blog, and we are asking that you do the same.  That means no rubber stamping or using digital stamps either.  Sound hard?  It's really not hard at all...you'll see!
Our theme this month is...

"I Could Have Danced All Night" with the twist to use Ribbons

I loved this theme when I saw it.  I wanted to do something a little different from the usual usage of putting a dancer on the front of the card...and I knew I wanted to do something vintage and beautiful.  Well, I came across this gorgeous antique boot image on one of the collage sheets I had purchased awhile back.  It got me thinking of ball room dancing, ladies beautiful large skirts swooshing across the dance floor, dance cards, etc. 

Here's how my vision turned out...


Of course I needed to have roses, beautiful ladies, patterned paper and rhinestones to complete the look!  I love this card, and hope you will as well.  

We have a wonderful sponsor again this month...


Website Banner
Be sure to check out their online store!
http://www.flourishwithabling.com.au/blog/welcome-to-flourish-with-a-bling/

 I hope you've been inspired by my creation today, and I'm also hoping that you take the challenge to join us at Unstampabelles! 

Until next time...

Life is Easier...

...with a friend by your side!
Isn't that so true!  Especially when you wanna have a little fun or cause a little trouble!  LOL
Or when you're down in the dumps and need a little lift!

I've finally felt well enough to join back in with my design teams!  I just need this crazy cough to disappear!

So let's get down to business.  
This week we have a new challenge starting over at Pile it On!
This one is sure to get your mind whirling...I really had to think hard on this one and actually didn't come up with anything too creative...

"Wrong But So Right...Use Something in a Way it Wasn't Originally Intended"

Won't that be fun!
Hope you're not to spooked to join us!

Let me show you what I finally was able to dream up...


As I mentioned, I wasn't really too creative.  My items that were not originally intended for card making use are the button, thread and sequins! 

Isn't the little guy so cute splashing around in the water with his little frog buddy.  
This adorable image comes from our sponsor for the week...


...and they are offering one lucky winner a $7 gift certificate.
How awesome is that!

And I must make mention that the awesome sentiment used on this card comes from TLC Creations!

Now if you're needing a few more ideas for this weeks challenge be sure to check out the other DT creations!  They've had some awesome ideas!

Thanks so much for taking the time to stop by today!  
Hope the week will treat you well.

Until next time...

This card has been shared in the following challenges...


Under the Sea

It certainly feels like the weeks are passing faster and faster lately!
How about for you?
We're still awaiting spring here in Manitoba, Canada...and I'm just happy that the snow they've been calling for in the last week or so has never come to pass.  
The kids and I are so ready for sunshine and green grass!

I'm glad you could stop in today to see what our new challenge over at {Pin}spirational Challenges is this week.  As you know, we always base our creations on a {pin}spiring photo.

We have a unique one for you today...so be prepared to throw on your creativity cap...


Aren't the colors beautiful?  Those teals, blues, greens...not to mention the textures!
And the possibilities with turtle digis seem to be endless these days!

I decided to use some cutting files for my Silhouette Cameo which I purchased on sale at
 Designs on Cloud 9.  This under the sea themed set was a file that was being retired and I just couldn't let it slip through my fingers.  

But, before I show you what I created for this challenge, let me bring you up to speed on our wonderful sponsors for this week...

as well as...


and last but not least...

 
Be sure to check out the {Pin}spirational Challenge blog to see the wonderful prizes are sponsors are offering this week!

Now, back to my creation! 
Let's take a look!


and here's a closer peek at the sentiment I used from our sponsor Imagine That...


and lastly a closer look at the grouping in the shadowbox as well as the turtle on the front...


I had purchased a shadow box cutting file from the Silhouette online store that I thought would be perfect for this card challenge.  The different layerings and the fact that it was a shadow box I felt would give you that under the sea water feeling like in our {pin}spiring picture.  Since I was a little short on time with this one, I decided to use the PNG files that were included with the cutting files rather than paper piece for this project.  I've popped up the sea horse, as well as some of the seaweed so the background looks dimensional.  I've cut some extra waves for the front of the card and added the turtle so it looks like he's swimming through the scene as well.  Lastly, I've added a print out of the sentiment from our sponsor Imagine That.  All in all, I thought it came out kinda cute!

Are you ready to tackle this under the sea challenge?  Needing more {pin}spiration?  Don't forget to check out the other DT members creations on the blog!
I'm looking forward to seeing where your creativity takes you with this photo!

Until next time...

This card has been shared in the following challenges...
Alphabet Challenge..."D is for Die Cuts"
Bloggers Challenge..."Animals"
Crafty Catz..."Anything Goes"
Sister Act Card Challenge..."Anything Goes"

Crafting by Designs..."Colors of the Sea Recipe" (inspiration photo, sea creatures, water & bubbles)
The Sisterhood of Crafters..."Animals"
Creative Card Crew..."Animals"
Crafty Calender Challenge..."Animal Antics"
Open-Minded Challenges..."Animal Antics"
2 Cute Ink..."Anything Goes"
The Cutie Pie Challenge Blog..."Cute with Dies/Punches"
Use Your Stuff..."Die Cuts"


Pretty in Pink

Are you ready to be {pin}spired today?
I hope so!
I'm back today to share with you the new challenge over at {Pin}spirational Challenges.  
We have another stunning photo for you this week...totally spring inspired. 

Are you ready?


Isn't that just so pretty in pink?

We are once again joined by some wonderful sponsors...

who is offering one lucky winner __________

...as well as...


who is offering one lucky winner 2 digis of their choice!

I had the pleasure of working with a digi from All Dressed Up...I just love their cute digis.  The image I selected is called "I Love my Puppy". 
I decided to try to make a more unique card this time, so I got to browsing my card templates I had purchased from the Silhouette online store.  I came across a card I had never made before.  It's simple, but different than the regular card.

Take a look...


I printed out the image through my Silhouette Cameo right onto the round centre piece I would be needing to use.  I printed it out on watercolor paper so I could use my Tim Holtz distress markers to water color the image.  I printed out the card base using the printing fill pattern option on the Silhouette.  I found a great sentiment that I thought suited the card well.  It's from TLC Creations.  I printed it out and matted it onto some pink colored card stock.  I then added a few flowers with rhinestone centres that I've had for many moons!  I didn't embellish this card too much as I felt the digi was absolutely awesome all on its own.

Now it's your turn to see where the {pin}spiring photo will lead you.  Will you design around the colors, the textures, the images themselves?  There's really no way of doing it wrong!  Then link up with us over at {Pin}spirational Challenges!  For more fantastic inspiration, check out the other DT members creations and leave them some blog love as well.

Until next time...

This card has been shared in the following challenges...
Aud Sentiments Challenge Blog..."Anything Goes...with Sentiment"
Cute Card Thursday..."Girls, Girls, Girls"
DL Art Thursday..."Uplifting Sentiment with at least 5 words" 
In the Pink..."Mother's Day/Card for a Special Lady"
MilkCoffee Challenges..."Use at Least 2 Flowers"
Jellypark Friday Challenges..."Pastel Colors"
Emerald Faeries Challenge Blog..."Girly Pretty in Pink"
Bearly Mine Challenges..."One for the Girls"
Crafty Hazelnut's Patterned Paper Challenges..."March Challenge"
Paper Sweeties March Inspiration..."Polka Dot Love"
Allsorts Challenges..."Pretty in Pink"
Stamping Sensations..."Pretty in Pink" 
Melonheadz Friends..."Girly"


Santa Claus is Coming to Town...

...many days from now thankfully!  LOL

I'm so excited today as this is my 100th blog post!  I started blogging last year in April and really never thought I'd go anywhere with it!  It seemed so daunting and un nerving at the time...but look at this...I've written 100 posts and there are even a few of you who check in ever so faithfully!  Thank you!  You've been some of the most awesome encouragers along the way!

Enough rambling...and let's get down to business!

Over at Christmas Stampin' All Year Long this week we are excited to be starting a new challenge.  This go round our theme is as always "Anything Goes" with the extra twist of adding some "sparkle and shine".  So, break out the glitter, Stickles, gems, rhinestones, etc. and lets see how you "sparkle and shine".

Our wonderful sponsor for this week's challenge is Bugaboo!

 
They are offering one lucky winner 7 digis of their choice!

I had so much fun playing with the digi entitled "Chubby Santa - Candy Cane which you can find here.  


I colored him up using my Spectrum Noir markers and then set about to adding some sparkle.  I used red and white stickles on the candy cane, and some gold stickles on Santa's belt buckle.  The peppermint candy embelly is from the Martha Stewart line and came all glittered up.  I added some Glitter Ritz to Santa's hat, and lastly added some gem stones to various points on the card.  I wish you could see this card in person...it really does sparkle and shine with all those elements catching the light.  The sentiment is from TLC Creations, and the card base is once again a pre made base that I purchased at Michaels after the holiday season for a deep discount!

I encourage you to jump on the band wagon and get creating those Christmas cards along with us so you will have less stress during your holiday season.  Link them up at CSAYL and maybe you'll be our next lucky winner!

Thanks for visiting!

Thanks for visiting!