Showing posts with label sequins. Show all posts

Simple Elegance...

Hello and Welcome!

I'm back today with a Heartfelt Creations post...but before we move along to today's project, I just have to ask...have you seen the sneak peek of the new release?
It's the "Sparkling Poinsettia" collection....and oh my oh my...it's splendid!
So...you can expect Christmas in July here on the blog!
How fun!

Well, moving along to the business at hand...I've created a simple card set to share with you today!
Nothing over the top this week...just a quick peek at how to create a simple but elegant note card with the fabulous stamps in the "Blazing Poppy" collection.

Now, we all know that "foiling" is the new rage in the crafting world.  
A few months ago while attending a scrapbook crop, I asked one of the retailers there about the new foiling machine.  She mentioned that she didn't carry the machine as she had found a way to use her laminator to create the same effect.  Well...I'm all for that as I had a cheap Walmart laminator at home and was certainly willing to give her technique a try!
(Instructions are included at the end on how to achieve this technique!)

Here's the result...


I'm sorry the photos are not the greatest...it was really hard to get a good picture with the shimmer of the foil!  LOL

I've used the Heidi Swapp Minc Foil in "Holographic" for this project...and as you can see in the photo, some images have a more blue tone and some a more pink on the foil.  This foil really really shimmers in all sorts of colors but is super elegant at the same time.  

Here's a closer look at the cards...


...and a look at the second set...


Sometimes it's just nice to create a more quick and simple card, but you still want it to be covered in elegance.  Foiling is a quick and easy way to do that!  Add a few sequins and you have pretty little note cards that are perfect for any occasion.  
(For full instructions and project supplies please see the bottom of blog post.)

Lastly, have you checked out the Heartfelt Creations blog today?
I promise you that there is an abundance of inspiration, new techniques to try, educational videos and all around just gorgeous projects!  Don't delay!

Thanks again for stopping by today!
I'd love to hear what you think of this foiled project...so don't be shy...feel free to leave a comment!

Until next time...

Project Supplies and Instructions
HCDP1-255  Blazing Poppy Paper Collection
HCPC-3677  Blazing Poppy Stems Cling Stamp Set
HCPC-3676  Blazing Poppy Vase Cling Stamp Set
HCPC-3675  Blazing Poppy Corner and Border Cling Stamp Set
HCPC-3674  Blazing Poppy Petals Cling Stamp Set
HCD1-764  Blazing Poppy Die
HCPC-3673  Heartfelt Sentiments Cling Stamp Set
HCPC-3666  Everyday Hero Cling Stamp Set
SMP001  Rubber Stamp Mat Pad
273900  Zip Dry Glue

Other Products Used:  white card stock, black card stock, white copier paper,  holographic foil, laser photocopier, laminator, VersaFine black ink, black and silver sequins, black embossing powder, 3D pop dots, heat tool

Cut four pieces of white card stock measuring 6 3/4 " x 4 3/4" and fold in half to create four small note sized cards.  Using black ink, stamp the images onto regular white copier paper and allow to dry.  Once dry, using a laser photocopier (an ink jet printer will not work for this technique), copy the stamped image sheet onto white card stock.   Cut pieces of foil just large enough to cover each of the images.  Warm up laminator and cut the stamped image sheet in half so you can send two images through the laminator at the same time.  Follow foil instruction as to how to place on image.  Using a clean piece of copier paper, fold it over the images and foil you are about to laminate.  Send the images through the warm laminator.  The ink on the images will be warmed just enough to adhere the foil to the stamped images.  Allow card stock to cool slightly and then remove foil...your images should now be foiled.  Repeat for second batch of images. Trim each image to fit onto the small note sized card.  Mat each image onto a slightly larger piece of black card stock.  Adhere matted images to card.  Choose  sentiments, stamp in black ink and sprinkle with black embossing powder.  Heat embossing powder with heat tool.  Adhere sentiments using 3D pop dots to desired location on card. Add sequins as desired.  You now have simple, but elegant note cards ready for several occasions or to present to someone as a gift or small token of appreciation!   

"Spring Flowers"

Good Morning, Afternoon or Evening!
I'm so glad to visit with you today!
Today's post is an exciting one as I am guest designing for Crafting by Designs!
I'd like to thank them for having me!

Their challenge for this go round is "Spring Flowers"!
 Don't you just love spring flowers?  The roses, the daffodils, tulips and daisies!
Well I decided to go with a rose theme!

Now if you're a follower of my blog, you know that I have been busy creating some pocket letters lately!  I find these are a wonderful way to use up paper collections and scraps that I haven't touched in awhile!


I made several of these using the Graphic 45 Collection "Botanical Tea".  While they have all been created from the same paper pack, each of the letters itself is different and has taken on a personality of it's own and each has been packed with different gifts.  This one will be/has been sent to New Mexico to a pen pal who loves pink!

Now the rest is up to you!
It's your turn to get yourself immersed in spring flowers and join the challenge over at Crafting by Designs!  You can find all the challenge details and prizes being offered on their blog!

Until next time...

Pocket Letter Craze

Hi Everyone!
Thanks for stopping by today!
It's Wednesday, which means I'm here to share with you another Heartfelt Creations project!
I have a quick question for you...have you jumped on the band wagon with the pocket letter craze?
I just recently discovered this new addiction and thought this would be a great way to showcase the Heartfelt Creations "Everyday Heroes" collection!

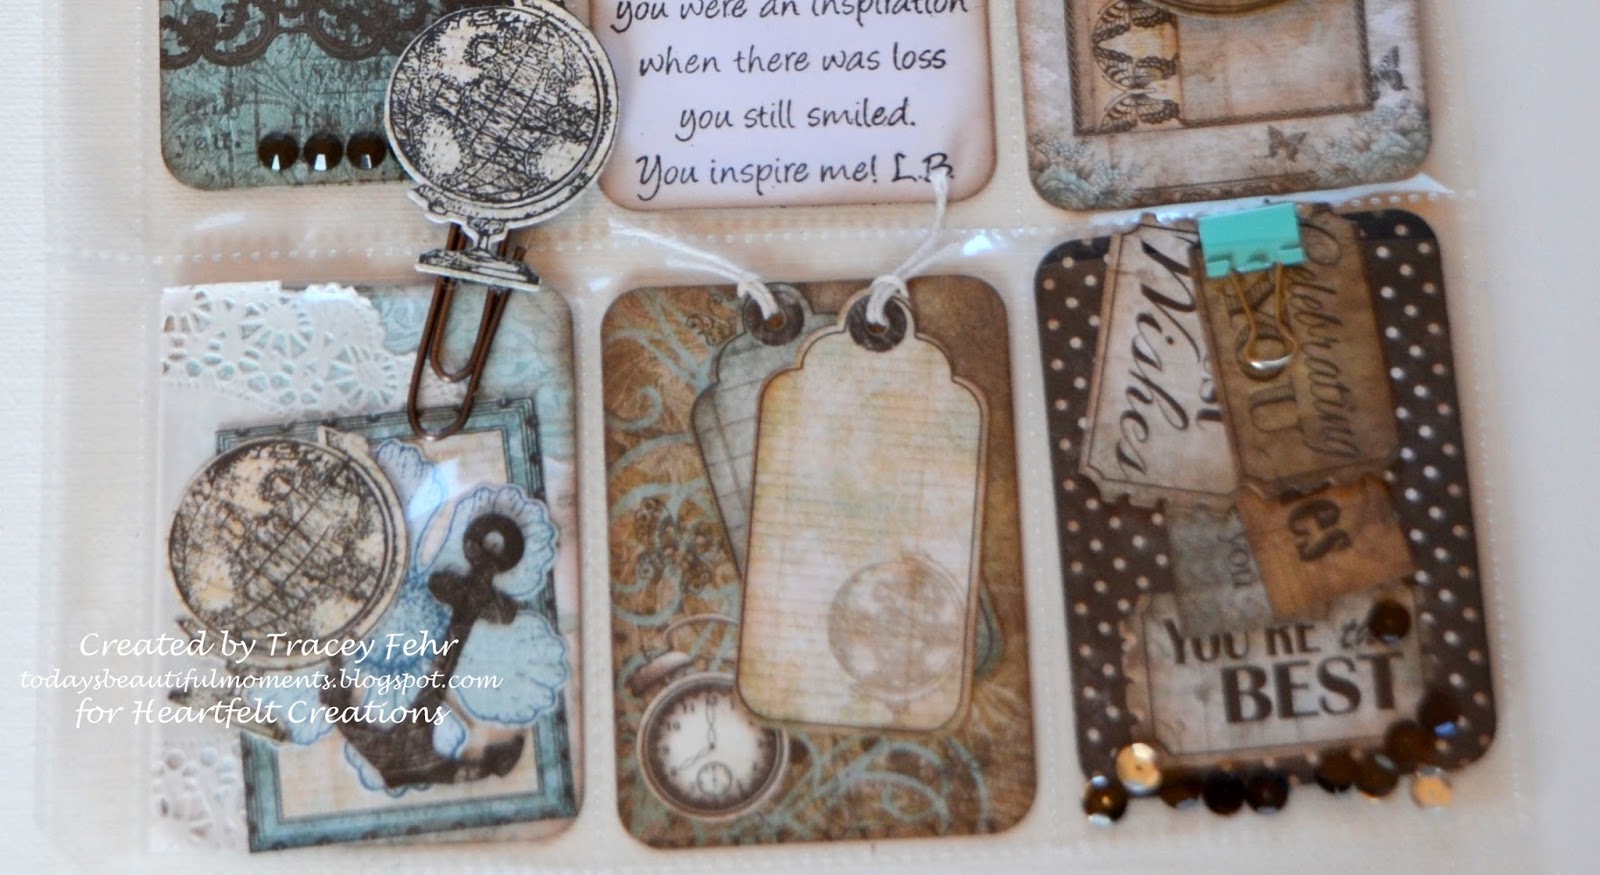
I had a few scraps laying around from the collection that were the perfect size to use in a pocket letter.  Using the Cut Mat Create 1B die cut set, I was able to cut the pieces out quickly to the perfect size I was needing for the pockets. I set about to embellishing them and started adding small gifts to send in the letter.  The gifts make this so much fun...and the possibilities are really endless!  Great items to include are buttons, washi tape, ribbons, die cut...and how about a tea bag, or even flower seeds!

Here's a peek at how it turned out...


I think this collection makes a beautiful color palette for a pocket letter!

Here's a few more close up pics as well...


Now I suppose I should put a disclaimer on this blog post...if you decide to venture out into this pocket letter craze, be very aware that it is addictive!  They are so much fun to make!

Lastly, I decided to try making a YouTube video tour of this project!
Now be kind...this is my first video and I know it is not perfect...but ok for a first attempt I hope!
Feel free to come see!

https://youtu.be/J_NXvEBRYO


And remember, the Heartfelt Creations blog holds so many more creative ideas for you to browse today!  Be sure to take some time to head over there and take a peek...and maybe leave some blog love for the designers.  I know we all appreciate it!

Until next time...

Project Supplies and Instructions
HCDP1-253  Everyday Heroes Paper Collection
HCD1-761  Everyday Heroes Die
HCD1-745  Luggage and Tags Die
HCD2-750  Cut Mat Create 1B Die
HCD1-758  Botanical Wings Die
HCPC-3667  You Inspire Me Cling Stamp Set
HCPC-3663  My World Cling Stamp Set
HCPC-3662  My Anchor Cling Stamp Set
HCPC-3651  Botanical Rose Cling Stamp Set

Other Products Used:  scor tape, Stampin Up Basic Black Ink, scissors, Big Shot Die Cutting Machine, Electronic Die Cutting Machine, Silhouette Design Store Design ID #50783, VersaColor Pine Cone ink, metal clip, paper clip, twine, sequins, buttons, washi tape, star brad, mini clothespin, charm, doily, ribbon, black gems, seam binding ribbon, Stampin Up small circle punch

Assemble all of your left over papers from the Everyday Heroes paper collection and using the 2 1/2" x 3 1/2" die from the Cut Mat Create 1B die set, cut 8 assorted patterned papers to use as your base cards.  Embellish each card as you wish, keeping in mind that when the small gifts have been removed from the Pocket Letter the cards will remain visible and you want them to be visually appealing.  Die cut one of the large tags from the paperpack to use as a journaling card to include questions for your pen pal. Add ribbon to the tag. Ink all of the edges on the cards on both front and back using a brown colored ink. Once you have created and embellished all of your pocket cards,  begin arranging and including the small tokens.  You may add buttons, sequins, ribbon, charms, etc.  Use the circle die and sentiment stamp from the Everyday Heros collection to spool your ribbon in an interesting way.  Include stamped die cut images, die cut ticket sentiments from the paper collection, die cut tags, flowers, etc.  Create a cute paper clip by gluing on a stamped die cut globe image to the paper clip with a hot glue gun.  Add a small circle punch in matching paper on the back of the image covering the mechanics of the paper clip.   Using an electronic die cutting machine, cut the envelope pattern and assemble.  You are now ready to bless someone with a beautiful pocket letter anywhere in the world.

Peacock Treat Box

It's another Heartfelt Creations Wednesday!
So happy you are able to stop by and visit with me today!
I hope you've been enjoying all of the design team creations featuring the Peacock Paisley Collection. I am so blessed to be working with such a creative and accomplished bunch!

This week I decided that I wanted to create something fun and a little out of the ordinary!
I started searching the web for a peacock SVG cutting file and found the cutest treat box!
I immediately knew this was something I could work with...only I was going to give it a Heartfelt Creations touch!

Are you ready?


How fun is that!
Wouldn't you love receiving some chocolates, or nail polish, or gift cards in a fun peacock treat box like this?  Wouldn't it immediately brighten your day and bring a smile to your face!?!

Here's a bit of a close up of the body portion and some of the elements...


You can see all the shimmer and shine I've added to the flowers using Stickles, and the feathers on the body as well.  I had originally added just the jewels to the tail feathers when I asked my hubby to come take a peek...he insisted that it needed a little more bling...huh?  LOL
He never pays attention to that sort of stuff!
I usually get a "that looks nice" and that's the end of the conversation.
Well, I decided to add a few sequins to the tail feathers as well...and I do declare that I do believe hubby was on to something!

I've given this peacock the Heartfelt Creations twist by turning one of the stamped images into the feathery tail feathers that you see on the top.  I've also used several other stamped images directly behind the body treat box. When you are working with SVG cutting files, it's sometimes fun to think outside the box and see how you can incorporate other elements such as stamped images, other die cuts, etc.  In this case, using the stamped images as tail feathers, the whole creation has been taken up a notch.  The peacock now has an airy and feathery look. (You can find full instructions on how this project has been created at the end of this blog post.)  

Well, I hope you've enjoyed today's share...not sure we can claim this as a beautiful moment...but a fun one at least!
I hope that I've been able to inspire you, and hopefully bring a smile to your face!
There are so many more wonderful and inspiring projects on the Heartfelt Creations blog.  
Be sure to stop by and take a peek...and maybe you'll even get a teaser on the next new collection coming in April. 

Until next time...

Project Supplies and Instructions
HCDP1-252  Peacock Paisley Paper Collection
HCPC-3661  Feathery Peacock Cling Stamp Set
HCPC-3658  Daisy Flourish Cling Stamp Set
HCPC-3657  Feathered Daisy Cling Stamp Set
HCPC-3656  Delightful Daisies Cling Stamp Set
HCD1-760   Delightful Daisy Die
SMP001  Stamp Mat Pad
HCST1-401  Deluxe Flower Shaping Kit
273900  Zip Dry Glue

Other Products Used:  Fleurette Bloom Peacock Palace SVG cutting file, Silhouette Cameo electronic die cutting machine,  Black Versafine Ink, Spectrum Noir Blendable Pencils (011, 043, 046, 048, 051, 055, 062, 063, 064, 072, 074), Spectrum Noir Blending Solution, Spectrum Noir blending stump, assorted colored jewels, Diamond Stickles, Patina Stickles, BigShot manual die cutting machine, white card stock, sequins, scissors, finger dauber, Dandelion Memento ink

Begin by choosing the papers from the paper collection that you wish to use for each piece of the peacock in the SVG cutting file and cut using your electronic die cutting machine.  Set aside pieces.  Stamp seven stampings of the large floral image in the Daisy Flourish Cling Stamp Set onto blue and green patterned paper in the Peacock Paisley Collection using black ink.  Color using blendable pencils and blending solution. Fussy cut each piece.  Now stamp several stampings of the Delightful Daisies Cling Stamp Set using black ink on white card stock.  Color the centres only using a finger dauber and yellow ink. Die cut using the coordinating die.  (You will need seven double small flowers for the ends of the peacock tail feathers, seven single large/mid sized flowers to use between the tail feathers, as well as one mid sized flower paired to create a double bloom to use at the base of the peacock's tail.)  Shape the flowers that need shaping, and create the double blooms.  Apply prills to the centre of each small double flower.   Adhere them to the matching flower on the stamped Daisy Flourish image.  Adhere the large/mid sized flowers to the stamped image as well.  Moving along, stamp one stamping of the large flower image in the Feathered Daisy Cling Stamp Set as well as two stampings of the feather image in the Feathery Peacock Cling Stamp Set onto the same blue/green paper from the paper collection you have been using to create the tail feathers. Color each of these and again blend with blending solution and fussy cut.  Follow SVG cutting file directions to put together the treat box for the peacock's body.  Adhere two largest pieces of the tail together.  Now lay out the seven stamped images you've completed making sure that the smaller double flowers are to the top of the tail and the large flowers are peeking through the areas where they will be visible when the next layer of tail feathers are added.  Once you are happy with the arrangement, adhere them to the two larger tail pieces that you have already put together.  Proceed to add the last two small tail pieces to the rest of the tail and assemble and adhere the rest of the project. Once your project is completely assembled,  take the two feather images and adhere them to the bottom portion of the tail near the opening of the treat box.  Now adhere the flower stamped image over top the feather images directly in the centre of the treat box.  Apply the last shaped flower to the stamped image over the matching stamped flower at the base of the tail. Add a jewel to the centre of this flower. Continue to add jewels to the centres of each of the cut outs in the peacocks tail, as well to each of the larger flowers peeking through the tail feathers. Add some sequins to the tail feathers where you desire.   Apply Diamond Stickles to each daisy on the creation, and  Patina Stickles to the feather cut outs on the body on the treat box.  Add a special treat to the box and have fun presenting this unique packaging to a special friend or family member!

This project has been shared in the following challenges...

Papertake Weekly..."A Cut Above"  (I've used fussy cutting and die cutting)
Party Time Tuesdays..."Anything Goes"
Through the Craft Room Door..."Anything Goes"
Craft My Life..."Anything But a Card"
Crafting from the Heart..."Anything Goes"
Craft Your Passion..."Anything Goes"
Melonheadz Friends..."Animals"
Not Just Cards Challenge Blog..."Anything Goes"
Stamps and Fun = Creativity..."Feathers" 
Crafting by Designs..."Flowers with a Twist" 
Decorate to Celebrate..."Anything Goes"
Inky Impressions..."Bold and Bright"
Whimsy Stamps Challenge..."Use a Die Cut"
Cosmic Strawberry Cosmic Color Challenge..."Color Challenge (photo shown below)


A Sweet Christmas

Hello Again!
It's Friday, and I have a treat for you today...two blog posts!
And, this post is a "sweet" one!

There's a new challenge over at Christmas Stampin' All Year Long beginning today, and you will love the theme...

"Anything Goes"

I'm guessing you'll all find this one easier than the sketch challenge that we had running last week.

We are welcoming back Meljen's Designs as our sponsor this week...

Meljen's Designs :: Digital Stamps by Melissa Jenkins

...and they are offering one lucky winner 4 uncolored digis of their choice!
They have such sweet images...it will be hard to choose!

For this challenge, I used the digi called "Sweet Candy Canes".


I found some candy cane striped glittered paper in my stash and decided to use it as the background to the card. I then came across a piece of candy patterned paper and decided that it fit the "sweet" theme of the creation.  I colored up the image with my Spectrum Noir markers and added some sequins to the image to give it some extra shine.  A doily made perfect sense to me as a layering element as it reminded me of packaging goodies and I often use doilies to make a lovely presentation plate during the holidays.  Lastly, I found a neat piece of patterned paper with different sentiments on it and decided to use it on the bottom of the card as the holiday wishes.  Add the three snowflakes with their button centres and you have a quick, but cute "sweet" greeting card to pass along to a friend or loved one at Christmas. 

I'm looking forward to visiting your blogs this week to see what you have created for this weeks challenge.  You'll be glad come the chaotic holiday season that you've taken the time to create a few cards when you're busy with the rest of the holiday preparations!

Until next time...

This card has been shared in the following challenges...
Polkadoodles..."Getting Organized for Christmas"
Winter Wonderland..."Anything Goes for Christmas"
Christmas Cards all Year Long..."Sparkle and Shine"
Crafty Hazelnut's Christmas Challenge Extra..."August Challenge"
Sparkles Christmas Challenge..."Snowflakes"
ABC Christmas Challenges..."Quick and Easy"
Penny's Paper-Crafty Challenge..."Christmas"
Holly Jolly Christmas..."1,2, 3" (1 image, 2 patterned papers, 3 snowflakes)

Life is Easier...

...with a friend by your side!
Isn't that so true!  Especially when you wanna have a little fun or cause a little trouble!  LOL
Or when you're down in the dumps and need a little lift!

I've finally felt well enough to join back in with my design teams!  I just need this crazy cough to disappear!

So let's get down to business.  
This week we have a new challenge starting over at Pile it On!
This one is sure to get your mind whirling...I really had to think hard on this one and actually didn't come up with anything too creative...

"Wrong But So Right...Use Something in a Way it Wasn't Originally Intended"

Won't that be fun!
Hope you're not to spooked to join us!

Let me show you what I finally was able to dream up...


As I mentioned, I wasn't really too creative.  My items that were not originally intended for card making use are the button, thread and sequins! 

Isn't the little guy so cute splashing around in the water with his little frog buddy.  
This adorable image comes from our sponsor for the week...


...and they are offering one lucky winner a $7 gift certificate.
How awesome is that!

And I must make mention that the awesome sentiment used on this card comes from TLC Creations!

Now if you're needing a few more ideas for this weeks challenge be sure to check out the other DT creations!  They've had some awesome ideas!

Thanks so much for taking the time to stop by today!  
Hope the week will treat you well.

Until next time...

This card has been shared in the following challenges...


Reindeer Games

Happy Friday!
It would be much happier if I still wasn't battling this sore throat, ear aches and brutal headache!
Anyhoo...on with the show...

Christmas Stampin' All Year Long is starting a new challenge this week!
As always, our theme is "Anything Goes" with the twist of ...

"Use Ribbon and Trims"

I found a cute reindeer image die cut in my stash of "vintagey" Christmas things and thought it would be fun to use him in a card.  I gathered up some fun patterned paper, ribbon and some sequins (not sure if you consider them trims but for this moment we will, LOL) and got to creating. 

Here's the card...


I die cut some snowflakes to add to the card and then colored them with my Wink of Stella pen to give them a very subtle shimmer.  I also colored the white on his Santa hat and the shadows on the ground so that they would sparkle as well.

The challenge at CSAYL does not have a sponsor this week...but one lucky winner will be able to be a Guest Designer with us in the month of July!
So get crafting...you never know...you could be our next lucky winner!

Until next time...

Lessons from a Child...

Have you ever noticed that children offer so many lessons for us adults?
It's funny that when you have your own kids...you suddenly realize how you act, talk, etc.  
And, it becomes even more apparent when they start to mimic you!  LOL
They hold such wisdom in their simplistic way of thinking and seeing the world!
That's why I fell in love with the sentiment and the digi that I've used on todays sharing. 

Welcome to another new challenge beginning over at Pile it On!
It's one that is certain to bring a smile to your face...

"Child's Play"

We are so very excited to be sponsored by Digital Delights!
They are offering one lucky winner a $5 gift certificate!

I had the pleasure of playing with the digi entitled Swinging Scottie .
He's so adorable sitting on his swing with his teddy!  

Here's what I created with this little cutie...

I decided to get the Silhouette Cameo involved in this card as well.  I've used the tree and cloud die cut cutting file.  I've colored up Scottie with my distress markers, and popped him up with 3D dots so he looks like he really is swinging on the tree. A few sequins were added for some sparkle. I came across a sentiment in my Stamp'n Up collection and thought it just sounded like a child's simple wisdom...

"Life doesn't have to be perfect to be wonderful".  

We forget that, don't we!  Kids find joy even in situations that are less than perfect. 

I hope you'll take the time for some play in your craft room this week, and that you'll join us in our "Childs Play" challenge at Pile it On!
Can't wait to see what the inner child in you leads you to create!

Until next time...

This card has been shared in the following challenges...


It's a {Pin}spirational Day

Welcome, and happy Tuesday!
That means its a new challenge over at {Pin}spirational Challenge Blog!
You know....where we challenge you to use our weekly photo for your crafting pleasure!

It's another good one this week...


Isn't she just adorable!
And her dress gives you so many color options...and the bunny!

 Here is where the {pin}spirational pic led me...


 The digi I had the pleasure of working with is from Elizabeth Bell...one of the awesome sponsors this week.  She's been colored with my Spectrum Noir markers.  I threw in some designer paper which reminded me of the little girls dress in the photo, cut out a circular tree cutting file from the Silhouette online store, threw on a few sequins and lastly came up with a fantastic sentiment from TLC Creations.  I also did a little distressing on one of the designer paper layers to give the card an older feeling.

Before I forget, here's all the sponsor info for this go round...
(Please check the {Pin}spirational Blog for the prize info)


as well as...


  and last but not least...


So, head back on up to the beginning of this post and study the {pin}spiring photo and see where your creativity will take you.  Then, don't forget to link up with us over at the {Pin}spirational Blog!  You never know...you might just be one of our next lucky winners!

Until next time...


Favorite Festive Colors

Wow!  It's Friday again...can you believe it?  
I just can't believe how time is flying.  We're nearly at the end of March already!
I'm glad you've taken time to stop in for a visit with me today!

Since it's Friday, I'm here with another new challenge with Christmas Stampin' All Year Long!  As always, our theme is "Anything Goes"...with the twist of "using your favorite color combo"!  

We are excited to have our challenge sponsored by none other than Meljens Designs this week!
(I just love Meljen digis!)

Meljen's Designs 

They are offering one lucky winner 4 of their awesome non colored digis!
How awesome is that!

I was sent the cute image called Snowman Cupcake.  
I decided to pair that image with Meljen's digi Sweet Candy Canes.
And as for using my favorite color combo...I have to say I love blue and white together.  I especially love blue and white for Christmas cards.  I usually land up having to talk myself out of this color combo when I make cards because not every card I create for the holiday season can be blue and white.  And, since I chose the candy cane image for this card as well, I used red as my accent color.  

Here's a peek at how it turned out...


I colored the images with my Spectrum Noir markers.  I dug out my Christmas patterned paper and got to matting the different layers.  The sentiment is from Di's Digis.  I added some sparkle to the card by using Stickles on the candy canes, cupcake liner ribbon as well as the holly berries.  I covered the snowman's face completely in Glitter Ritz.  Lastly, I added some different blue toned colored sequins.  

And there you have it...another blue and white Christmas card creation.  I really hope you all decide to get into the Christmas spirit and get creating with your favorite color combination.  Maybe you'll inspire me to give a new color combo a try!  LOL
Remember to link up CSAYL so I can see your creations.  While you're there, take a look at all the other fabulous cards the other DT members have created for your inspiration.

How's The Weather?

How's the weather out in your neck of the neighbourhood today?
Here in Manitoba, Canada we have been having a mixed bag of strange weather.  The other day we had a storm watch, a thunderstorm warning, a blowing snow warning and a wind warning all in effect at once....and it really did do all of the above.  A friend in the neighbouring town did say she actually heard thunder.  I know it rained quite hard for a period of time during the night and we had some nasty winds and snowfall as well.  I've never seen or experienced weather like this.  And for the last few days, we have been having unseasonably warm weather.  We bounce from +3 degrees  Celsius and thawing ice and snow to the next day being -25 degrees Celsius with a windchill of -42.  It's just crazy!

Well, enough chit chat about the weather...and on with our new challenge over at {Pin}spirational Challenges.  Wait until you see the cute pic we have for your {pin}spiration this week...


Aren't they adorable!
I loved their decor...and I have used their picture on the wall and their couch for my inspiration.  I knew I would have paper to match the sofa, and I just loved the snowy scene in the framed picture on their wall.  I found a cute design over at TLC Creations and decided to turn this into a card.  The penguin was in a frame which was perfect to mimic the portrait on the wall.  I colored up the image with my Spectrum Noir markers (still practicing!), and then decided to add some sequins for some sparkle.  I thought it turned out pretty cute!
Take a look see...


Now, take another look at that cute little picture again and create a card with what elements pop into your sight first. It's such fun...and I so enjoy visiting your entries to see what has inspired you!
And don't forget, we have some awesome prizes from some awesome sponsors this week...

 Scribbles

offering 3 digis to one lucky winner...

...and

Aurora Wings

offering one lucky winner $10 worth of digis!
 
Lastly, be sure to check out the other fantastic creations the {Pin}spirational DT has created to jump start your creative juices!  Enjoy creating!

Until next time...

This card has been shared in the following challenges...
Lia Stampz..."Color Scheme/Picture Challenge"
613 Avenue Create..."Anything Goes/Winter Blues"
One Stitch at a Time..."Use a Digi"
Robyn's Fetish..."Winter Card"
Created with Love..."Winged Things"
Kaboodle Doodles Challenge Blog..."Use Blue"
Paper Makeup Stamps Digi Challenges..."Snowflakes"
MilkCoffee Challenges..."Monochromatic"
The Cutie Pie Challenge Blog..."January Blues"
Melonheadz Friends..."Winter Fun"
Stamp and Create..."Winter Wonderland"

Thanks for visiting!

Thanks for visiting!