Let's Craft Together...An "S" Card Tutorial

Happy Friday!
Can you believe it's the weekend again!
I'm back today with a tutorial for you featuring the "S" Card and some amazing Heartfelt Creations products!  Were you aware that every other Friday Heartfelt Creations features a tutorial with one of the design team members as a special treat for you?  Be sure to sign up for the emails if you haven't already so you never miss any of the yummy inspiration that HC wants to send your way!

Anywho...enough rambling and lets get down to creating!

Birds and Blooms Collection "My Wish For You" S-Card Tutorial
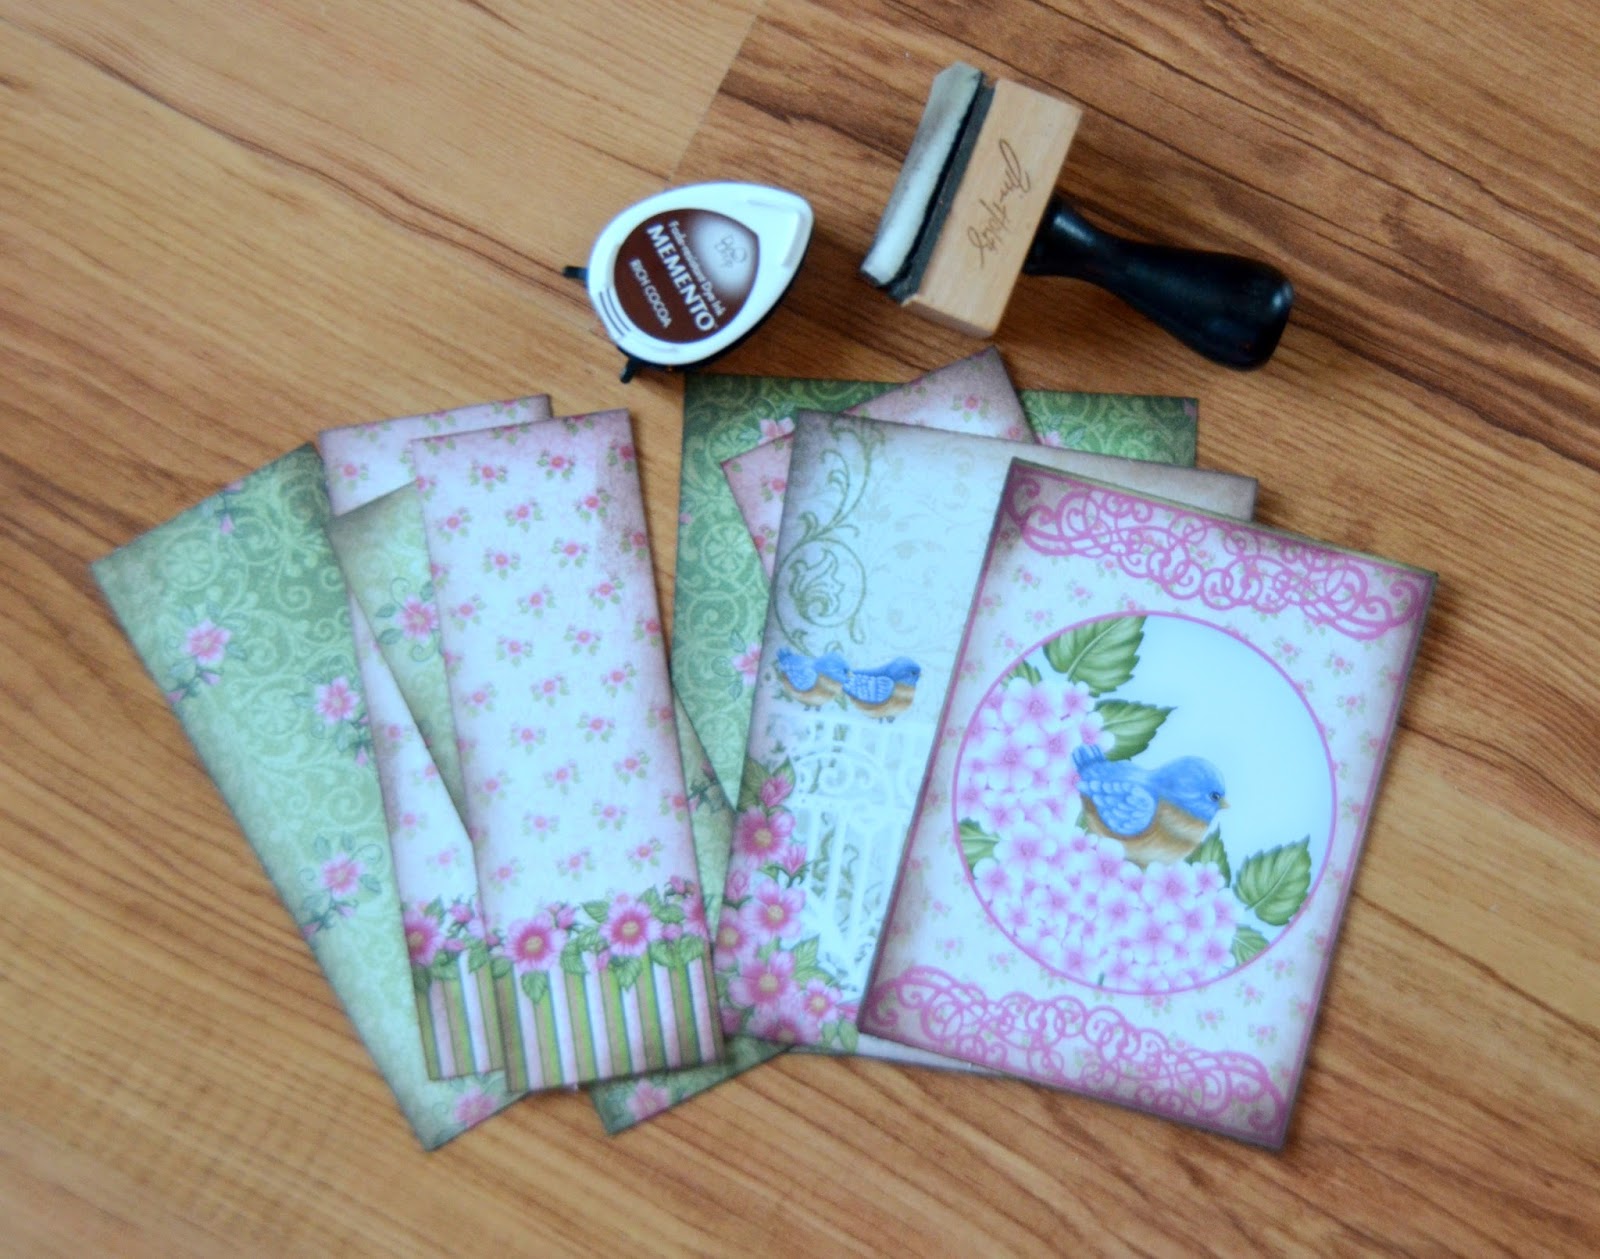
Products Used
Birds and Blooms Collection Paper Pack, Birds and Blooms Die, Birds and Blooms PreCut Set, Leafy Branch PreCut Set, Leafy Branch Die, Spectrum Noir Colored Pencils, Spectrum Noir Blending Solution, Blending Stumps, Toffee Crunch Memento Ink, Rich Cocoa Memento Ink, BigShot Die Cutting Machine, double sided adhesive, Spellbinders Dies – Standard Circles (Large), Spellbinders Dies – Majestic Circles, Zip Dry Glue, ribbon, rhinestone gems, Scor-Pal, Stamp Mat Pad,  McGill Paper Shaping Tools and Mat, McGill Paper Blossoms Molding Mat, 3D pop up dots, Art Institute Glue – Dries Clear,  Art Institute Metal Glue Tip

Project Instructions

Begin with a single piece of card stock measuring 5 1/2"x 8 1/2" for your card base.


To create your "S" fold score at 4 1/4" as well as 2 1/8" on the left hand side of the card base.


Fold first scored fold toward the inside of the card, and the second fold out away from the card creating the "S" for the special fold.


Select the paper palette you wish to mat with, as well as a small premade image card panel.


Cut the pieces you will need for the matting.

For the smaller two sections of the "S" fold you will need the following...


2 - larger background bases (green in this tutorial) measuring 2" x 5 3/8"
2 - smaller front bases (floral/striped in this tutorial) measuring  1 5/8" x 5 1/4"

For the inside card center you will need the following...

1 - large base measuring (green in this tutorial)  5 3/8"x 4.0"
1 - mid sized base (floral/striped in this tutorial) measuring 2 3/8"x 5 1/4"
1 - main image base (birds on fence cut from large piece of pattened paper) measuring
3 5/8" x 5.0"
1 - premade card panel from paper pack, trimmed as shown

Using your ink and ink tool, apply the ink to all outer edges giving it a vintage and aged appearance.  (Should you not be a fan of the vintage look, feel free to skip the inking!)


You are now ready to assemble the base elements of your card.


Next adhere the main front image panel to the "S" fold on the card, being careful to only put adhesive on the half of the image panel that will be adhered to the card.


Moving along to some die cutting...


To create the circle border for around the bird image, group the circular dies together (the two largest from the Majestic Circles and the mid sized Standard Circle) and cut with a manual die cutting machine. (Washi tape is an excellent way of keeping the grouping together so nothing moves on the platform of your machine while cutting.)


Apply 3D pop up dots to the back of the circle frame and adhere to card.


Stamp the Birds and Blooms branch image onto paper using a light brown colored ink.  Once dried, color image and die cut with the coordinating die.


Adhere the die cut floral branch across the top of the circular frame.  Fussy cut a ticket sentiment for the front of the card, and another sentiment that you wish to use on the inside of the card.  Ink the edges of both of these elements as you did with the other paper pieces.  Using 3D pop up dots, apply the ticket to the front of the card.  Using double sided tape, apply the second sentiment to the inside of the card.  Using ribbon of your choice, create a bow and glue just above the front sentiment.  Apply three rhinestone gems to the bottom corner of the front image card panel.


Stamp Birds and Bloom flowers and leaf images with a light brown ink.  Once dried, color and then die cut with the coordinating die.


Shape leaves and flowers using a paper shaping tool and a mist of water to the backside of the image.  There are some wonderful tutorials on YouTube that Heartfelt Creations has put together for flower shaping.  Be sure to check out the different techniques there.


Glitter the edges of the flowers with a fine tip glitter glue and allow to dry.
Also glitter the small flowers in the bottom corner scene of the inside panel. 


You are now ready to do the placement of your leaves and flowers.  Once you are happy with the placement of the elements, adhere to card.

Now give yourself a pat on the back because you have completed a card that is ready for you to send and bless someone!

Here's a few more views of the completed project...


...and one last view...


I hope you've enjoyed todays tutorial!
Be sure to check out the Heartfelt Creations Online Store for this gorgeous collection!

Until next time...

This card has been shared in the following challenges....


A Simple Thank You

Hello! It's Wednesday again!
Can you believe it?!?!
  And it's also the last Wednesday of January!
Where has the first month in 2015 gone?
Here in Manitoba Canada we've had a relatively nice January weather wise...and I'm hoping that February will be the same.  I'm not missing the -40 C with windchill forecasts, and the small amount of snow we have received suits me just fine! 

Speaking of nice weather...the Birds and Blooms Collection at Heartfelt Creations has me dreaming of spring...to see the summer birds return, flitting in the bird bath in my flower garden...smelling the fresh flowers in the breeze...
If you haven't checked out this awesome collection, don't wait any longer!
The patterns, colors and images are sure to chase away your winter time blues!

I decided to go with a more simple design this week.
I wanted to do something feminine with a touch of vintage, but nothing over the top.
I wanted to showcase one of the fabulous stamped images in the collection...and I had the desire to water color!
So, that's exactly what I've done!

Let's take a look...


...and a closer look at the image and shaped flowers...


I love to water color!  I love the look of it...so soft and romantic!
I may not be one of the very best at it, but I do so love to try!
I find the technique I have the most luck with when it comes to water coloring is to scribble a small amount of color from my distress markers onto my splat mat and pick up the color from there and apply it to the image.  I find I have more control over how much color is applied and can pull in my different shades of color better that way.  

This collection is so versatile...you can color with markers, water color and even chalk...and it all looks great!  No matter what color you decide to create your flowers in, they turn out wonderful! 
You can create with the beautiful bright hues in the collection, or you can create beautiful muted vintage projects.  It's such a great collection that works in so many ways!
Be sure to stop by the Heartfelt Creations blog to see how the rest of the design team members have been inspired to use this collection!

I'm including the instructions and project supplies for this card here on the blog as well!
It's really a quick creation that you can use for any occasion, simply by changing the sentiment.
I hope you give it a try!

Until next time...

Project Instructions & Supplies
HCDP1-250 Birds and Blooms Paper Collection
HCPC-3648 Home Sweet Home Cling Stamp Set
HCPC-3644 Birds and Blooms Cling Stamp Set
HCD1-757 Leafy Branch Die
ANC850 Spring Bling Prills - Tu Tu Pink
159223 Paper Blossoms Molding Mat
459222 Paper Blossoms Tool Kit
SMP001 Stamp Mat Pad
273900 Zip Dry Paper Glue

Other Products Used:  premade 5"x7" card stock base, white card stock, water color paper,  Memento Angel Pink ink, Versa Color Pine Cone ink, Stampin Up Basic Black ink,  Ranger blending tool and pad,  Ranger distress markers - tumbled glass, faded jeans, salty ocean, mustard seed, vintage photo, tea dye, crushed olive, forest moss, peeled paint, victorian velvet, spun sugar, Ranger Water Color Brush, Spellbinders Exquisite Labels Eleven die, Spellbinders Floral Ovals die, scor tape, 3D pop dots, BigShot Die Cutting Machine, Zig 2 Way Glue Pen
To begin, choose a background paper from the Birds and Blooms Paper Collection that you wish to use as a background mat.  Trim this mat slightly smaller than the 5"x7" card size so that you will have a small white perimeter around the card face.  Muddy up the entire panel with some brown ink using a blending tool, and then ink all of the outer edges with the ink pad itself to give the panel a vintage look.  Move along to cutting your first die cut to use on the top of the patterned mat piece...using a piece of white card stock, run the largest of the  Exquisite Labels Eleven dies through your die cutting machine.  Next stamp your image using a permanent blank ink onto water color paper.  Allow to dry and then proceed to color.  (I prefer to scribble the color on my splat mat and pull the color off of there with a water brush and apply to paper rather than coloring on the image and then brushing.) Die cut your image with the largest of the Floral Ovals dies. Adhere the large decorative die to the background mat, and then the image die cut onto the top of the grouping.  For the image panel I have used scor tape on the centre and allowed the decorative edge to stand off the card ever so slightly as it does not have any adhesive on it. Adhere the card front to the card base.  Stamp your flowers and once dry, proceed to water color and shape, adding a touch of Angel Pink Memento ink to the edges and  TuTu pink prills to the centre of each as shown.  Decide on your flower arrangment and then adhere to card. Choose the sentiment you wish to use from the Birds and Blooms paper collection, ink with a brown ink around all edges and apply to the card front with 3D pop dots.  You are now ready to  send a friend or loved one a beautiful handmade vintage style greeting card!  Enjoy!

An Encouraging Word for You Today...

Welcome, Welcome, Welcome!
Happy Wednesday!

I'm back with a second project today with the Birds and Blooms Collection by Heartfelt Creations!
If you haven't checked out this collection yet, be sure to head over to the blog and the store for a peek!  It's fabulous...and very popular...the "I Want It All" packages have already sold out in one week!!!
So, don't wait if you're contemplating a purchase of any of the remaining products!

I came across a tutorial at SplitCoast Stampers that I wanted to give a try.  It was an ATC booklet created out of one piece of cardstock or designer paper.  You can find that tutorial here.  I created one as a mock up and decided that it was just a little too tiny to do much embellishing, and that I really wanted to make more of in interactive booklet.  I decided to give the same technique a try with a full 12x12 piece of designer paper and came out with a creation just slightly smaller than your average cheque book.  
This I was able to work with!

Now, I wasn't sure exactly how I wanted to theme it...make it for an occasion such as birthday, thinking of you, etc. when it popped into my mind to create an encouragement booklet! 
So many people in my life lately have been discouraged with certain circumstances, receiving bad news of loved ones falling ill, loved ones passing away, or being cooped up sick with colds, flu, etc. and I thought what I neat idea if I could create something to encourage them!
I wanted to incorporate Scripture verses, pockets, tags, glitter and sparkle...and how can you not be cheered and encouraged when you see the beautiful Birds and Blooms papers and stamps!
So I set to work!

Here's a look at the little encouragement booklet I created!


Would you be so gracious as to allow me to give you a tour of this tiny creation?
My apologies as the post will get a little picture heavy!

Let's begin with a close up of the front cover...


The little birds and the blooms in this
collection are totally awesome!
I've water colored the little birdie after the stamped image was dry.
After the flowers were shaped I glittered just the edges with Glitter Ritz and added Prills to the centre of each bloom.  
The little cover panel has been applied with 3D pop dots to give the project some dimension.

Let's move along to the first set of pages!
First the left side with the pocket and tag...


...and then the right side with the encouraging verse...


...moving along to the centre portion of the booklet...
again a scripture sentiment and another tag


The tags in this creation give you plenty of journaling space for you to add in your
own handwritten messages of encouragement!
And another idea...why not place a gift card in one of the tag pockets as well!
Who doesn't love a gift card to their favorite coffee house, and it's another way to encourage someone and remind them how special they are!

...and the last pages...


Each of the pages and tags have been embellished with a little bit of Glitter Ritz to give them the sparkle factor...wish the pics showed it a little more!
This little project has so many endless possibilities... anniversarys, birthdays, just because, thinking of you, etc.  It would make a wonderful present for a prayer partner or someone special in your church as well.  It's a wonderful alternative to a card and yet not an overwhelming creation that needs a bunch of time...but still packs a presentation punch!

Well, that's all from me today!
So glad you were able to pop by and visit!
I hope I've been able to brighten your day a little with this beautiful collection
And if you're someone who is going through a rough patch, feeling blue or just needing an extra dose of sunshine to put the spring back in your step...I hope that this booklet has spoken to your heart and reminded you that you are loved and special!
I'd love to know what you think of this creation...so please feel free to leave a comment below!
I have also included the instructions and a link to the tutorial I used below!

Until next time...

Project Instructions & Supplies

Other Products Used:  ribbon, Glitter Ritz, paper cutter, Stampin Up Garden Green ink,  Stampin Up Basic Black ink, Antique Linen and Faded Jeans distress markers, water color blending pen, water mist spray bottle, finger daubers, funnel tray, 3D pop up dots,

Locate one of the 12x12 premade scrapbook pages in the Birds and Blooms collection paper pack as the base of this project is created from one card stock sheet.  For folding instructions please see the SplitCoast Stampers tutorial here.
Please keep in mind that you will need to follow the measurements for this size booklet located at the bottom of the SplitCoast Stampers tutorial as this is a larger version of the ATC example shown.  (This booklet measures 5 3/4" x 3").  Once your folding is completed, add a piece of coordinating card stock over the outside of the booklet covering the spine to give it added strength.  Select a decorative strip from the paper pack to cover the mechanics of adding the extra cover over the spine.  You will need a matching strip for both front and back.   Select the sentiment strips from the paper pack that you wish to use on top of booklet pages.  Adhere to tops of pages and allow glue to dry.  Begin cutting your 3 layering panels for the inside of the booklet.  Each panel should measure 4 3/4" x 2 1/2".  Score around the edges as shown in the tutorial and stamp one uplifting sentiment on each panel. Adhere one panel to one of the first pages, one of the second and one of the third.  To create simple pockets to go on the opposite page of the sentiment panels, cut two squares 4 1/2" x 3".  Then cut these in half on the diagonal.  Adhere pockets to booklet remembering to not put glue on the side where you will want to slip in your tags.  Select the sentiment tickets from the paper pack that you wish to use on the bottom of each pocket and adhere.  Cut out three premade tags from the collection that you wish to use and thread with ribbon.  Moving along to the cover, cut a piece of floral cardstock 3 3/4" x 2 3/8".  Score around the edges as you previously did with the sentiment panels.  Stamp sentiment and add bow to the top corner as shown. Adhere to the front of the booklet using 3D pop up dots. Stamp flowers (Rose Bud Memento ink), leaves (Bamboo Leaves Memento ink), and fluffy bird image (Stampin Up Basic Black ink) and allow to dry. Die cut the images with the coordinating dies.  Shape flowers and add Glitter Ritz around the edges for some sparkle and all yellow prills to the centre of each bloom.  Ink the edges of the leaves with Stampin Up Garden Green ink using a finger dauber.  Shape leaves.  Water color the fluffy bird using distress markers.  Die cut one of the branches and trim to suit size of booklet.  Apply small amounts of glue to the printed flowers on the cover panel and then sprinkle with Glitter Ritz.  Once dry, you can begin arranging your little bird on the branch and floral cluster.  Once happy with your layout adhere to booklet.  Lastly, going through the booklet, add small amounts of Glitter Ritz to the flowers on the pages as well as on the tags to give them a beautiful subtle shimmer.  Remember to handwrite your own encouraging messages on the tags before gifting to a friend or loved one...another way to make it extra special would be to enclose a gift card in one of the pockets! 

This project has been shared in the following challenges...

Spread Your Wings And Fly...

Happy Wednesday!
Are you as excited as I am that today is a new collection release day at Heartfelt Creations?
Let me tell you .....you are going to love this one!
Birds, butterflies and blossoms in beautiful spring colors....oh my!

Here's a little about the collection...

"Does Old Man Winter have you firmly in his grip?  Chase the winter blues away with a breath of springtime!  Heartfelt Creations is pleased to present the "Birds and Blooms" collection:  a virtual spring garden that's lovely as a song! Shades of cherry blossom pink, robin's egg blue, and soft leafy green fill sunny garden scenes featuring bluebirds, blooming branches, picket fences, bird baths, bird houses, butterflies and frilly hydrangeas.  Dozens of stunning card fronts, pre-designed layouts, borders, sentiments and artwork are the perfect remedy for mid-winter doldrums. Six hand-drawn stamp sets feature blossom laden branches, nesting birds, garden scenes and an elegant collage.  Two sets of dies coordinate with papers and stamps allowing you to add realistic blossoms, branches and birds to your artwork.  Take a well-deserved break from the bleak landscape of winter and escape to a colorful springtime garden where birds chirp, flowers bloom, and soft breezes lift your spirit and inspire your creativity!"

This collection just speaks to my heart!  It so reminds me of my Grandma! 
She loved birds, and it's a love that I've inherited from her!  The beautiful patterns and colors in this collection remind me of her as well.  She passed away several years ago right after Christmas, and I began working with this collection just before the holiday season...she is always on my mind as we prepare for the holidays, and this collection just made her seem that much closer to my heart!  It's funny how God sends us little reminders of loved ones, isn't it?

 One of the other loves that I have that has inspired me in this creation is beautiful old china!
I love going to thrift stores and just gazing at beautiful old plates, tea pots, cups and saucers!
The soft colors, the floral patterns...and even the fine line cracks that give away their age!  I'm sure you'll see this love of "antique" in my card today!

How about a look see...


I'm so sorry that the lighting on this photo really doesn't do this card justice!
I wish you could see it in person!

Here's a closer look at the flower details...


So there you have it...my Wednesday inspiration for you!
Be sure to check out the Heartfelt Creations Blog to see the other gorgeous creations the design team have made with this stunning new release.  Then be sure to check out the Heartfelt Creations online store...I predict that this collection is going to be a popular one!  I think we're all ready to start designing with gorgeous spring colors and beautiful birds and butterflies...it will make what's left of winter pass so much more quickly!

I've also included the instructions for this card here on the blog as well...

Until next time...

Heartfelt Creations Products Used:
                HCDP1250 Birds and Blooms Paper Collection                
HCPC3644 Birds and Blooms PreCut Set
HCPC3645 Leafy Branch PreCut Set
HCPC3647 Hydrangea Bird Bath PreCut Set
HCD752 Cut Mat Create 2B Die Template
SMP001 Stamp Mat Pad
048749 McGill Paper Shaping Tools and Piercing Mat
159223 McGill Paper Blossoms Molding Mat
311070 Water Dew Drops
273900 Zip Dry Paper Glue

Other Products Used:  Lindy's Stamp Gang Spray - Frozen Jack Frost, Pistachio Memento Ink, Pearl Flourishes, Crystal Stickles, Scor Tape, ribbon, Gesso Primer, Distressing Tool, white card stock, chipboard frame, Antique Linen Distress Paint, Picket Fence Distress Paint, hot glue gun, 3D pop dots, BigShot Die Cutting Machine, mist bottle of water

Project Instructions:
Create your 6"x6" card base using white card stock.  Locate the premade "Spread Your Wings and Fly" card front measuring the same size in the paper collection.  Using Pistachio Memento ink, stamp the bird bath scene from the Hydrangea Bird Bath PreCut Set in the lower left hand corner.  Using your distressing tool, distress all edges of the panel, and then ink with the Pistachio ink on all of the distressed edges.  Set aside to dry.  Locate the smaller card panels within the paper collection and cut out the image with the butterflies and white florals.  Select a coordinating patterned paper from the collection to use as a mat for the smaller image panel, making sure that the backside of the patterned paper matches the image as the corners of the mat will be rolled back to reveal the back pattern.  Taking the patterned paper mat, wet a top corner with a mist bottle and roll back corner.  Do this a second time with the opposite bottom corner.  Allow to dry, and then use your distressing tool to distress the edges of the matting piece.  Adhere the image panel to the mat.  You are now ready to adhere the smaller image piece to the card front.  Once applied in place, spray lightly with Lindy's Stamp Gang Spray.  Allow to dry. Die cut two decorative corners from the Cut Mat Create 2B Set in a pink contrasting patterned paper in the paper pack collection and adhere to card as shown.  Stamp several inkings of the flowers in the Birds and Blooms PreCut Set with Summer Sky Memento ink, and several stampings of the various leaf bunches in the Leafy Branch PreCut Set with Pistachio Memento ink onto white card stock.  Die cut using the coordinating die and your manual die cutting machine.  Shape flowers and leaves, leaving some flowers flat to use as filler pieces within the floral cluster.  Apply Water Dew Drops to the centers of the shaped flowers. Moving along to the chipboard frame.  Cover it lightly with one coat of White Picket Fence distress paint, and once that is dry a light coat of Antique Linen distress paint allowing a small of the white to show through giving it a touch on an aged look.  Fussy cut one large and one small butterfly from the paper pack and shape so wings have a slight curl.  Apply chipboard frame as shown using 3D pop up dots.  Next hot glue the ribbon into place onto the frame.  Arrange you flower clusters and leaves as desired and once happy with placement affix to card.  Adhere large butterfly using paper glue and small butterfly using 3D pop dots.  Add pearl flourish giving the small butterfly the illusion of being in flight. Using a small amount of Gesso Primer on a brush, lightly brush butterflies and leaf tips. Lastly, add a touch of shimmer and shine to the shaped flowers using Crystal Stickles.  Add a handwritten message to the inside and send to a special friend or loved one!

This card has been shared in the following challenges...
Fab'n'Funky Challenges..."Something New" (new collection, stamps, dies, etc)
Penny's Paper Crafty Challenges..."Anything Goes"
Inky Chicks..."Anything Goes" 
Paper Minutes..."Flower Power"


When You Wish Upon A Star....

"When you wish upon a star,
Makes no difference who you are,
Anything your heart desires will come true!"

Do you remember who sang the song and where it comes from?
I bet I have you humming it!  LOL
Let me give you a hint...if you are my age or older, you probably remember sitting in front of the TV on a Sunday night waiting for this song to be sung!
That's right...it's from Disney and it was always sung by Jiminy Cricket before the show was to begin!  Such fond memories!

You may wonder what Disney has to do with my crafting post today...so let me share.  As you are reading this we will be flying home from Disney World in Florida.  We went for a 10 day stay with the kids and some friends to the "Most Magical Place on Earth"!  We were there about 4 1/2 years ago, and I printed online photo books for each of the kids that time.  This year I decided to do something a little different!  I decided to do a mini scrapbook style idea ahead of time which I can add pictures to after the fact! 

So...without further waiting, let's take a peek!
(Sorry for the photo heavy post today!)

Let's begin with the album cover...


Now...any of you who know me or have followed along the blog for some time will know that I love the old vintage and retro looks.  So, when I stumbled across this "old" Disney style collection that Simple Stories makes, you just know that I had to create with it!  I love the colors that are slightly muted and not so bright...and they were perfect when I was finished distressing and inking all of the pages!
This collection is called "Say Cheese" and of course, can be purchased at Scrapbooks by Design!
The collection includes several sizes of paper packs (both patterned and basics), a full Collection Kit which is perfect to get you started, both cardstock and chipboard stickers and a metal brads collection!  I can't tell you how much fun it was to play with all of these elements!
I added different stickers with 3D pop up dots to the front cover after covering the chipboard.  Of course everything was inked in brown around the edges and I applied a small amount of Stickles where I thought a little bit of shimmer would be fantastic.  

The album I chose to use was a chipboard album that came with several chipboard dividers inside and the pocket pages perfect for the pocket tags provided in this collection.  Now, don't be dismayed as any type of album you like will work and you can adapt to make the collection work for you.  Scrapbooks by Design carries several different styles of albums that may work for you!

Moving along to the chipboard dividers...


...and this collection comes with so many awesome pieces for journaling and matting your photos...


So there you have it!  Just a few pages of my Disney themed scrapbook ready to have those pics developed and added shortly after we get home.  
I've only been informed of one problem...our two kids have informed me that there is only one book and there are two of them!  LOL  I think I do see another project in the making!

Until next time...

Birthday Wishes

Welcome to another Wednesday!
Can you believe it's the first Wednesday of the New Year!
I'm so glad you could stop in for a visit...you know that Wednesdays are Heartfelt Creations inspiration day, and I hope you look forward to them as much as I do!

I've created a simple Birthday card for your inspiration this week.  Nothing too frilly or fancy!

Take a look for yourself...


I was in need of some sunshine the day I created this project.  We've had very little of it lately, and the colors of the Majestic Morning Paper Collection just spoke to me with its vibrant colors!
When I spied the bright yellow ribbon in my stash, I knew that I wanted to incorporate it into this creation!

Here's a closer peek at the flowers...


I've simply added three hand shaped flowers to the card panel over top of the printed florals in the vase, giving the card dimension and the feeling of the flowers being real.  As you can see, each flower has been colored using the same colors, however some tips have been colored darker,, some flowers have been shaped tighter, one is layered and two are single etc, to give them each their own individual look...after all, God has not created two identical flowers in nature...so why should we?  LOL
And, for me the icing on the cake is the prills used in the centre of each flower.  To me they take the flowers up a whole notch, making them look so realistic!
If you have never created your own flowers, please do not be hesitant about it!  Emma Lou of Heartfelt Creations has wonderful videos on YouTube that guide you through step by step!  Some of the techniques I've used while creating these blooms can be found in a video here and here!  Once you've given this a try, I promise you will have so much fun and will be so pleasantly surprised how easy it really is!

For the full instructions on how this card was created, I will ask that you please check out the Heartfelt Creations blog...if I send you there, I know that you will also be able to take in the beautiful creations the rest of the design team have created!  Be sure to leave them some blog love on their individual blogs as well...after all, we all love a compliment and would love to hear from you!

Until next time...

This card has been shared in the following challenges...

Thanks for visiting!

Thanks for visiting!