You're the Best...

Welcome!
Grab a cup of coffee, tea or favorite cold beverage and kick your feet up 
and visit with me awhile!

It's Heartfelt Creations Wednesday, which is always such a treat!
If you don't find inspiration here, I promise you will find it on the Heartfelt Creations blog because the projects there are always so amazing!
It's also a special Wednesday this week because we are participating in a blog hop with Art Anthology!  I had the pleasure of using some of their products on a few of my creations and am excited to share with you!

This week I've continued working with the Blazing Poppy Collection.  
It's filled with such beautiful prints and colors.

Here's where my creativity took me this week...


I simply love the color palette of this collection paired with black.  
I think you land up with such an elegant looking creation!

Here's a closer look at the poppies...


When I found these sparkly embellishments in the clearance section, I bought them all in every color they had knowing that they would make fantastic flower centres.  I love how they look with these poppies!  If you look closely, you'll also see some sparkle on the poppies.  I've achieved this by using the Art Anthology Sorbet - Dazzle paint.  I've used a small paint brush to just apply a thin layer all over the flowers.  It's too bad that it's so hard to see in the picture because it give the flowers a beautiful hint of shimmer.  I've also used it on the background where I've stamped the poppy image.

Here's a close up of how that turned out...and it's a little easier to see the glitter...


That beautiful shimmer just brings the glamour of the card up to a whole new level.
The gorgeous stamped image has been colored with my Spectrum Noir Blendable Pencils along with a blending solution.  The 3d poppies have been stamped onto a textured card stock and you can see how the texture lends an extra interest to the flower as the pencils allow the texture to shine through.

Now, since we're doing a blog hop with Art Anthology this week, I'd like to also point out that the Father's Day card I created for my dad has also used another one of their fabulous products.  You can find more information and photos of that creation here

Thanks so much for stopping by to visit with me today!
My wish for you is that you leave with your soul feeling refreshed and  uplifted...and that your creative side is inspired as well!

Should you desire detailed instructions on how this card has been created, as well as a full supply list please visit the Heartfelt Creations blog where you are able to view them and even print out a copy for yourself to follow along.

Until next time...

Happy Father's Day...

Happy Sunday!
I hope life it treating you well!
Here in Canada we're celebrating Father's Day today, so I'm here to
 share a special card with you!

Let me share with you a little with you about my dad!
My dad has taught me so many things in my life.  He has taught me to look at the world in black and white...right and wrong.  He has taught me to work hard for what you want in life and that your word and integrity are some of the most valuable and important things you have.  His hand shake is worth more than any written signature on a contract and I know that he would help out his kids in anyway he could.  When I was growing up he wasn't always home a lot as he was a long distance truck driver.  Now in his retirement years I enjoy seeing how he interacts with his grandchildren and gets to experience some of the things he missed with my brother and I while we were growing up!

So dad...today we're celebrating you!

Here's a peek at the card I created just for him...


I decided to go with an "Old World" style card that looked aged...like it had just been found at the bottom of a vintage sailors trunk.  I chose to use the "Everyday Heroes" Collection by Heartfelt Creations.  The stamped globe image in the centre of the card as well as the die cut are both part of this fabulous collection.  I've also used an Art Anthology Paint - Velvet Wineberry around the edges of the card both on the base and the small card panel that has been popped up off the base.  I've also used a touch of it on the die cut itself as well.  I've then used another Art Anthology Paint - Sorbet Dazzle which leaves a beautiful glitter where you apply it.  To add more texture to the project I've also used some Ferros Metallic paint in various places of the card...it leaves a gritty feeling where applied and just really adds to the aged effect. I love using it on masculine cards.  I've fussy cut the images and sentiments along the side of the stamped image.  I've matted the sentiments onto a wine colored card stock to tie in with the Wineberry colored paint. To add the aged effect, I've added some Mr. Huey's spray as well as a spritz of Smooch Spritz - Log Cabin.  To finish it off I've inked all of the edges of the card with a black ink, added two gold brads as well as some gold twine. 

Well, that's all for me today!  
Short and sweet!
I hope you've found some inspiration here...and it's never to late to make a card to let your dad know you appreciate him...it doesn't just have to be on Father's Day!

Until next time...

This card has been shared in the following challenges...

Graphic 45 Card Set

Hello Everyone!

I'm back today with a blog post for Scrapbooks by Design!  
I have to admit I wasn't sure what to create for this blog post...I've recently started working with my husband full time in our SnapOn business and my creative juices have been somewhat stiffled with being on the truck everyday!  LOL

So...I got to thinking about the end of the school year which is quickly coming to a close here at the end of the month in Manitoba, Canada and decided to go with a end of year teachers gift idea.
I dug through my paper collections and stumbled upon Graphic 45's "ABC Primer".  
Perfection!
I decided that a boxed card set would be something useful and not clutter up these wonderful educators homes.  I'm sure they have plenty of mugs and trinkets hiding in closets from all their years of teaching.  I browsed the Silhouette Design Store and came up with a gift box that I just loved...and got to work!

Here's a look at the final outcome...


...and here's a peek at how the gift box opens and how the cards lay inside...


Now when you use the same collection for everything, the projects just about build themselves!  LOL
I made 5 cards to include in the box and they came together so quickly!

Here they are...


The matching stickers and chipboard pieces included in this Graphic 45 Collector's Edition make it so simple to embellish quickly and have everything looking great!

Well, that all for me today!  Remember that you can purchase this fantastic collection for a limited time at Scrapbooks by Design!  They also carry the wonderful Silhouette Cameo which made creating this gift box soooo easy!

I'd love to hear what you think about this little gift set idea!
If you have a "go to" crafty gift idea that you bless the teachers in your child(ren)'s lives I love to hear about it!

Until next time...


Bloom Where You're Planted...

Welcome!
So glad you can stop in for a visit today!
It's Wednesday, which means it's time to enjoy a project featuring Heartfelt Creations and their newly released "Blazing Poppy" Collection.

This week I'm going to treat you to a little country theme...you know... a little burlap, some denim and how about some crackled poppies...

...and here's the "Bloom Where You're Planted" canvas...


When I came across the denim canvases at Michaels I knew that I needed to use one for this collection...and it was such a great buy at 50% off!  I so regret not having purchased more than one.

...and here's a closer peek at those beautiful poppies...


I've used several techniques to achieve the look of these finished poppies.
They have been stamped in a black ink and colored with finger daubers and several colors of Distress inks....
They have then been painted with crackle medium, and once dry have had a brushing of Pumice Stone distress stain to make the cracks appear a little more... and the finishing touch are the multi colored seed beads from the dollar store...


I loved this sentiment when I can across in in the Silhouette Design Store!
Such a great message!


To achieve the cracked look on the letters and banner in the sentiment, I've used Crackle Accents.
 For full instructions on the steps to completing this canvas, please see the end of this blog post.  

Be sure to visit the Heartfelt Creations blog as well as there are many more fabulous creations that the design team have created for your inspiration!

Until next time...


Project Supplies & Instructions
HCDP1-255  Blazing Poppy Paper Collection
HCPC-3678  Blazing Poppy Fillers Cling Stamp Set
HCPC-3675  Poppy Border and Corner Cling Stamp Set
HCPC-3674  Blazing Poppy Petals Cling Stamp Set
HCPC-3656  Delightful Daisies Cling Stamp Set
HCD1-760  Delightful Daisy Die
HCD1-764  Blazing Poppy Die
HCST1-401  Deluxe Flower Shaping Kit
SMP001  Stamp Mat Pad
TSMP707  Memento Dye Ink Pad - Bamboo Leaves
TSMP704  Memento Dye Ink Pad - New Sprout
273900  Zip Dry Glue


Other Products Used:  denim canvas, electronic die cutting machine, Silhouette Design Store Design ID #56870, BigShot manual die cutting machine, VersaColor Pine Cone ink, VersaFine Black ink, Finnabair Texture Paste - Crackled Platinum, Rangers Crackle Accents, assorted fabric washi tapes, burlap ribbon, burlap accents, green ribbon, 2 vintage style buttons, My Hueys Spray - Manila, Tim Holtz Distress Tool, blue card stock, green card stock,  glue gun, scissors, scor tape, Elmer's Spray Adhesive, Tim Holtz Distress Crackle Paint - Clear Rock Candy, Tim Holtz Burlap Stencil, craft spatula, Ranger Distress Ink Tool, 3D pop dots, finger sponge daubers, water, mist bottle, paint brush, Diamond Stickles, Stampin Up Basic Black ink, Tim Holtz Distress Ink - Festive Berries & Worn Lipstick, Tim Holtz Distress Stain - Pumice Stone, dollar store seed beads

Begin by locating the two 12"x12" papers from the paper collection shown.  Starting with the main front paper, stamp the corner poppy image in the top corner opposite the pre printed image in a green colored ink.  Using the small poppy stamp in the Poppy Filler Cling Stamp Set, stamp several around the outer edges where you would like to add some interest...ink lightly as you do not want a heavy image but rather want it to appear being printed lightly on the paper.  Remove cap from your Mr. Huey's spray mist and allow droplets to fall over the page where they land.  Using your crackle texture paste and burlap stencil, apply where you would like to have some dimension on the piece.  While texture paste is drying, cut sentiment with your electronic die cutting machine.  Moving along to the second 12"x12" page you've selected, rough up all edges using a distress tool allowing some areas to rip.  Once happy with edges, begin inking with a brown colored ink and the ink distress tool  to achieve an aged look.  Repeat for the other page as well.  Centre the background page on the canvas and adhere using a spray adhesive.  Adhere the burlap strip ribbon to the background page as shown using spray adhesive.  Mount the second page to the background paper at a slight angle.  Once again with spray adhesive, adhere sentiment to canvas.  Locate the matching paper in the paper collection to that of the front 12"x12" page.  Fussy cut pocket and appy to canvas over pre printed image using 3D pop dots.  Fussy cut several poppy and leaf images from the page you've just cut the second pocket image from.  Using pop dots apply to canvas so they appear to be growing out of the pocket.  Using black ink, stamp several of the Blazing Poppy Petals Cling Stamp Set as well as the leaves from the Delightful Daisy Cling Stamp Set.  Using several shades of red, ink the poppies using a finger dauber.  Ink a slight amount of black ink on each centre.  Use a small spray of water and your flower shaping tool kit to shape each flower and assemble.  Once you have assembled all of the flowers you wish to use, paint each flower with the clear Distress Crackle Paint and allow to dry. Once dry, paint with a thin coat of Pumice Stone distress stain and adhere seed beads to each centre.   Ink leaves using a light green ink for the centres, and then a darker green ink around the edges.  Once again using a small spritz of water and your shaping tools, shape leaves.  Using a spray adhesive apply a small burlap ribbon strip to the bottom corner of the canvas under the pre printed image.  Arrange your flowers and leaves on the canvas, and once happy with the arrangement adhere to canvas.  Cut a few very thin strips of green card stock and curl using a scissor and add among flowers to appear as decorative grass.  Add some fabric washi tape as shown.  Create a loopy burlap bow as well as a small loopy green bow and tie together.  Adhere to the top corner of the canvas using a glue gun.  Also adhere a vintage button to the centre of the bow as well as the pocket. Fussy cut a butterfly from the paper collection and bend slightly in the centre.  Adhere to canvas and with finger tip add some stickles.  Lastly, cover your sentiment with clear Crackle Accents and allow to dry.   You now have a pretty country style canvas to give to a special someone or to hang in your own porch or sunroom!  Enjoy!

This project has been shared in the following challenges...
Inky Impressions..."Summertime"
Whimsy Stamps..."Use Ribbon, Lace or Twine"
Crafting By Designs..."Summertime Fun"
Crafty Sentiments Designs..."Anything Goes"
Crafting Musketeers..."Shades of Summer"
Live & Love Crafts..."In the Garden"


Heartfelt Creations "Blazing Poppy" Collection Release

Hello!
It's an exciting Wednesday today as it's new release day over at Heartfelt Creations!
Don't you just look forward to new release time?  I know I sure do...it's thrilling to see what the talented artists dream up!  You can always count on it being amazing!

Today's new release is the "Blazing Poppies" collection.
Here's a little more about the collection...

Has the humdrum of the daily grind sapped your energy and stunted your creative mojo?  Rejuvenate your creativity with the saturated colors and resplendent artwork of the Blazing Poppies Collection of stamps, dies and designer papers from Heartfelt Creations.  Escape to verdant fields where dancing poppies sway like ballerinas wearing dramatic hues of blush, coral, peach, scarlet and ebony.  Let this glorious canvas of flowing script, heirloom lace, ornate flourishes, flower laden arbors, bold stripes and soft neutral backgrounds enliven your senses and awaken your inner Van Gogh.  The Blazing Poppy stamp and die allows you to fashion bold, life-like poppies in every size and color.  You'll design museum worthy backgrounds, card focals, layouts and home décor with the sumptuous stamps and paper collection.  Create your own masterpiece, and spark your imagination with the amazing artistry and uncommon brilliance of Blazing Poppies.

To me the poppy is such a simple but elegant flower.  I wanted to make something to reflect this and came across another SVG cutting file I just couldn't pass up!

How about a beautiful violin gift box with some beautiful poppies adorning it....


I chose to do a copper, cream and black color scheme for the gift box as I just loved the softness of the light colored paper in the collection and felt that copper would be the perfect color to lend some elegance to the creation. A few stampings of the beautiful poppy stamp sets in a similar color tone were perfect to draw attention to the side of the violin that would not be holding any flowers. 

The poppies have been created using the same colored paper from the collection and heat embossed with copper embossing powder. 

Here's a closer peek at the poppies...


I found some metal bees in my stash that I had purchased at Walmart some time ago and decided to give them a touch of copper as well using Ferros paint.  I love how they turned out!
A few sequins in the same copper colored tone family and an elegant black bow were the perfect finishing touches to the box.  
(You can find more detailed instructions at the end of this blog post.)

I'd love to know what you think about this project!
Please don't be shy and feel free to leave me a comment!

I hope you've found some inspiration here today.  There are many more beautiful projects over on the Heartfelt Creations blog...so be sure to stop by and check out the wonderful designs the other design team members have dreamed up to inspire you!  While you're there maybe pop by the online store and pick up that "I Want it All Kit"...you know they've all been selling out early and you won't want to miss this one!

Until next time...

Project Supplies & Instructions
                      Blazing Poppy Paper Collection
HCPC3677  Blazing Poppy Stems Cling Stamp Set
HCPC3674  Blazing Poppy Petals Cling Stamp Set
HCD1-764  Blazing Poppy Die
HCST1-401  Deluxe Flower Shaping Kit
TSMP804  Memento Dye Ink - Desert Sand
273900  Zip Dry Glue

Other Products Used:  copper crafting wire, Ferros Metallic Paint - Copper,  sequins, brads, black ribbon, copper embossing powder, metal bee embellishments, scor tape, BigShot die cutting machine, heat tool, SVG cut file, Silhouette Cameo electronic die cutting machine,  VersaColor Pine Cone Ink, hot glue gun, VersaFine Black ink, water mister bottle, water

Begin by choosing the color scheme from the paper collection that you wish to use.  Load your cut file and using your electronic die cutting machine, cut pieces in the color you wish to create them in.  Locate your top piece to the violin and stamp both of the images in the Blazing Poppy Cling Stamp Set along one side of the violin in a color just slightly darker than that of the paper.  Ink all pieces of the violin using a brown colored ink.  Choose the sentiment strip from the paper collection that you wish to use along the top of the lid.  Cut both of the matching sentiment strips as you will need two to go around the box.  Ink both using a brown colored ink.  Assemble the gift box as per instructions provided with the SVG cutting file.  Adhere sentiment strips all the way around the top lid.  Measure out wire for strings and using a hot glue gun adhere them to the violin.  Leave a little excess wire over the neck end so you are able to put curls into the strings when finished drying in place.  Wrap a large section of wire around the glued area on the neck of the instrument to hide your mechanics.  Next adhere the three brads to the bottom of the box.  I've snipped the back prongs off of the brads and just adhered them with a glue gun.  Do the same for the brads on the top of the neck of the violin.  Next stamp several stampings of the Poppy Petals Cling Stamp Set.  Apply copper embossing powder and heat emboss using a heat tool.  Die cut using coordinating die.  Using your flower shaping tools and a spritz of water, shape flowers. Arrange flowers along the opposite side of the stamped images and a few on the neck of the violin.  Create you bow and adhere to box.  Next adhere flowers after you are happy with the arrangement.  Adhere a few sequins where desired.  Lastly, cover metal bees using Ferros metal paint.  Allow to dry and add to flower clusters where desired.  You are now ready to gift a special music lover a beautiful gift box with the contents of your choice. 

Countryside Evening Any Occasion Card

Welcome back!
I'm here today with a second Heartfelt Creations post for the week!
I just couldn't resist making a card with the Countryside Evening paper collection paired with the gorgeous fuchsia flowers!

The Countryside Evening paper collection is one that I love love love...well I love love love each and every one of the collections...but this is one that I hoard and hate to cut into!  LOL  I love the colors of the papers and decided that they would be perfect paired up with fuchsias on a celebration card for any occasion!  
After all, we can never have too many any occasion cards tucked away for those special moments that tend to creep up on us!

Let's take a look at the card I created by pairing these two collections together...


I decided to go with a little bit of a different color theme for the fuchsia which is so out of my comfort zone...I tend to stick to the colors of the real flower for some reason.  But I do have to admit that they came out with an interesting look...


The flowers were stamped on a blue paper from the Countryside Evening collection and then inked lightly with a purplish color.  The "cap" to the flower as well as the stamens have been inked slightly with a blue ink.  I've then added some Vintage Photo Stickles to the edges of the petals as well as a dot to the bottom of each stamen.  Sorry the picture isn't the best...I did find this one hard to photograph as the colors are all so monochromatic. 

I've added some golden colored rhinestones around the sentiment as well as around the leafy areas to add some extra sparkle and interest.  I've also used some lace type ribbon to keep with a more country feel...as well as some gold twine to bring a touch of glamor.  I've fussy cut the small bird from one of the pre made card panels in the paper collection.  And, doesn't that decorative oval die cut look beautiful paired up with the pretty lace design printed on the paper.  The last bit I wanted to point out is the background behind the decorative oval...to tie in the fuchsia theme, I've stamped the Fuchsia Spray Cling Stamp Set in navy ink.  It's hard to see in the picture, but it gives the card just a little extra interest.  
Here's a little closer look...it's just such a subtle detail...


Well, I hope you've enjoyed what I shared with you today!
Heartfelt Creations makes it so easy to mix and match all of their different collections!
Remember that next week brings a new release!  Have you seen the previews of the Blazing Poppies Collection?  It's another one you won't want to miss!

Until next time...
Project Supplies & Instructions 
HCDP1-229  Countryside Evening Paper Collection
HCPC-3670  Fuchsia Spray Cling Stamp Set
HCPC-3668  Cascading Fuchsia Cling Stamp Set
HCPC-3673  Heartfelt Sentiments Cling Stamp Set
HCPC-3545  Open Leaf Cling Stamp Set
HCD1-762  Decorative Oval Die
HCD1-763  Cascading Fuchsia Die
HCD2-752  Cut Mat Create 2B Die
HCD1-736  Classic Leaf Die
HCST1-401  Deluxe Flower Shaping Kit
TSMP608  Memento Dye Ink Pad - Paris Dusk
TSMP607  Memento Dye Ink Pad - Nautical Blue
TSMP804  Memento Dye Ink Pad - Desert Sand
SMP001  Stamp Mat Pad
359848  Spellbinders Tool N' One
273900  Zip Dry Glue

Other Products Used:  white card stock, Spellbinders Classic Ovals Set (LG), lace ribbon, gold cord, VersaFine black ink, Memento Ink - Sweet Plum, VersaColor Pine Cone ink, BigShot die cutting machine,  scissors, gold colored gems, washi tape for masking, Elmer's spray adhesive, water, mister bottle, Vintage Photo Stickles, Ranger sponge ink tool

Cut a piece of white card stock measuring 41/4" x 12" and fold in half to create your card base.  Locate the background paper shown here in the paper collection and cut to cover card base.  Mask off any area on the card base you do not wish to have any image stamped over.  Using Paris Dusk Memento color, ink the Fuchsia Spray Cling Stamp Set, and create a patterned background in the open area of the paper.  Ink all edges of the card front with a light brown ink.  Using a light cream patterned paper from the paper collection and a manual die cutting machine, cut a decorative oval.  Next, locate the oval image shown which is part of a smaller premade card panel.  Die cut the oval image using the Spellbinders oval die. Ink around the oval with a light brown ink.   Using the same paper you cut the decorative oval, trace the Spellbinders oval die you just used around the outside of the die to create a mat for the oval image.  Once again ink with a light brown color.  Adhere both ovals together.  Using the Nautical Blue Memento ink, stamp the sentiment of your choice.  Adhere card front to the card base.  Using a spray adhesive apply the decorative oval to the card base.  Next adhere the matted oval to the card as shown.  Choose a lighter blue paper from the paper collection and stamp your fuchsia images.  Lightly ink the flower portion with a soft purple in some areas and a light cream colored ink in others with ink tool.  Ink the stamen and flower tops with a blue colored ink.  Die cut the flowers with the coordinating die.  Shape flowers, one in each size.  Next, using the same blue paper, stamp several of each of the stamps in the Open Leaf Cling Stamp Set.  Die cut using the coordinating die and shape as desired.  Lastly, using a darker green paper from the paper collection die cut one vining corner from the Cut Mat Create 2B die.  Snip into pieces.  Begin by placing your leaves around the sentiment oval as well as positioning your flowers where you would like them to be.  Once happy with placement adhere to card, filling in more leaves as needed.  Create loopy bow and attach as shown.  Take snipped pieces of the vines and add where desired within the leaves.  Lastly add gold tone gems as desired.  For the finishing touch add some stickles to the tips of petals on the flowers as well as to the bottom of the stamens.  You now have an any occasion card ready for that next special event...whether it be a wedding, anniversary, or birthday!

Wedding Presentation Box

Have you ever walked through the dollar store and found something that you were drawn to and felt you needed to alter it to give it some extra pizazz?  That's exactly what I thought as I was walking through the small bridal section and spotted a gift presentation box set.  The set contained three small jewelry sized boxes and just sat there begging to be fancied up a bit!

Well...and since it's another Heartfelt Creations Wednesday today...you know where I'm going with this don't you!  LOL
You can make anything pretty with the Heartfelt Creations touch!
So I set about to giving one of those sad white little boxes a new lease on life...a little tissue paper, embossing powder, some fantastic die cuts and flowers....

...and voila...


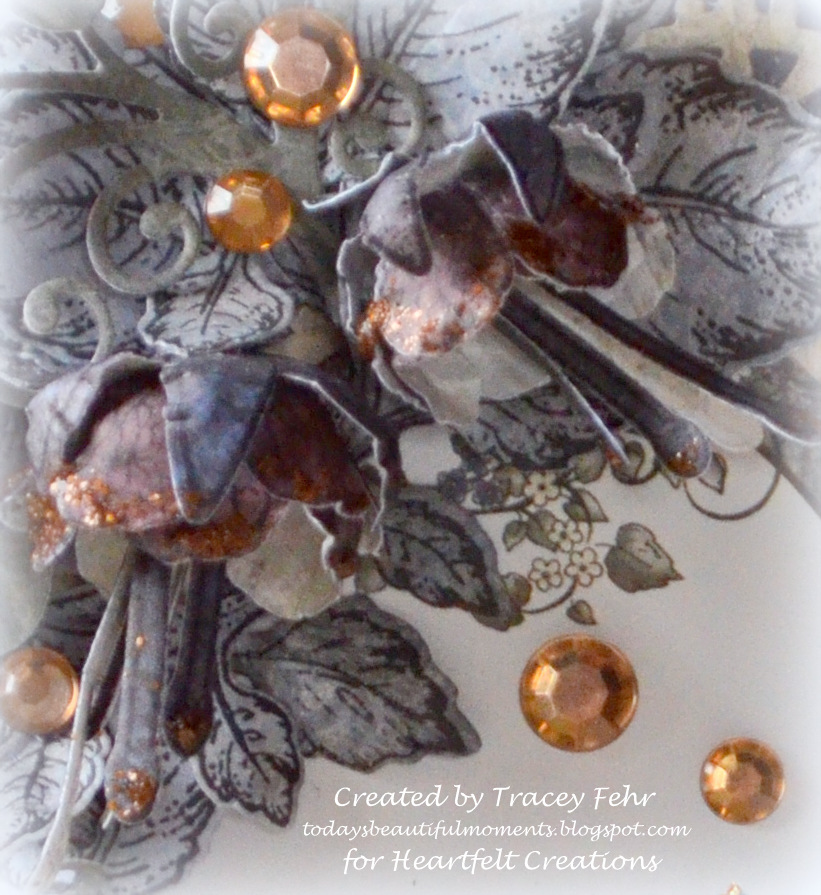
I decided to go with a lace and rose theme for this creation.
(Stick with me and I'll share a quick tutorial with you on how I achieved that lace look on the box with tissue paper, stamped images and heat embossing!)
Wedding season is just around the corner and I thought it would be great to create something a little different for your presentation cheque or gift card.

Believe it or not, most of this project has been created with the "Cascading Fuchsia" collection.  The "I Want it All Kit" has sold out, however you can still grab all these fabulous items individually.  The gorgeous decorative oval die is an absolute must have...it's so elegant!  And, the fuchsia stamps and dies are ones that you will never be sorry you have in your collection.  The roses on this gift box have actually been created with the fuchsia stamps and dies!  (I've included a link to a Heartfelt tutorial on shaping roses in my instructions at the end of this blog post...and while the die may be different...the technique is the same!) 

Here's a close up look at the roses...


I love how the white embossing powder pulls out the veining in the fuchsia stamp and makes them look so elegant!  And a touch of tulle and some pearls were just the perfect finishing bridal elements!

Now, I promised you a quick tutorial on how I achieved that look of lace on the box...it's not a new technique by any means...but it's pretty quick and simple but looks fantastic once it's done!
I so wish I'd had time to work on a matching card, because this technique would look so awesome on a matching card as well.

On with the tutorial..

Cut your tissue paper a bit larger than the size of the lid you're wishing to cover.  Make sure you have enough to wrap around all sides both inside and outside.  Using a white ink, stamp the fuchsia image onto the tissue paper...sprinkle with embossing powder and heat emboss.  Then repeat as many times as necessary to fill the background of your tissue paper.

Here's a photo of what your finished tissue paper will look like...


...next you will need to crumple this tissue paper up ...that's what gives you the beautiful texture later when you apply the tissue paper to the box...


....next you'll have to reopen the tissue paper gently, being careful to resist the urge to smooth it out...you'll want all those wrinkles...


You are now ready to apply the tissue paper with Modge Podge and a foam brush...you will just need a thin layer of the glue...


...begin with applying Modge Podge to just the top of the box and set your tissue paper onto the glue.  Try not to smooth out the paper, but rather pat it down so you keep the creases in the paper.


 Make sure that it is adhered everywhere and then move along to the long outside edges of the box. Moving along to the short ends, tuck the corners in as you do when wrapping a present and then add a touch more glue over the folds and adhere the tissue paper.  If your tissue is uneven now when you have all the outer sides covered, trim so the tissue is basically the same length all the way around.  This will leave you with the neatest finish inside the box as possible.  Again, starting with the longest sides on the inside, apply glue and then adhere tissue to sides.  Proceed with all edges.  Now, I had a bit of glue squish onto the bottom of the inside, so I cut a piece of white card stock just slightly smaller than the size of the lid and then adhered it to the in
side of the lid to cover up any glue overage that may appear. 

You now have a pretty, lace look gift box that you can embellish any way you choose...for really any occasion you choose!


Thanks so much for stopping by!
I hope I've been able to inspire you today!
For more fantastic inspiration, be sure to visit the Heartfelt Creations blog!

And...psssttt...I have another Heartfelt Creations blog post coming tomorrow featuring another any occasion card!  So stay tuned!

Until next time...

Project Supplies and Instructions
HCPC-3671  Fuchsia Clusters Cling Stamp Set
HCPC-3668  Cascading Fuchsia Cling Stamp Set
HCD1-763  Cascading Fuchsia Die
HCD1-762  Decorative Oval Die
HCPC-3651  Botanical Rose Cling Stamp Set
HCD1-758  Botanical Wings Die
HCD2-752  Cut Mat Create 2B Die
HCST1-401  Deluxe Flower Shaping Kit
SMP001  Stamp Mat Pad
273900  Zip Dry Glue
159723  Art Institute Glue - Dries Clear
352854  Art Institute - Metal Glue Tip

Other Products Used:  small gift box, Stampin Up White ink, Zing white embossing powder, Modge Podge, white tissue paper, white card stock, Stampin Up pearls, BigShot die cutting machine, heat tool, white tule, sponge paint brush, water, water mist bottle, Elmer's Spray adhesive

Cut a piece of white tissue paper larger than the box cover you will be covering.  Starting at the edge of the tissue paper begin stamping the chosen image (I have used the swirl fuchsia image from the Fuchsia Clusters Cling Stamp Set) onto the tissue paper with white ink.  Once you have stamped the image, cover with white embossing powder, shake off and then heat emboss.  Repeat this step until you have your pattern completely covering the tissue paper. Next, crumple tissue paper into a ball.  Straighten out slightly, however do not smooth our wrinkles.  Apply a thin layer of Modge Podge to the top of the box cover and adhere the patterned tissue paper over top making sure to have enough overhang to cover the outer and inner edges.  Next adhere Modge Podge to the longest sides of the box and adhere tissue paper.  For the shorter edges of the box, apply Modge Podge to the sides and fold tissue paper edges as though you were gift wrapping a present.  Trim overhang tissue paper to be close to the same size as possible all around the box for as clean a look as possible for the inner edges of the box.  Apply Modge Podge to each edge and fold tissue paper inside.  Measure the dimensions of your gift box and cut a small white piece of cardstock slightly smaller than the measurement.  Adhere this piece of card stock to the inside top of the box to hide any messy mechanics that may have happened during brushing on the Modge Podge.  Set aside cover to dry completely.  Next using a manual die cutting machine cut one decorative oval.  Using a spray adhesive, apply to top cover of gift box.  Die cut two vining floral corners from the Cut Mat Create 2B die and apply one full die cut to one corner and set aside the second die cut to use later.  Stamp the Cascading Fuchsia cling stamp set several times and heat emboss with white embossing powder.  Die cut using the Cascading Fuchsia die.  Using the Deluxe Flower shaping kit along with some water mist, create three roses varying in size.  For a tutorial on shaping roses please see here.  Adhere a small piece of tulle to the corner where you have already applied the vining corner.  Adhere two roses among the tulle.  Going back to the second vining corner die cut, using a scissor, trim into smaller sections.  Adhere the third rose to the opposite corner of the floral cluster.  Adhere the smaller vining sections around the single rose.  Using white ink, stamp the two leaves from the Botanical Rose Cling Stamp Set, and once again heat emboss using white embossing powder.  Add leaves to the floral cluster.  Lastly, add small pearls to the centre of each intricate design in the decorative oval and larger pearls to each of the flower centres in the vining die cuts.  Bring on the wedding season...your presentation is sure to stand out in this beautiful gift box which will be treasured for years.   

Thanks for visiting!

Thanks for visiting!