Welcome!
I'm so glad you've stopped by today!
It's another Heartfelt Creations Wednesday, and today I have a project to share with you that I created with the Patchwork Daisy Collection!
Did you know that the Patchwork Daisy Collection and previously released Buttons and Blooms Collection pair together perfectly! They both have those charming patterned daisies which are just adorable!
I opted to use the new border dies within the Patchwork Daisy Collection. I chose to snip it apart to use it as a free standing embellishment. As I was working with the dies, I decided that it might be fun to create a background with them...and throw in the lace like accent from the Sweetheart Borders Die.
...here's how that background came together...
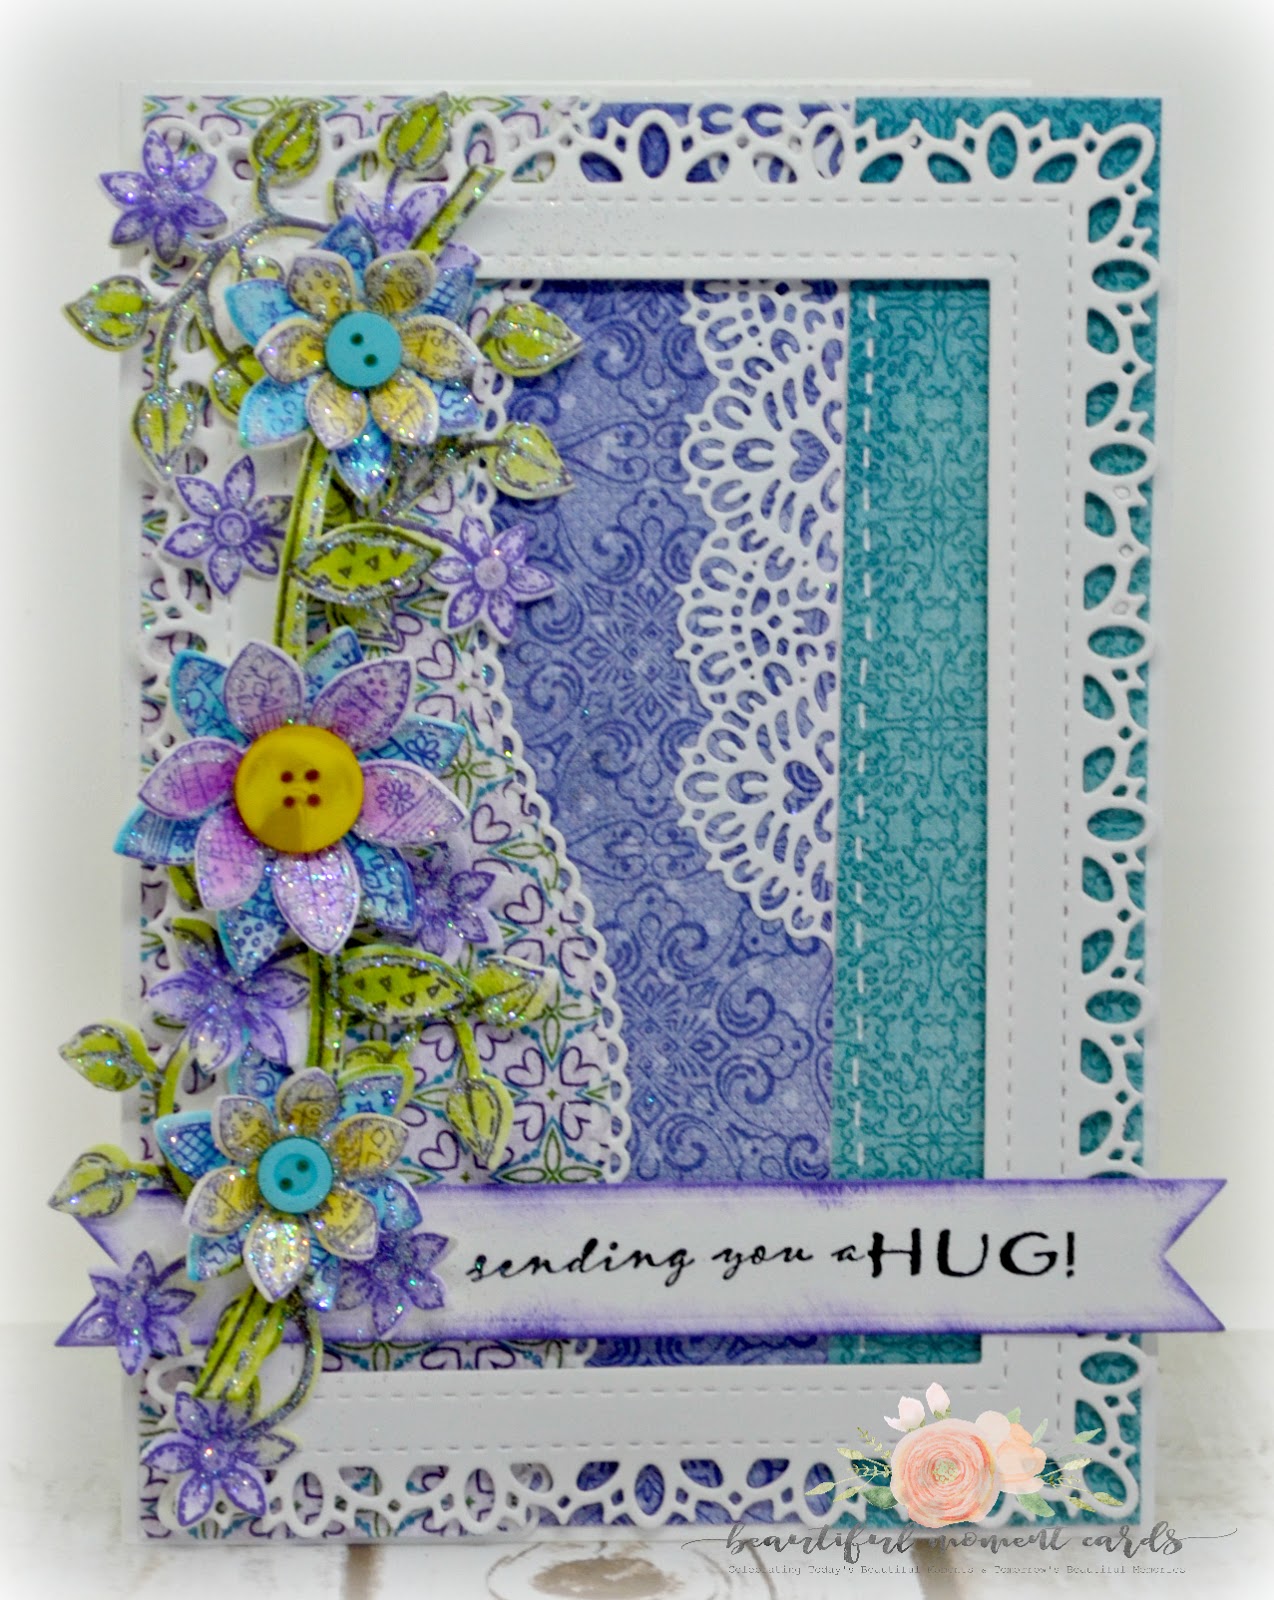
I chose to use the outer frame portion from the Intricate Swirl Frames Die to frame up the background. I popped the frame up off of the card front with some foam tape. I then die cut the sentiment banner from the Arrows and Banner Die, stamped the sentiment and then inked the edges of the banner with Ranger Archival Ink Pad - Deep Purple. I adhered the sentiment strip to the card base using dimensional foam tape.
I stamped all of the floral images onto white card stock using Ranger Archival Ink - Deep Purple. Using my Stack and Store Daubers, I colored all of the images as seen above. I die cut the images using the coordinating dies, and then did a little bit of shaping with my Deluxe Flower Shaping Kit. I assembled the floral cluster as shown. (For more detailed instructions, please see end of blog post.)
I stamped all of the floral images onto white card stock using Ranger Archival Ink - Deep Purple. Using my Stack and Store Daubers, I colored all of the images as seen above. I die cut the images using the coordinating dies, and then did a little bit of shaping with my Deluxe Flower Shaping Kit. I assembled the floral cluster as shown. (For more detailed instructions, please see end of blog post.)
...here's a closer peek at the papers I've used to create this project, as well as the pretty patterned flowers...

As my last and final step I used a designer dries clear adhesive to apply glitter to all of the leaves, flower petals and daisy flourishes!
I was pleased with how this card turned out...and I hope that you have been inspired to create your own backgrounds using decorative papers.
Be sure to check out the Heartfelt Creations blog to take in the rest of the creative projects the design team have designed for your inspiration!
Until next time...

Other Products Used: white
card stock, paper trimmer, white gel pen, assorted buttons, scissors, foam tape
For more tips on creating
with the Patchwork Daisy collection, watch the tutorial at https://youtu.be/v5BEpcSlmoI.
Create a card base from
white card stock measuring 5” x 7”. Next select the patterned papers you wish
to use in your background. Die cut a curved eyelet edge onto one larger piece
of paper using the Eyelet Border Basics Die. Next, measure out the approximate
sizes you will need for the other two layering pieces, both will remain having
straight edges.
Die cut an eyelet trim
border piece from white card stock that coordinates with curve of the piece of
patterned paper. Adhere it to the back of the patterned piece as a second
eyelet layer using dries clear adhesive as shown.
Die cut the lace like
accent piece from the Sweetheart Borders Die from white cardstock. Trim down to
the size you wish to use as accent on background. Adhere to back of layering
piece using a dries clear adhesive as shown.
Adhere your layering
pieces to the card base as shown, beginning with the center most section so the
other die cut accents overlap.
From white card stock, die
cut the large frame from the Intricate Swirls Frame Die, and one banner from
the Arrows and Banner Die. Using Ranger Archival Ink Pad – Jet Black, stamp
sentiment found in the Cheerful Note Sentiments Cling Stamp Set. Using Stack
and Store Dauber, ink all edges of banner using Ranger Archival Ink Pad – Deep
Purple.
Using a dimensional foam
or pop dots, adhere frame and sentiment banner to card front as shown.
Stamp one inking of each
of the illustrations found in the Patchwork Daisy Border Cling Stamp Set, onto
white card stock using Ranger Archival Ink – Deep Purple. Color leaves on all
stamped images using Stack and Store Daubers and Ranger Archival Ink – Leaf
Green. Color daisies on large border die cut using Stack and Store Daubers and
Ranger Archival Ink – Forget-Me-Not. Color smaller daisy flourish flowers using
Ranger Archival Ink – Deep Purple. Die cut all images using coordinating dies.
For large daisy border embellishment, using a scissor, snip entire border free
so you have a free standing embellishment. Shape all embellishments slightly
using Deluxe Flower Shaping Kit.
Stamp one inking of the
mid sized and smaller daisies found in the Buttons and Blooms Cling Stamp Set,
onto white card stock using Ranger Archival Ink – Deep Purple. Color two
smaller blossoms using Ranger Archival Ink – Buttercup, and one mid sized
flower using Ranger Archival Ink – Cactus Flower. Die cut using coordinating
dies, and shape slightly in the center using your Deluxe Flower Shaping Kit.
Adhere smaller daisy
flourish to top of card front, and larger flourish to bottom. Adhere daisy
border die overtop as shown. Layer small yellow daisy flowers over daisy images
on top and bottom of border, and the larger pink flower in center.
Using a dries clear glue,
apply glitter to all leaves and petals. Lastly, using a white gel pen, add
stitching to straight background panel as shown.


