Take Time to Relax...

Hello and a Big Warm Welcome!
Most of the craziness of the Christmas season has passed and now it's time to take a little time to relax!  I hope you had a wonderful holiday season!
We landed up not having to dream of a white Christmas...we received a beautiful dumping just before and it really did help with the holiday spirit!  I hope Santa was good to you and you received a little crafty stash among other things!  I also hope you took some time to think about the real reason that we celebrate Christmas...to remember the best gift mankind has ever been given!

It's hard to believe that this year is coming to a close so quickly!  This is probably my last blog post for 2015!  Wow!  Where does the time go?

For this week's Heartfelt Creations project, I decided to create an interactive gift card holder using one of the flip fold album pieces as well as a pocket from the album collection.  

Here's a look at how the card looks when it's closed and bundled with a stretchy ribbon belly band...


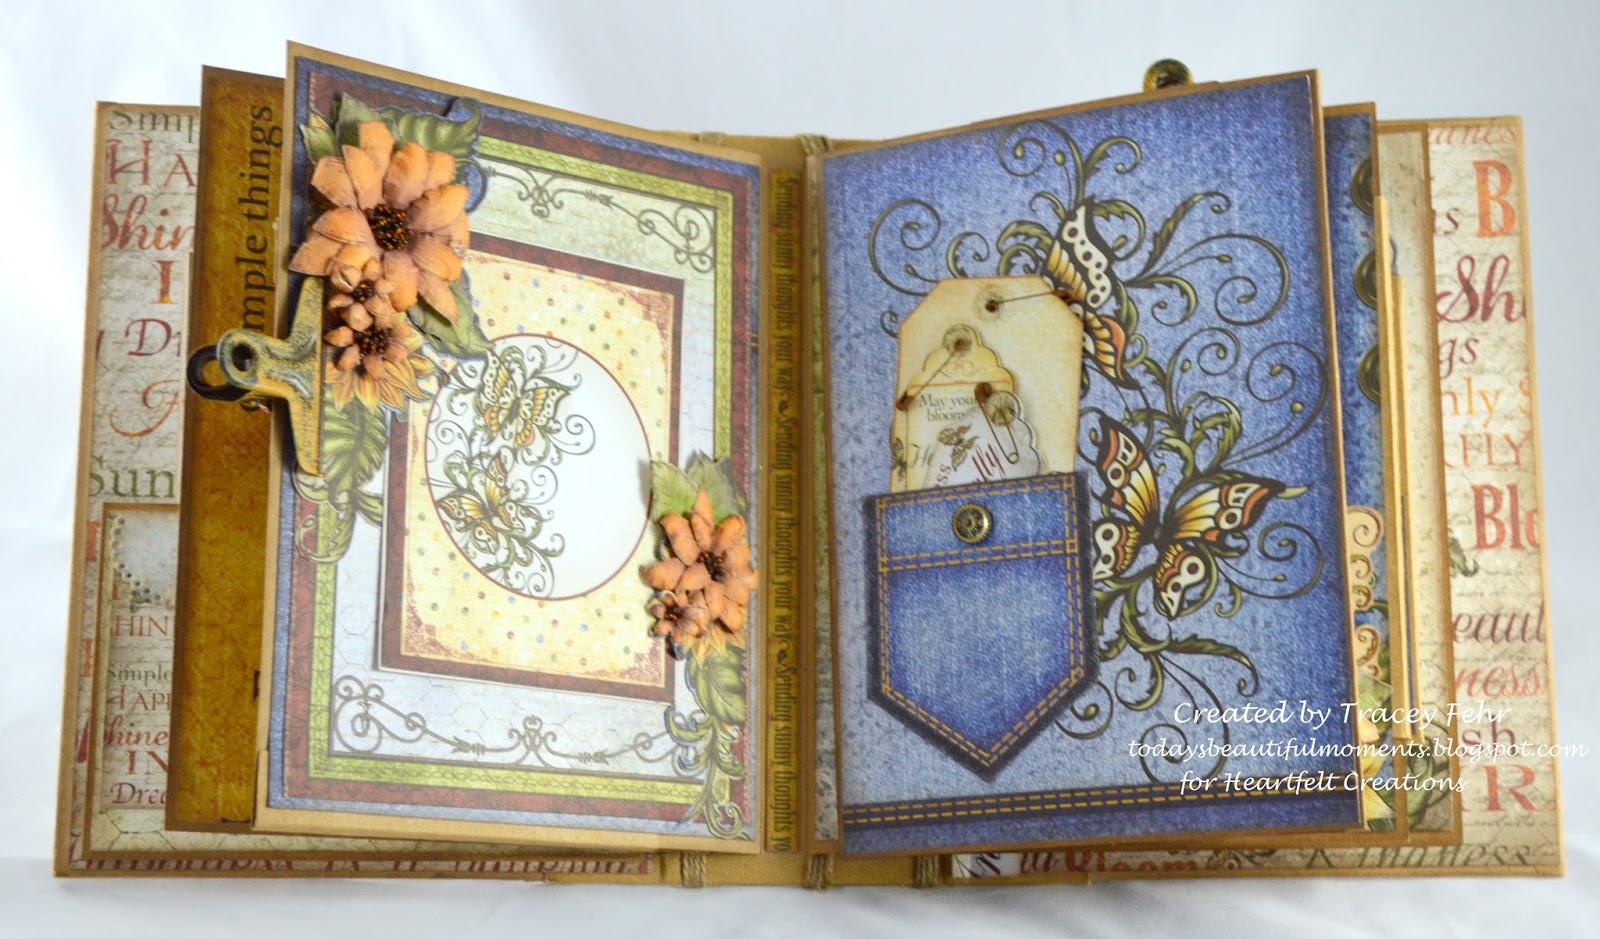
...and here's a peek at the card completely open...


I decided to use one of the pockets in the flip fold album collection to create the gift card holder part of this creation.  I've added a magnetic closure with a faux button closure on the front.  (If you're wondering how to add the magnet, please see the instructions below for a video tutorial.)

Here's a closer look at the pocket...


I've added the steaming "Enjoy" die cut sentiment to the coffee cup setting on the card image and then added some Stickles to give it a shine.  I've also added a stamped image of the smaller coffee cup to the page on the right, along with the small spoon.  I've used Stickles on the spoon as well.
On the left hand page, I've used one of the essential borders dies to frame the paper.

Moving along to the other fold out portions of the card...


I've stamped the medium sized coffee cup image along with the large whipped topping image.  I've colored it, and then added the whipped topping to create a small note card to accompany the gift card.  I've used another one of the essential borders die to hold the card in place.  

And, there you have my project for this week!
I hope you've been inspired and have been encouraged to use the flip fold album inserts for interesting and one of a kind cards as well.
Be sure to stop by the Heartfelt Creations blog as well to see the other amazing creations the team have "brewed" up for you!

Until next time...

Project Supplies and Instructions
HCDP1-261  Coffee Talk Paper Collection
HCPC-3709  Coffee Talk Cling Stamp Set
HCPC-3711  Latte Art Cling Stamp Set
HCD1-782  Coffee Talk Die
HCPC-3651  Botanical Rose Cling Stamp Set
HCD1-758  Botanical Wings Die
HCD1-783  Border Essentials Die
HCD1-779  Regal Borders and Pockets Die
HCFP1-433-3  Pocket and Flip Fold Inserts A - Kraft
HCFP1-434-3  Pocket and flip Fold Inserts B - Kraft
HCST1-401  Deluxe Flower Shaping Kit
SMP001  Stamp Mat Pad
TSMP805  Memento Dye Ink Pad - Toffee Crunch
TSMP704  Memento Dye Ink Pad - New Sprout
TSMP604  Memento Dye Ink Pad - Summer Sky
TSMP607  Memento Dye Ink Pad - Nautical Blue
159723  Art Institute Glue - Dries Clear
352854  Metal Glue Tip - Art Institute

Other Products Used:  VersaColor Pine Cone Ink, VersaFine Black Ink, scor tape, scissors, paper trimmer, ruffled  elastic ribbon, Distress Ink - Antique Linen & Vintage Photo, Distress Markers - Scattered Straw, Iced Spruce & Vintage Photo,  Stickles - Diamond,  distress ink tool, BigShot die cutting machine, white card stock, water, spritz bottle

For a full tutorial on how to add a magnet to your creation please see video here

For a full tutorial on how to shape the Botanical Rose, please see video here

Open the long flip fold insert and begin by die cutting both ends of the flip fold insert using one of the long die edges in the Regal Borders and Pockets Die set, making sure that the ends are cut so they will match up when closed.  Choose the patterned papers that you wish to use in the project from the paper collection, or as shown.  Measure and cut the papers for the panels that need to have the edges die cut to match the die cut edges on the card.  Measure the remaining panels and cut papers chosen to correct size.  Ink all edges on each of the pieces using a brown colored ink.  Adhere all pieces to card base.   Next add magnet to small gift card holder pocket.  Measure, cut and adhere papers to pocket. Adhere pocket to card base.   Using white card stock and black ink, stamp one inking of the spoon, coffee cup, small coffee cup, Enjoy sentiment and large whipped topping image. Using distress markers color details on cups and topping image.  Add base color using a distress tool or finger dauber to all images.  Die cut using coordinating dies.  Using a scissor, or sharp craft knife, cut a slit in the medium sized coffee cup and insert whipped topping to create a little note card.  Adhere sentiment, spoon, and small coffee cup as shown.   Lastly apply Stickles to whipped topping, sentiment, spoon and spoon and tie together using a ruffled elastic ribbon. Stamp one inking of the Botanical Rose stamp and one inking of the leaves using a dark blue ink.  Using sponge daubers, ink the centers of the flowers using a light beige ink, and the outer portions of the petals using a light blue ink.  Cut using the coordinating die, shape flowers using the flower shaping kit along with a spritz of water. Create one rose blossom using all of the flower die cuts.  Ink leaves with a light green ink and cut using coordinating die.  Shape using deluxe flower shaping kit and a spritz of water.  Adhere rose and leaves to ribbon as shown. Remove the ribbon belly band from the card and allow to dry separately so it will not stick to the background paper. Add gift card. 

This card has been entered in the following challenges...
Allsorts Challenge Blog..."Anything But Christmas"

Tidings of Comfort & Joy...

Welcome!
I'm so glad you've had a chance to pop by my blog today, just before Christmas!
We're just a few days away...are you ready?
I have to admit that I'm looking forward to slowing down a bit over the holiday season and having a bit of a less hectic schedule. 

Seeing it's Wednesday...you know what that means!
It's a Heartfelt Creations posting day!

I decided to post a Christmas card that I created for classes that I taught in November.  
You may have caught a glimpse of it in the class advertisement.
I decided that I would share it on the Heartfelt Creations blog and share the instructions with everyone as well...you never know if you all of a sudden have a last minute card to create because someone was accidentally forgotten.  

Here's a peek at the card...


This is a super fast card to make, and the addition of the glitter just brings it up a notch!
I've done some layering with pop dots to give it a touch of dimension as well.  

I've also completed the inside of this card.
Here's a peek on how it has been finished...


I've done some more layering with pop dots on the inside as well as some more glittering.  
I've added just a simple candle stamp impression to tie off the front and inside of the creation, and have still left some room for a handwritten holiday message.  

Well, that's all for me today!
I do hope you stop by the Heartfelt Creations blog to see some more wonderful creations made just for your viewing pleasure.

I hope you have a wonderful Christmas and are filled with God's peace and joy as we celebrate the birth of our Saviour...and all the best in the coming year!

Until next time...

Project Supplies and Instructions
HCDP1-256  Sparkling Poinsettia Paper Collection
HCPC-3681  Sparkling Poinsettia Candle Cling Stamp Set
HCPC-3679  Large Sparkling Poinsettia Cling Stamp Set
HCD1-765  Large Sparkling Poinsettia Die
HCST1-401  Deluxe Flower Shaping Kit
SMP001  Stamp Mat Pad
159723  Art Institute Glue - Dries Clear
352854  Metal Glue Tip - Art Institute
TSMP301  Memento Dye Ink Pad - Rhubarb Stalk
TSMP707  Memento Dye Ink Pad - Bamboo Leaves

Other Products Used:  BigShot die cutting machine, Distress Ink - Vintage Photo, white card stock, scissors, paper trimmer, VersaFine Black ink, VersaColor Pine Cone ink, 3D pop dots, sponge daubers, Spellbinders Die - Wonderful Locket, water, mist bottle, Glitter Ritz - Transparent Copper Kettle, Zig 2 Way Glue Pen, Glossy Accents, Stickles - Xmas Red, washi tape

For full instructions on how to shape the Sparkling Poinsettia flower, please see video here.

Create a white card stock base measuring 6" x 6".  Cut out the square premade card panel from the paper collection featuring the candle image as shown.  Using a black ink, stamp the sentiment from the Sparkling Poinsettia Candle Cling Stamp Set in the upper corner and set aside to dry.  Locate the red and white decorative strips in the paper collection and cut to fit across the top of the card as well as another piece for the bottom.  Fussy cut a straight strip of poinsettias and leaves from the paper collection.  Ink all edges of all pieces including the card front panel using a brown colored ink. Adhere strips to card panel. Die cut the Spellbinders Wonderful Locket die using white card stock, and adhere to bottom corner where poinsettia will be placed.    Adhere the fussy cut poinsettia images using 3D pop dots slightly off to the side of the candle image.  Adhere to card front.

Stamp one inking of the Large Poinsettia Cling Stamp Set onto white card stock using black ink.  Color using sponge daubers or distress ink tool using the Memento Rhubarb Stalk and Vintage Photo Distress inks until you have reached the desired color intensity.  Color the leaves in the same manner using  Memento Bamboo Leaves.  Die cut flower and leaves using the coordinating die.  Shape using a light spritz of water and your flower shaping tools.  Adhere flower and leaves over top the popped up poinsettia images and locket die cut . Using the Art Institute Glue - Dries Clear and the fine metal glue tip, run along the veins of the flower petals.  Sprinkle with Transparent Copper Kettle Glitter Ritz.  Using a Zig 2 Way Glue Pen, add a touch of adhesive onto the petals of the poinsettias printed onto the paper surrounding the candle. Sprinkle with Glitter Ritz.  Apply Glossy Accents to the dripping wax on the candle, and Xmas Red Stickles to the berries printed on the patterned paper and set aside to dry.

Inside of Card: Locate and cut out the square premade card panel featuring the triple poinsettia grouping running along the bottom. Ink all edges with a brown colored ink.  Mask off the area you do not wish to have your stamped image appear on with washi tape.  Using black ink, stamp the candle image off to the side in the white open space.  Set aside to dry.  Locate the decorative green and white strip as well as the Merry Christmas sentiment strip.  Trim to fit the inside card panel and ink all edges with brown colored ink. Adhere to card as shown.  Fussy cut one of the corner poinsettia images from the paper collection and ink all edges with the brown colored ink.  Adhere to top corner of card opposite candle image using 3D pop dots.  Adhere to card base.  Using the Zip 2 Way Glue Pen, apply some glue to various parts on the poinsettias on the card and sprinkle with Glitter Ritz.  Apply the Xmas Red Stickles to the berries printed on the designer paper.  Allow to dry.

The Perfect Blend, is Coffee With a Friend...

...and that includes you!
So, grab yourself a cuppa and join me in another Heartfelt Creations Wednesday post!

Have you fallen in love with the Coffee Talk Collection that was released last week?
Do you have some coffee lovers on your list that you will be creating projects for?

This week I tried to keep things a little more simple in my creating...
I'm not sure that it really worked out that way when you see how everything has been layered and die cut, but with a little patience and some good measuring I know you can recreate this easily!

Here's a peek at the front of my card for this week...


You can't see it in this photo, but this card has three layers on the front of it to give it a bunch of dimension.  The cup itself has been popped up off of the inside of the card, so I knew I needed a little extra layering on the front of the card to give it the appearance I wanted.  

Here's a look at the inside of the card...


I thought the coffee beans and the spoon on the inside were the perfect finishing touches.

Now, this is one of those cards that I would include a tiny note inside as I wouldn't want to write my message on the bottom of the cup to have it show through to the front.  I actually do this with a lot of my cards, simply because then the recipient can regift the card if they want to.  (I'd rather have someone regift than throw away!  LOL)

I do hope you'll hop on over to the Heartfelt Creations blog as well to see the other wonderful and imaginative creations the rest of the team have come out with this week.

Until next time...

Project Supplies & Instructions
HCDP1-261  Coffee Talk Paper Collection
HCPC-3712  The Perfect Blend Cling Stamp Set
HCPC-3709  Coffee Talk Cling Stamp Set
HCD1-782  Coffee Talk Die
HCD1-781  Coffee Mug Die
SMP001  Stamp Mat Pad
159723  Art Institute Glue - Dries Clear
352854  Metal Glue Tip - Art Institute
85-glitter  Crystal Ultrafine Transparent Glitter

Other Products Used:  white card stock, 3D pop dots, pearl embellishments, VersaFine Black ink,  VersaColor Pine Cone Ink, scissors, paper trimmer, pencil

For more ideas on how to use the Coffee Talk Collection, along with the Coffee Talk Cling Stamp Set and Die, please see video here.  https://www.youtube.com/watch?v=AlwXTnWu9q8

Begin with a white 5"x7" card base.  For the card front background, locate the coffee bean paper within the paper collection and cut  just slightly smaller than the card base. Ink all edges using a brown ink. Locate the decorative paper as shown on the inside of card, and cut two pieces just slightly smaller than the card base as well. Ink all edges using a brown ink.  Adhere one of the pieces to the inside of the card base on right side where coffee mug image will be placed.    Find  the large image of the coffee mug in the paper collection.  Cut using coordinating die. Using your manual die cutting machine and the coffee mug die, cut the mug die cut into the front of the card base.  Closing card front, mark off where the die cut coffee mug image that you've cut from the paper collection will appear on the inside of the card.  Adhere die cut coffee mug image to the center of the card on the inside using pop dots.  Using white card stock, cut a piece the same size as the card front.  Using the coffee mug die and a manual die cutting machine, cut out a cup shaped centre after marking where you want the cut to appear using the already cut card front as a guide.   Using 3D pop dots, adhere cut white card stock panel to the card front.  Repeat the same process once more using the coffee bean decorative paper background you cut earlier.  Adhere to card front using pop dots.  Stamp several inkings onto light colored patterned paper from the collection of the coffee beans image, one of the coffee ring sentiment, as well as one of the spoon using black ink.  Die cut spoon using coordinating die and adhere to inside of card using pop dots as shown.  Fussy cut sentiment image as well as all coffee beans.  Adhere sentiment to front of card.  Arrange some of the coffee beans on the front of the card around the sentiment area, as well as on the top opposite corner, layering them slightly overlapping to create a flat base and then adding a few using the pop dots to create a dimensional effect.  Adhere a few layered coffee beans at bottom of coffee mug base on inside of card.  Locate sentiment strip pictured and cut to fit inside of card as shown.   Adhere pearl embellishments to mug.  Lastly, using the Art Institute Glue - Dries Clear trace all decorative swirls on mug and then glitter using a transparent glitter.  Allow to dry. 

Confessions of a Busy Crafter...

Hi Everyone!
I'm just quickly popping in to share with you the Christmas cards that I've quickly put together to hand out this year!
Life has been super busy in the last little while, and I decided to try something new this year!
I have a confession to make...I went digital!
I almost feel like a failure as I usually hand create them.  However, this year has been so busy that I was actually considering purchasing my cards (*gasp* - I know!), until the beautiful "All is Calm" collection by Nitwit Collections came across my Facebook feed.  

I decided to use my Silhouette Cameo to print and cut all of the pieces in the design and I would just be left doing the laying and 3D decoupage.  

Here's how the first set of cards I designed turned out...


...and here's a closer look at each of the cards individually...


...and here's the second set of cards I quickly designed using the same Nitwit collection...


...and a close up of each individually...


I've added some glitter and some Stickles to give them a holiday sparkle, and now all that's left is to do some addressing and get those into the mail that need to be sent off!

I do have to admit that I did enjoy designing these in the Silhouette studio and then assembling them.  They went together quick and easy, and the layering for dimension really brought them to life.  
Shhhh....I think I'll design a few more like this for various other occasions just to have on hand for those moments when you need a card at the last minute!

Until next time...

December Release with Heartfelt Creations...

Hello!
How are your Christmas preparations coming along?
I have finally started some holiday baking and there are a few wrapped gifts under the tree...and only a few more to purchase!  The lack of snow and unseasonably high temperatures have made it a little hard to get into the Christmas frame of mind this year.  I never thought I'd say it, but I'd take a little sprinkling of snow right about now!  LOL

For those of you who have already seen the sneak peek up on the Heartfelt Creations blog, you know that the new collection is none other than the "Coffee Talk" Collection.  The color palette and illustrations are amazing.

Here's a little about the collection...

It's the beverage that starts our mornings, chases our mid day slumps away, and in the evenings has us gather around the table to enjoy and partake in laughter and light hearted banter, to share treasured memories and deepest dreams and to encourage one another in meaningful friendships...and now we invite you to our table to warm your hands, hearts and souls with the fresh brewed designs of the Coffee Talk Collection by Heartfelt Creations!  Capture and relive those precious moments spent around the kitchen table, or favorite cafe with family and friends shared over the simple pleasure of a cup of  coffee, latte, or cappuccino.  The charming and delightful illustrations of coffee mugs, barista style chalkboard  sentiments and gorgeous patterns in variations of blues, creams and mochas are the perfect blend to get your creative senses percolating, and will allow you to espresso your style perfectly!  The delectable card fronts and dreamy patterned scrapbook pages are splendid for sending well wishes or for displaying those fun and silly selfies taken in the back corner of your favorite coffee shop with your inner circle of friends!  Whether you enjoy your cuppa java black, with cream, milk or sugar, instant or made from freshly ground coffee beans, the Coffee Talk Collection will provide you with the perfect fusion of flavors for all of your paper crafting concoctions.       

I decided that I wanted to create a coffee themed gift box and came across the perfect SVG cutting file at SVG Cuts.  It holds one package of coffee beautifully!

Here's how the project turned out...


I created a folded gift tag in the shape of a coffee cup using one of the stamps and dies from the collection. (A video tutorial is available on how to create a shaped card or tag, and I've put that link into the instructions below.)  I've colored it using distress markers and then hung the tag from the handle using gold cord which I've looped around the box lid several times.  The stacked tea cup image I have fussy cut from the paper collection and added it to the front of the gift box.  Not a hard project at all...but it sure does make a nice presentation!

The design team has really outdone themselves this week again, so be sure to stop by the HC blog for more of a caffeine fix.  The ideas they've brewed up are amazing!
Also, I suspect that this collection is going to be very popular already having seen the comments and delight from the sneak peek last week....so be sure to stop by the HC online store and pick up your "I Want It All Kit" before they disappear!  

Until next time...

Project Supplies & Instructions
Coffee Talk Designer Paper Collection
HCPC-3709  Coffee Talk Cling Stamp Set
HCD1-782  Coffee Talk Craft Dies
SMP001  Stamp Mat Pad
TSMP808  Memento Dye Ink - Espresso Truffle
159723  Art Institute Glue - Dries Clear
352854  Metal Glue Tip - Art Institute

Other Products Used:  BigShot manual die cutting machine, Silhouette Cameo electronic die cutting machine, SVG Cuts File - Santa's Surprises, gold cord, brown ribbon, acetate sheet, Ranger Distress Ink - Antique Linen, sponge daubers, Zutter Bow It All, Distress Markers - Faded Jeans, Walnut Stain & Vintage Photo, hot glue gun, scissors, paper trimmer, white card stock

For full instructions on how to create a shaped coffee cup shaped card/tag, please see video.

Project Instructions:   Begin by choosing the papers from the paper collection that you would like to use for the various pieces of the cutting files.  Cut using your electronic die cutting machine.  Assemble gift box as per instructions that accompany cutting file.  Ink all edges of the gift box using a dark brown ink.  Locate the large stacked coffee cup image in the paper collection, and fussy cut.  Ink all edges with a dark brown ink, and adhere to gift box as shown.  Using a hot glue gun, adhere ribbon and bow to box lid as shown.  Using a piece of folded white card stock and a manual die cutting machine, create a coffee cup shaped tag.  (For full instructions on how to create a shaped card/tag please see video link above.)  Color coffee cup details using distress markers and then lightly sponge a cream colored ink over several areas on the cup itself.  Loop gold cording around gift box lid several times and then through coffee cup tag handle.  Tie cording so tag is visible on front of gift box. 

Let's Celebrate Beautiful...

It's Wednesday again...and you know what that means...it's a Heartfelt Creations post!
I hope you had the chance to take in the Black Friday release and special pricing!
I think Heartfelt Creations has really outdone themselves this time with the mini album and flip fold/pocket inserts!  I know I at least will probably never create another album from scratch because now I know how easy this is!  LOL

This week I'm back with another creation featuring the "All Glammed Up" Collection.  

Let's take a peek...


I used the gorgeous gown stamp included in this collection, along with the delicate and pretty rose swirls which I've paired together to create a corner piece just behind the handshaped daisies.  
I've finished it off with a sentiment that can be used for any occasion!

Here's a close look at the floral cluster...


I love those gold edged pearls that I've used for the flower centers.  They were purchased at the local Dollar Tree and were really brads...I've snipped off the backs to allow them to be glued into the centers of the flowers.  A touch a glitter, and this card has a great sparkle!

All of the images that have been stamped have been colored with Spectrum Noir blendable pencils, and then blended using a gamasol solution and blending stump.  I love the soft look it gives the card, even when paired with the black die cut background.  

That's all for me today!
I do hope you'll stop by the Heartfelt Creations blog to see the rest of the amazing creations by the design team!  We all really put our hearts and souls into these pieces that we bring you every week, so while you're there, be sure to leave some blog love for the designers!

Until next time...

Project Supplies & Instructions
HCDP1-260  All Glammed Up Paper Collection
HCPC-3704  All Dressed Up Cling Stamp Set
HCD1-775  All Dressed Up Die
HCPC-3656  Delightful Daisies Cling Stamp Set
HCD1-760  Delightful Daisy Die
HCST1-401  Deluxe Flower Shaping Kit
SMP001  Stamp Mat Pad
TSMP808  Memento Dye Ink Pad - Espresso Truffle
TSMP802  Memento Dye Ink Pad - Peanut Brittle
159723  Art Institute Glue - Dries Clear
352854  Metal Glue Tip - Art Institute
741  Shell White Glitter

Other Products Used:  black card stock, Grand Calibur manual die cutting machine, Spellbinders Heirloom Legacy Die, VersaFine black ink, VersaColor Pine Cone ink, Spectrum Noir Blendable Pencils - 087, 104, 059, 104, 097, & 033, Spectrum Noir Gamasol Solution & Blending Stumps,  gold edged pearls, 3D pop dots, paper trimmer, water, mist bottle

Create a 5"x7" card base using black card stock.  Locate the background paper as shown in the paper collection and trim just slightly smaller than the card base.  Ink all edges of the background mat and adhere to card base.  Using black card stock, die cut the Spellbinders Heirloom Legacy Die using the frame and oval from the set.  Adhere card panel shown to back of Heirloom die cut.  Using pop dots, adhere to card base.  Using black ink, stamp the gown and straight rose decorative stamp onto white card stock.  Color using Spectrum Noir pencils and blending solution, and then die cut using coordinating dies.  Using 3D pop dots, adhere gown to corner of card as shown, as well as the rose borders on the opposite side framing the corner.  Stamp one inking of the Delightful Daisies Cling Stamp Set using a dark brown ink.  Once again color using blendable pencils and blending solution.  Die cut using coordinating die.  Lightly ink petal edges with just a touch of Memento Peanut Brittle ink.  Using just a spritz of water and your deluxe flower shaping tools, shape flowers.  Create one large double blossom, and one mid size double blossom, leaving the rest of the flowers as single blooms.  Arrange flower cluster as shown and adhere to card base. Adhere flower centers.  Cut the sentiment strip from the paper collection, ink all edges using a brown colored ink and adhere to bottom of card.  Using your fine metal glue tip and Art Institute - Dries Clear, appy glitter to flowers on gown, flowers on card panel, roses on border die cuts and centre of petals on each handshaped flower.  Allow to dry.

Black Friday Release with Heartfelt Creations...

Hello Everyone!
Happy Black Friday!
I'm here today with a special Heartfelt Creations post!
I hope you were able to take in the first ever live stream with Emma Lou today!
What do you think of the new 3D Flip Fold Album and Dies Collections?
I have to say that I found this album absolutely delightful to work with, and is perfect for crafters of all experience levels!

Well, first let me apologize for how picture heavy this post will be!
I won't take you on a full tour of the album with a pictorial as I have included a video link below that will walk you through the entire creation.  

Let's begin...

I chose to use the Classic Sunflower Collection to create this album...it remains one of my favorite collections to this day!  I paired it with the kraft colored album and flip fold/pocket inserts....


I decided not to cover the spine with paper but to rather add some dangling charms on twine to give the album a country feeling...

This is the inside front cover and first page...
(you can find the instructions for the inside cover and front page at the end of this blog post)


...moving along, let's take a tour of a few more pages...
...as you can see I added some fun clips to the pages along the way...


...this next page is one of my favorites...it has a long flip fold that I simply was not able to capture on a still photo...so be sure to check out the video to see how this gorgeous addition turned out...
...I love the rusty safety pins used instead of ribbon on the tags in the pocket...


...a simple pocket that holds several photo/journaling mats clipped together with a denim clothes pin...and of course a super cool flip fold with additional pockets...


...another side flip fold along with a large pocket with magnetic closure on the opposite page...
...and how about that beautiful decorative die cut that frames the top of the large pocket...


...and last but not least, the final page and inside back cover...


For a full video tour, be sure to check out my YouTube channel where I run through each and every flip fold in detail.  (My apologies as the video has a bit of poor lighting and I definitely am not a professional videographer!  LOL)

I do hope you stop by the Heartfelt Creations blog to see the other amazing albums the rest of the uber talented design team have created!  It's super exciting to see what everyone came up with!

Until next time...

Project Supplies & Instructions
 HCFA1 - 432  3D Flip Fold Album - Kraft
HCFP1-433-3  Pocket and Flip Fold Inserts A - Kraft
HCFP1-434-3  Pocket and Flip Fold Inserts B - Kraft
HCFP1-435-3  Pocket and Flip Fold Inserts C - Kraft
HCFP1-436-3  Pocket and Flip Fold Inserts D - Kraft
HCD1-780  Ornate Borders and Pocket Dies
HCD1-779  Regal Borders and Pocket Dies
HCD1-778  Fleur Borders and Pocket Dies
HCDP1-247  Classic Sunflower Paper Collection
HCPC-3626  Classic Sunflower Cling Stamp Set
HCD1-753  Classic Sunflower Die
HCST1-401  Flower Shaping Kit
TSMP808  Memento Dye Ink Pad - Espresso Truffle
TSMP805  Memento Dye Ink Pad - Toffee Crunch
TSMP802  Memento Dye Ink Pad - Peanut Brittle
TSMP800  Memento Dye Ink Pad - Rich Cocoa
TSMP708  Memento Dye Ink Pad - Olive Grove
TSMP707  Memento Dye Ink Pad - Bamboo Leaves
159723  Art Institute Glue - Dries Clear
352854  Metal Glue Tip - Art Institute
486490  Bottle Cap Inc Vintage Magnets .5" 12/Pkg.

Other Products Used:  cream card stock, kraft card stock, white card stock,  VersaColor Pine Cone ink, scor tape, Grand Calibur manual die cutting machine,  brown and gold seed beads, Stampin Up Ink - Close to Cocoa & Chocolate Chip,  paper trimmer, scissors, mist bottle, water, sponge daubers, twine, decorative dangle accessories

To view a full video tour of this completed album, please click here.

To view a tutorial on how to shape the Classic Sunflower, please click here.

Instructions:
Before I begin with the instructions for the pages shown, please allow me a brief moment to give all of you timid album makers out there a wonderful testimonial.  This 3D flip fold album has been a delight to work with.  The addition of the flip folds/pockets is quick and easy, and because you are the designer, the combinations are endless and allow you to make this project as simple or complex as you choose.  Not having to construct the album itself from scratch, and simply being able to head into the creative part of decorating has been wonderful!  Heartfelt Creations has made this simple and easy for crafters of all levels to enjoy!

Using the paper collection of your choice, trim the paper to the size you desire for the front inside cover along with a piece for the first page.  Ink all edges using a brown colored ink, along with all edges of the cover and first page.  Adhere to book using a strong adhesive such as scor tape.  Locate the pocket shown on the inside of the front cover from Flip Fold and Pocket Inserts Package A, and ink all edges.  Measure paper to cover the pocket using a paper of your choice, adding a second coordinating paper slightly smaller across the centre of the pocket.  Die cut a decorative piece using the scalloped and dotted edged die in the Ornate Borders and Pocket Dies.  Ink all edges of all pocket pieces using a brown ink.  Adhere to pocket, and then adhere pocket to cover as shown.  Locate the flip fold pocket shown on the first page within the Flip Fold and Pocket Inserts Package C.  Decide on paper combinations to cover the flip fold pocket, measure and trim decorative paper and ink all edges including the edges of the pocket itself.  Adhere magnet to pocket and then complete covering the pocket with decorative papers.  Add border trim to inside of pocket.  Locate a decorative strip from within the paper collection to use to cover the centre of the inside spine.  Ink using a brown colored ink and apply to album.  Create photo/journaling inserts using the premade card panels of your choice within your paper collection.  Die cut tag toppers for each from kraft card stock.  Ink all edges of card panels and tag toppers.  Adhere tag toppers to backside of card panel.  Using white card stock, cut a mat slightly larger than your card panel to adhere to the back.  Ink all edges and adhere to back of photo/journaling tag.  Create some dimensional flowers using your flower of choice, along with a spritz of water and the deluxe flower shaping kit.  Adhere to tag toppers.

Christmas Shoe...

I cannot believe how quickly Christmas is approaching!
It's mid November, and usually I'm ready to put up the tree, do some baking, etc. and I have to admit that so far this year Christmas fever has not hit me yet!  I suppose a good dose of snow would help...but I'm quite enjoying the nicer weather we've been experiencing.  

A few weeks ago, as I was working on some holiday projects while listening to Christmas music, the song "Christmas Shoes"came on...and I came up with the idea to create a card using the theme of that song.  It's one of those songs that really puts Christmas into perspective, doesn't it!  I decided to combine the Heartfelt Creations "All Glammed Up" Collection along with the "Sparkling Poinsettia" Collection.  I caught myself wondering what the shoes the child in the song would have longed to give his mother to meet Jesus.  I was pretty sure that they would have a shine and sparkle like no other.  I imagined him filling them with a lovely bouquet of flowers just as in the heels in the "All Glammed Up" Collection.  

Here's how the project turned out...


...here's a closer peek at the shoe and flowers...


I fell in love with the piano and music card panel I've used in this creation, and thought it was perfect since I was designing this card based around a song.  It definitely is not your typical holiday greeting card style, but would certainly stand out among the other holiday wishes received.  

As always, there are a multitude of gorgeous designs on the HC blog today featuring this stylish collection.  I am always so amazed that we all receive the same papers, stamps and dies and yet the designs are always so varied and unique!

I also hope that you've already heard the exciting announcement Emma Lou made in the last video about the first ever Heartfelt Creations Live Stream on Black Friday at 1:00pm EST!  You won't want to miss it!  I won't be posting a new project next Wednesday, but will be posting on Black Friday instead...it's a project I'm certainly excited about and can't wait to share with you!

Lastly, I'd love to share the song "Christmas Shoes" with you as we all begin to prepare for the upcoming holiday season.  Take some time during the busyness to refocus and realign your heart with the true meaning of the season!  Find a way to be a blessing someone during the holidays this year!


Until next time...

Project Supplies and Instructions
HCDP1-260  All Glammed Up Paper Collection
HCPC-3703  All Glammed Up Shoe Cling Stamp Set
HCD1-774  All Glammed Up Shoe Die
HCDP1-256   Sparkling Poinsettia Paper Collection
HCPC-3680  Sparkling Poinsettia Cling Stamp Set
HCPC-3679  Large Sparkling Poinsettia Cling Stamp Set
HCD1-766  Sparkling Poinsettia Die
HCD1-765  Large Sparkling Poinsettia Die
HCST1-401  Deluxe Flower Shaping Kit
SMP001  Stamp Mat Pad
TSMP301  Memento Dye Ink Pad - Rhubarb Stalk
TSMP800  Memento Dye Ink Pad - Rich Cocoa
TSMP707  Memento Dye Ink Pad - Bamboo Leaves
TSMP708  Memento Dye Ink Pad - Olive Grove
196  Lions Mane Glitter
159723  Art Institute Glue - Dries Clear
352854  Metal Glue Tip - Art Instititute

Other Products Used:  gold embossing powder, heat tool, Grand Calibur Die Cutting Machine, 3D pop dots, gold ink, Distress Ink - Antique Linen, gold gems, paper trimmer, black card stock, white card stock, Stickles - Red, Glossy Accents, VersaFine Black Ink, Ranger Distress Tool, water, mist bottle, sponge daubers

For Sparkling Poinsettia shaping techniques, please see video https://www.youtube.com/watch?v=1INCr0klRIQ

For more wonderful ways to use the All Glammed Up Collection, please see video https://www.youtube.com/watch?v=IRvlJMMYgP8

Create a card base using black card stock measuring 6"x6".  Trim piano and music note card panel so it is slightly smaller than the card base.  Locate gold colored card panel with roses in the corner and cut using paper trimmer.  Locate the card panel with the red polka dots, chevrons and stripes and trim to be slightly larger than the roses card panel.  Ink all edges on each of the pieces with gold colored ink.  Adhere rose panel to striped and polka dotted panel, lining up the edge of the rose panel to that of the striped side of the other panel allowing polka dotted area to peek through.  Adhere to piano and music note panel, and then adhere to card base.  Locate the small Christmas card panel shown within the Sparkling Poinsettia Paper collection.  Trim and ink all edges using gold colored ink.  Adhere to rose card panel using 3D pop dots.  Using white card stock and black ink, stamp one image of the high heeled shoe.  Using a blending tool, apply Antique Linen Distress ink and then a touch of gold ink to the shoe image.  Adhere shoe image to card using 3D pop dots as shown.  Using white card stock, stamp one inking of the Sparkling Poinsettia Cling Stamp Set.  While ink is still wet, add gold embossing powder and set using heat tool.  Using sponge daubers, apply color to flowers.  Die cut using coordinating die and  shape using Deluxe Flower Shaping Tool Kit and a spritz of water.   Adhere to shoe image.  Ink two inkings of the holly leaves from the Large Sparkling Poinsettia Cling Stamp Set, and once again heat emboss using gold embossing powder.  Using sponge daubers, apply color to leaves.  Die cut using coordinating die and shape using the Deluxe Flower Shaping Tool Kit and a spritz of water.  Adhere leaves as shown.  Die cut bow using white card stock.  Cover with glue and sprinkle with glitter on both sides.  Assemble bow and add gem to centre.  Adhere bow atop floral cluster.  For finishing touches, add gems to flower centers, glitter to heel and toe of shoe, Glossy Accents to dripping wax on candle and red Stickles to berries around candle image. 

A New and Glamorous Release...

Happy Wednesday!

It's a new release day with Heartfelt Creations!
Are you ready to get "All Glammed Up"?

"Cue the spotlight and roll out the red carpet because the new All Glammed Up Collection by Heartfelt Creations has arrived! This ultra feminine compilation of glamorous flowing gowns, lavishly flower filled heels and stunning rose accents all showcased in elegant tones of reds, blacks and golds are the perfect combination for any stylish celebration and are sure to have your magnificent paper crafts taking centre stage and dominating the runway! Modern patterns and motifs mixed with eclectic and vintage style lend the perfect blend to any masterpiece whether you wish to dress your project up or down.  The grand and regal footwear illustrations coupled with the complementing dies are perfect to create that specialty shaped invitation for a special bridal shower or girls night out. The wide array of sentiment stamps included in the collection are ideal to have on hand for a variety of occasions, while the gracefully detailed and lace like gown and floral sprays and accents are sure to bring that extra touch of splendor to all of your layouts, cards or altered art projects.  So channel you inner fashionista, gather your finest glitters, rhinestones, ribbons and laces and join us in celebrating life's beautiful moments with this stylish, timeless and classy collection."

This stunning collection features beautiful imagery for bridal showers, weddings, grads and many other fancy occasions!  When my twelve year old daughter first saw this collection, she fell in love.  I do think it's every little girls dream to put on a pair of heels and strut her stuff...ok, maybe not just the little girls!  LOL

Anyway, I decided to create a scrapbook layout...*gasp*...I know...Tracey virtually never does a scrapbook layout!!!  And, I decided that I would use a photo of my little lovely in one of her dance recital costumes.  I decided not to go to fancy, because I really wanted to show you all that this collection works perfectly for a young lady in the tween/teen age range.  I think this would be a wonderful style of page to frame and hang up in your young ladies bedroom.  Stylish and sophisticated, but not too over the top!

Enough chit chat...how about a look at the finished project...


The premade card panels make quick and easy assembly for a scrapbook page.
The gorgeous rose filled heel was the perfect touch to the bottom corner, and I decided to create some shaped flowers for a dimensional effect.  Of course, all girls...young and old...love glitter, so I thought the more glitter the better on this creation this time!

...and here's a closer look at the rose and ivy cluster on the shoe...


I love the corner stamp and coordinating die in this collection.  Swirling roses and foliage, in a beautiful corner cut!  I felt they would be the perfect embellishment to frame several corners of the photo and provide interest that would draw your eye over to the photo. 

Here's a closer peek...


I hope you've found some inspiration here today!
With Christmas fast approaching, why not make your daughter, granddaughter or niece a one of a kind framed scrapbook layout and make it "All Glammed Up" especially for them!  Whatever age they may be, whatever event they've been decked out for, this collection is sure to please the fashionista in each of us!  Be sure to check out the HC blog for more over the top and glamorous creations this week by the rest of the design team!

Until next time...

Project Supplies and Instructions
HCDP1-260 All Glammed Up Paper Collection
HCPC-3702  Heels and Roses Cling Stamp Set
HCPC-3703  All Glammed Up Shoe Cling Stamp Set
HCD1-774  All Glammed Up Shoe Die
HCD1-775  All Dressed Up Die
HCD1-776   Eyelet Oval Die
HCPC-3500  Open Vintage Floret Cling Stamp Set
HCPC-3502  Mini Vintage Floret Cling Stamp Set
HCD1-727  Vintage Floret Die
HCPC-3696  Italiana Grapevines Cling Stamp Set
HCD1-772  Italiana Grapevines Die
HCST1-401  Deluxe Flower Shaping Tool Kit
SMP001  Stamp Mat Pad
TSMP301  Memento Dye Ink Pad - Rhubarb Stalk
TSMP707  Memento Dye Ink Pad - Bamboo Leaves
741  Shell White Glitter
196  Lions Mane Glitter
159723  Art Institute Glue - Dries Clean
352854  Metal Glue Tip - Art Institute

Other Products Used:  white card stock, cream card stock, black card stock,  VersaColor Pine Cone ink,  VersaFine Black ink, red half pearls, scor tape,  paper trimmer, BigShot die cutting machine,  Distress Markers - Fired Brick, Aged Mahogany, Peeled Paint & Forest Moss, Xyron Sticker Maker Machine, sponge dauber, Lindy's Stamp Gang Spray - Bucket O Blood, mist bottle, water

For full instructions on shaping the Vintage Floret Rose, please see video.

For more inspiration on how to use the All Glammed Up Shoe Cling Stamp Set and Die, along with the rest of the collection, please see video.

Locate the 12"x12" background designer paper as shown.  Trim a piece of black and white script patterned paper from the paper collection to 10"x10" size.  Ink all edges on both pieces using a brown colored ink.  Locate the two card panels shown on the layout and cut from paper collection.  Ink all edges with a brown colored ink.  Adhere script pattened paper to centre of background paper.  Adhere card panels as shown.  Cut a piece of black card stock for a photo mat measuring  4.25"x6.25".  Adhere photo to mat and then adhere to layout.  Die cut the outer scalloped piece from the Eyelet Oval die and adhere to card panel as shown.  Using black ink, stamp the rose filled heel image onto a piece of gold colored patterned paper from within the paper collection.  Color roses and foliage using Distress Markers.  Adhere to bottom corner of layout overlapping card panel.  Stamp two rose corners onto white card stock and color using distress markers.  Cut using coordinating die and manual die cutting machine.  Adhere to opposite corners of photo as shown.  Select sentiment pieces from paper collection, cut and ink all edges with a brown colored ink and apply to layout as shown.  Using cream colored card stock and black ink, stamp three inkings of the Open Vintage Floret and Mini Vintage Floret Cling Stamp Sets. Using a sponge dauber, apply Memento Rhubarb Stalk to all flower images.  Ink all petal tips heavily with same colored ink.  Cut using the coordinating die and manual die cutting machine. Apply rhubarb stalk ink to back of flower pieces with sponge dauber. Shape two roses and one rose bud using a spritz of water and the Deluxe Flower Shaping Tool Kit. Spray lightly with Lindys Stamp Gang mist.  Stamp one inking of the small triple vine images from the Italiana Grapevines Cling Stamp Set using black ink and white card stock.  Using a sponge dauber, color with Memento Bamboo Leaves ink, and die cut using coordinating die.  Shape using a spritz of water and the Deluxe Flower Shaping Took Kit.  Arrange flowers and foliage onto stamped image of heel as desired and adhere to layout.   Using the Art Institute Glue - Dries Clear and metal glue tip, apply Shell White Glitter to roses on corner die cuts, to roses on gown, all roses within the scalloped oval frame as well as to each shaped flower petal.  Using the same technique adhere Lions Mane Glitter to folds on gown as well as accent areas on heel.  Lastly, adhere three red half pearls to top corner as well as opposite bottom corner. 

So Grape-full for You...

Hi and Welcome!
As I sit here scheduling this post, it's late at night and I'm up with a terrible head cold that won't let me sleep!  Ugghhh...pounding sinuses and a headache...so what do I do...come and schedule my post with you!  LOL

It's a Wednesday post, which Heartfelt Creations always makes so much fun!
 I hope you've had a chance to take in the stunning Italiana Riviera Collection.  
The images and the colors are so beautiful.

This week I decided to feature a step card.  I've cheated and made it easy by using a cutting file from the Silhouette store...it just makes it so quick and simple!  I decided that I wanted to feature one of the beautiful vineyard scenes from the collection.  I've paired it up with the Decorative Gate Chateau die and the Grand Portal Cling Stamp Set.  Both of these are in the limited edition section of the Heartfelt Store, and will be no longer available after the middle of December.  So, if it's on your list, be sure to grab them before they're gone.  

Now, with this card, I wanted you to feel that you were gazing out on a beautiful vineyard, all while taking in gorgeous grape clusters, beautiful flowers and multicoloured vining foliage around the window.  

Here's how the card turned out...it's a little busier than I normally create...


For full instructions on recreating this card, please be sure to stop by the Heartfelt Creations blog.  Also be sure to the other gorgeous creations made by the rest of the team!

Well, that's all for me today!
  I'm hoping to head back to bed to hopefully get some sleep and wake up feeling a little better!  

Until next time...

Party Table Setting Ideas...

Hello!  
It's mid week, and I hope that this week has been treating you well!
I'm back to share with you another creation I've made using the Heartfelt Creations "Italiana Riviera" Collection!

I hope you've been able to pop by the Heartfelt Creations store and take a full peek at this wonderful collection!  The beautiful images, gorgeous colors and wonderful patterned papers make you feel that you are on a mini vacation without even leaving your craft room!

I don't know if you came for a visit here last week, and if you missed my wine bottle project, you can still see it here.  After I completed the bottle, I decided that a whole romantic style table setting would be fun to create...a romantic candle holder and a place card came to mind and I set to work!

Here's how the ideas rolling around in my head turned out...


I've used several of the stamp sets and dies from this collection, as well as the Vintage Floret stamps and dies.  

How about a closer look at the candle holder itself...


...and how about a closer look at the grapes clusters and vines...


Here's a closer look at the flower cluster...

...and last but not least a better view of the place card...


I love how this simple dollar store place card turned out!
I think these would be great for a dinner party or vineyard themed wedding!

All of the instructions for these pieces can be found on the bottom of this blog post as well as on the Heartfelt Creations blog where you can print off the full instructions to recreate these pieces yourself!
You will find some of the most glorious and creative cards, layouts and altered art pieces on the HC blog, so don't forget to stop there for a visit for a fresh dose of inspiration!

Well, thanks for stopping by today!

Until next time...

Project Supplies and Instructions
HCDP1-259  Italiana Riviera Paper Collection
 HCPC-3696  Italiana Grapevines Cling Stamp Set
HCPC-3697  Italiana Grape Clusters Cling Stamp Set
HCD1-772  Italiana Grapevines Die
HCD1-773  Italiana Grape Clusters Die
HCPC-3502  Mini Vintage Floret Cling Stamp Set
HCPC-3500  Open Vintage Floret Cling Stamp Set
HCD1-727  Vintage Floret Die
HCST1-401  Deluxe Flower Shaping Tool Kit
TSMP708  Memento Dye Ink Pad - Olive Grove
TSMP707  Memento Dye Ink Pad - Bamboo Leaves
TSMP704  Memento Dye Ink Pad - New Sprout
TSMP507  Memento Dye Ink Pad - Elderberry
 241159  Dove Blender Kit
 SMP001  Stamp Mat Pad
159723  Art Institute Glue - Dries Clear
352854  Metal Glue Tip - Art Institute
273900  Zip Dry Glue

Other Products Used:  Silhouette Cameo electronic die cutting machine, Silhouette Design Store Design ID #96925, BigShot manual die cutting machine, gold card stock, white card stock, premade place card, loose glitter, Memento Dye Ink Pad - Grape Jelly, VersaFine Black ink, scissors,  flameless candle, VersaColor Pine Cone Ink, water, mist bottle, 3D pop dots

 For full instructions on how to shape the Vintage Floret roses, please see video here.

Cut candle holder pieces from gold card stock using your electronic die cutting machine and assemble according to directions with cutting file.  Once assembly is complete and the glue has dried, ink all edges of the candle holder with a brown colored ink.  Stamp several inkings of the  grapes and vines from the Italiana Grapevines Cling Stamp Set as well from the Italiana Grape Clusters Cling Stamp Set onto white card stock using black ink.   Color using inks and Dove Blender Pen, and die cut using coordinating dies and manual die cutting machine. Apply a dark green color to all edges of all leaves.  Shape leaves and grape clusters using the Deluxe Flower Shaping Tool Kit, along with a spritz of water.   Begin vining the grapes and vines, adhering from the bottom to the top of the candle holder.  Stamp the Open Vintage Floret Cling Stamp Set as well as the matching flower images from the Mini Vintage Floret Cling Stamp Set several times onto purple patterned paper from the paper collection using black ink.  Die cut using the coordinating dies, and add some dark purple ink to the tips of each of the flower pieces.  Shape roses using a spritz of water and the Deluxe Flower Shaping Tool Kit. Create one large rose, one smaller and one rose bud. Adhere to base of candle holder as shown.  Apply a small amount of Art Institute Glue - Dries Clear to each flower petal, and sprinkle with a diamond colored loose glitter.  Allow to dry.  Place flameless candle on top of holder.

Using a premade place card purchased from the dollar store, die cut a decorative vine accent piece using white card stock.  Using the coordinating background die, cut one cut out of gold card stock.  Trim both to the size of the place card, adhere together and then adhere to the front of the card.  Trim a sentiment strip from the paper collection to marry the decorative die cuts to the place card hiding the seam.  Stamp some grapes and vines along with one wine glass and wine bottle image. Color using Dove Blender Pen and die cut using coordinating dies.  Add a touch of dark green ink around all edges of all the leaves.  Shape vines and grapes using a spritz of water and the Deluxe Flower Shaping Tool Kit.  Adhere to top of place card as shown.  Using 3D pop dots, adhere wine bottle and wine glass to bottom corner of card. 

Thanks for visiting!

Thanks for visiting!