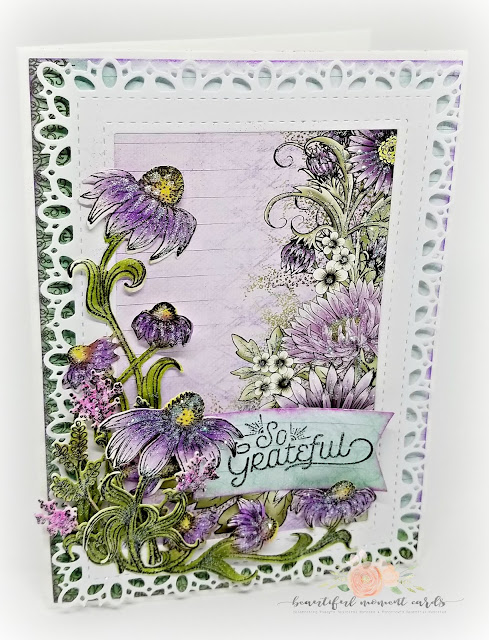
Grateful Coneflowers....

Welcome Back!
I hope you're doing well, and I'm so glad to see you here today!
It's been a fast and crazy summer already, and I just cannot believe that today is the 1st of August!
Where is the time going? 
It seems that the kids were just released from school for the summer, and now we're seeing school supplies on the shelves at Walmart and it's almost time to get the dreaded school clothes shopping done!  LOL

Well, as you know it's another Heartfelt Creations Wednesday!
This week I have a quick card to share with you featuring the gorgeous coneflowers from the Backyard Blossoms Collection as well as the papers from the Heartfelt Inspirations Journal Pages
And how can I forget the stunning Intricate Swirl Frames Die!


I've used the two pages from the Heartfelt Inpsirations Journal Pages to create this card...see...and you thought journal pages were just for journaling, didn't you!

Heartfelt Inspiration Journal Pages 

I've actually used the backside of the one page to do the matting behind the decorative frame, and have then trimmed out the portion of the floral design I wanted to showcase and adhered it to the backside of the decorative frame, which I have cut from white card stock! Once I had this all assembled, I popped the frame image up off the card base using pop dots!

I've then stamped and die cut the coneflower images and floral accents from the Backyard Blossoms Collection in a black ink onto white card stock. I've colored them using the easy to use Stack and Store Daubers from Heartfelt Creations! I'll list the colors of all the inks for you in the supply list at the end of this blog post!

I've then die cut my flowers using the coordinating dies and assembled them into a pretty wildflower like looking arrangement!

Here's a closer peek at those beautiful blossoms...


I've then created a little flag banner from a left over piece of teal colored paper and stamped my sentiment which is found in the Today's Quotes Cling Stamp Set!

Well, that's all for me today! Do pop on over to the Heartfelt Creations blog to take in all of the amazing projects the team have come up with for your inspiration!

Until next time...
Project Supplies and Instructions
 
Cut a 5" x 7" card base from white card stock using the Eyelet Rectangle & Basics Die. Cut the mat for the card base from the backside of one of the pages from the Heartfelt Inspirations Journal Pages pictured above using the Eyelet Rectangle & Basics Die. Ink the edges of your mat with the Ranger Archival - Majestic Violet and adhere to card base. 

Next, die cut the Intricate Swirls Frame Die from white card stock. Trim out decorative floral image from Journal Page and attach to back of frame using the dries clear glue. Adhere frame to card base using dimensional pop dots. 

Stamp the rounded coneflower image from the Blossoming Coneflower Cling Stamp Set, the smaller coneflower from the Garden's Edge Cling Stamp Set, as well as the floral accent also from the Garden's Edge Cling Stamp Set onto white card stock using Archival Ink - Jet Black. Color coneflowers using Ranger Archival Ink - Majestic Violet, Buttercup and Leaf Green using Stack and Store Daubers. Color the accent flowers using Ranger Archival - Cactus Flower and Leaf Green. 

Die cut all images using the coordinating dies.

Adhere rounded coneflower image to card base as shown. Tuck in accent flowers as shown, and adhere smaller coneflower image on top of arrangement as shown.

Trim out a banner flag and stamp sentiment using Ranger Archival - Jet Black ink. Ink edges of banner with Ranger Archival - Majestic Violet and adhere to card front.

Using dries clear glue and metal tip for adhesive bottle, apply Blue Rain Glitter to coneflower blossoms, and Crystal Glitter to all preprinted images on the card.

Quick and EZ Scrapbooking and Cardmaking...

Hello and Welcome!
I'm dropping in with a quick post showcasing the products I used to create my scrapbook journaling pages, canvas and cards from my Heartfelt Creations Facebook Live today! (If you missed it, you can find the replay here...https://www.facebook.com/HeartfeltCreations/videos/10155521633007401/)

As you know, I'm not really a scrapbooker....but the wonderful 3D ring binder and it's smaller size have allowed me to put together pages quickly and with ease...I'm not overwhelmed by the page size and I can embellish as much or as little as I want!

Here's a look at the binder I covered using the Woodsy Wonderland Collection and one of the journaling pages, the page that I put together during my Facebook Live, as well as a card I also created with the coordinating insert collections that go together with the 3D Ring Journal Binder.


I've used one of the journaling pages to create the scrapbook page from the Words to Live By Journal Page Collection. I've used the Intricate Swirl Frames Die to create the frame around the photo and have then snipped the smaller square frame from the Butterfly Kisses Decorative Die in half and have adhered one half on top of the large frame and the other half on the bottom of the large frame.

I've used the gorgeous coneflowers from the Backyard Blossoms Collection to do the embellishing on my page. I just love those coneflowers! I've stamped them in Ranger Archival Ink - Coffee, and have then colored them using the Ranger Archival Ink - Monarch Orange, Buttercup and Leaf Green using the Stack and Store Daubers from Heartfelt Creations!
This page came together quickly and with ease!

I hope you've enjoyed today's quick share, and you're been inspired!
Also, I should make mention, that the 3 Ring Journal Binder and coordinating Journal Pages are all currently 50% off until July 31st! You still have a few more days to purchase these at a fantastic price point! 

https://www.heartfeltcreations.us/journals

Until next time...

Christmas in July...

Hello and Welcome!
It sure has been awhile since we've visited, hasn't it!
School is out, my kids are enjoying the summer so far, and we've just returned from a week of holidays...and now it's time to start thinking Christmas!  LOL

It's another Heartfelt Creations Wednesday...and it's another release...we're doing Christmas in July with the new O Holy Night Collection!

Here's a little more about this adorable release...

Celebrate and create inspirational Christmas greetings that spread the true meaning of the holiday season with the O Holy Night Collection from Heartfelt Creations! Immerse yourself in the Christmas story right alongside the angels who announced the Savior’s birth, the shepherds who received the good news, as well as the loving family who welcomed the holy babe in Bethlehem so many years ago! Swaddled in a traditional color palette of reds and greens mingled with hues of midnight blues, golden starlight yellows and snowy whites, this festive paper collection has been beautifully wrapped with tender lace like details, charming plaids, flowing swirls, and elegant brocades all nestled among pretty poinsettias, delicate snowflakes, fanciful Christmas ornaments and gentle images depicting that holy night when Christ was born! Three exquisite cling stamp sets along with coordinating dies provide wonderful options for creating dimensional nativity scenes, holiday themed accents such as an old fashioned scroll, a pinecone with greenery, as well as an assortment of beautifully scripted Christmas sentiments in a variety of styles perfect for all of your holiday card making! The substantially sized and intricately detailed ornament die is magnificent for creating wonderful focal point images on card fronts, stunning accents on scrapbook layouts, or for creating ornament shaped cards ready to deliver your Christmas greetings to friends and loved ones! So pause, reflect and spread the message of God’s love given that holy night so many thousands of years ago as you create and send off holiday wishes with the O Holy Night Collection. 

For my first project with this release, I decided to do an ornament shaped card! 
I've used the ornament die to cut my card base and have then decorated it with the other ornament layering die cuts!

Here's how it turned out...


I decided to go with a bit of a country Christmas vibe by using the plaid paper as an underlay to the red die cut overlay. I opted to ink the edges of the white card base using Ranger Archival Ink - Red Geranium just so it wasn't so stark in contrast to the other colors. The die cut with the sentiment I have used a dries clear glue to add some Rajni Chawla's Crystal Clear Powder just on the decorative portion of the die cut to give the card some additional sparkle. I've raised each of the ornament layers using dimensional pop dots so the ornament has quite a bit of dimension.

I've stamped the pine cone images, poinsettia and holly cluster images onto white card stock using black ink and have then colored them using the Stack and Store Daubers. I've then die cut all of the embellishments and shaped my poinsettias using the coordinating 3D shaping mold. 

I've arranged my pinecone cluster and then adhered it to the ornament using a dries clear glue and have then created a small double poinsettia and backed it with one of the smaller holly leaf clusters. I've then added it to the center of the pinecone arrangement!

To give the floral cluster a bit of sparkle and the appearance of being snow covered, I've applied dries clear glue and then sprinkled those areas with Rajni Chawla's Frosting Powder, which I have then heat set using my heat tool! And, of course I've given the poinsettia a center with some prills!

This card came together so quickly and easily, and is one that I will surely be repeating for my own personal greeting cards this Christmas!

So, I hope I've encouraged you to get a jump on your holiday cards so that you're not stuck last minute in December trying to get them all completed! Be sure to pop on over to the Heartfelt Creations blog to see what the rest of the uber talented design team have come up with for your inspiration!

Until next time...

Thanks for visiting!

Thanks for visiting!