Heartfelt Creations "Romantique Garden" Release

Happy Friday!
And can you believe it's "Black Friday" already?
Time sure is flying!
For us here in Canada, this day is certainly not as crazy a day as for our US neighbours.  The idea is catching on here slowly it seems, and there are a few sales to be had... but nothing like the stories I hear about sales and crowds in the United States!

I have exciting news for you today though...Heartfelt Creations has decided to release a new collection today just in time for "Black Friday".

Here's a little info on the new collection...

Love is in full bloom with the Romantique Garden collection from Heartfelt Creations.  A romantic symphony composed in subtle shades of pink, fuchsia, green, cream and charcoal harmonizes beautifully with picturesque images of dainty hummingbirds, devoted love birds, graceful swans and delicate bleeding heart bushes.  Ornate ironwork backgrounds are in perfect harmony with layered elements of vintage sheet music, lace, flowing handwriting, scrollwork, florals, stripes and flourishes.  Six hand drawn stamp sets capture the idyllic beauty of a peaceful garden where swans glide across the surface of a glassy lake, nesting lovebirds are wreathed in flowers, and hummingbirds sip nectar from blossom laden branches of exquisite beauty.  The coordinating die cuts feature elegant swirled stems, a graduated set of bleeding heart blossoms and a majestic pair of swimming swans.  Dreamy and idyllic, uplifting and inspiring, romantic and moving as a masterfully scored concerto, this enchanting collection is a celebration of love and life amidst the extraordinary beauty of nature.

 Such a beautiful, romantic collection!

Have you ever heard the folklore story behind the bleeding heart?
It is a story of unrequited love!
It involves a prince who is head over heels in love with a princess who doesn't give him the time of day.  He tries to woo her and she is not interested.  Upon his last attempt to win her heart, she once again seems disinterested and he takes his life.  Low and behold the princess realizes that she really did love him and has made a mistake and she decrees her heart will bleed forever.  And, each piece of the bleeding heart flower ties into part of the story as you pull apart it's layers. You can read more about this bit of folklore here

When I saw this collection for the first time, I couldn't get over how romantic it was. 
I knew I wanted to create something that told the story of this beautiful flower.  When I came across the cutting file I've used at SnapDragon Snippets, I knew it would work perfectly!
What could be more romantic than a carriage ride through a wooded garden around a castle...and represent the folklore of the prince and princess more perfectly?

Let me show you...


and another view...


I thought this would make an awesome paper craft to accompany a gift for a bridal shower, wedding or special anniversary!

So, hurry on over to the Heartfelt Creations Online Store and pick up this collection before it's gone!  It's perfect for all those romantic occasions you need to create for!
And don't forget to pop by the Heartfelt Creations blog to see all of the other dreamy creations the rest of the very creative design team have created for your viewing pleasure...as well as the instructions for this creation!

Until next time...

Show Us Your Inner Elf!

Welcome Back!

I'm here today to share with you the latest challenge over at Holly Jolly Christmas Challenges!
For the next two weeks we are asking you to show show us your projects showcasing....

"Christmas Elves"

What a fun theme...and just in time as it's time to start gearing up for the arrival of our very own "Eli the Elf" (our elf on the shelf).
Our son is super excited and waiting for that little green sprite to appear!
Our daughter just smiles...I think she's caught on!  LOL

Here's my Christmas Elf creation...


Isn't he cute...and he has a reminder message for you..."Santa Claus is coming to Town".
So don't procrastinate...get those cards made, those gifts purchased and wrapped and that baking packed in the freezer. 

Before I go, I want to share sponsor details for this challenge...


...and they are offering one lucky winner...


...and here's a little more about them..

As if raising five children in the frozen land of the North was not enough of a challenge,Jodie Mackrell decided to dip her cold little Canadian toes into the world of paper crafting by opening an online store full of her illustrations. That was two years ago. Today Bugaboo Stamps is one of the leading companies in digital images, and we're still growing! From seriously snarky to sugary sweet to sublimely soulful all the way over to the other side of the super sexy spectrum, you're bound to find all that you need and more to create your paper projects. Jodie works very hard to provide New Releases and Freebies every week!
If your taste runs to rubber (and you know who you are), you can find Bugaboo Stamps atTotally Stampalicious. And finally, join the Bugaboo Stamps DT for weekly challenges atCatch the Bug.

 That's all for me today!
Can't wait to see your elf inspired creations!
Be sure to check out the other DT creations on the Holly Jolly blog for more fantastic ideas!

Until next time...

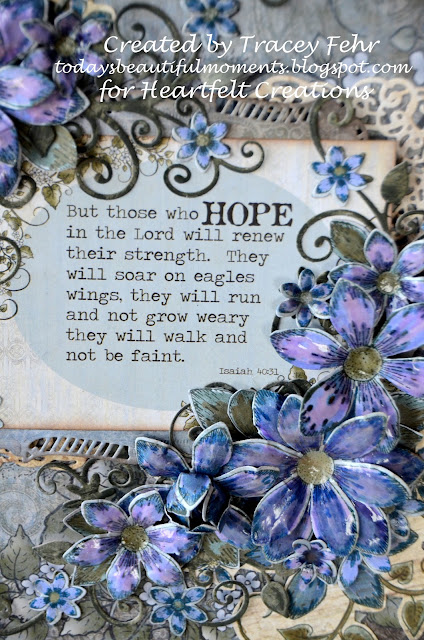
Hope in the Lord...

"But those who Hope in the Lord will renew their strength.
They will soar on eagles wings,
they will run and not grow weary
and they will walk and not be faint."
Isaiah 40:31

Is that not a wonderful promise?

This is the verse that I decided to create my latest Heartfelt Creations project around.
I decided that it would be perfect to create a canvas with.  A wonderful project to hang on your wall and be reminded daily of God's promise to us.
I've used the gorgeous Countryside Evening Collection paper pack, and this is where you will find this Bible verse along with more verse and occasion panels. 

Here's a peek at my canvas creation...


and here's a close up of the verse and bottom flower cluster...


I hope I'm leaving you inspired today!
Wouldn't a special handmade canvas be the perfect Christmas gift for someone this holiday season?
You still have time...and Heartfelt Creations store has so many beautiful paper packs to choose from!
Not to mention coordinating dies and stamps!

Be sure to check out all of the projects being shared by the design team today!
You'll never leave the Heartfelt Creations blog disappointed...well, maybe...but that's just because there aren't enough hours in the day to create each and every design!  LOL

Until next time...

HCPC3471 Tattered Collage PreCut Set
HCDP1229 Country Side Evening Collection Paper Pack
HCD752 Heartfelt Creations Cut Mat Create 2B Set (floral flourish & corner die)
HCPC3537 Sun Kissed Fleur Swirls PreCut Set
HCPC3533 Sun Kissed Fleur PreCut Set
HCD 734 Sun Kissed Fleur Die
273900 Zip Dry Paper Glue
048749 McGill Paper Shaping Tools and Piercing Mat
159223 McGill Paper Blossoms Molding Mat

Other Products Used:  scor tape adhesive, dollar store 7”x9” Artists Canvas, Zig 2 Way Glue Pen, Ranger Glossy Accents, Rangers Antique Linen Distress Paint, Spellbinders Majestic Squares Die Set, Memento Northern Pine Ink, Elmers Craft Bond Spray Adhesive, brown pine cone ink, BigShot Die Cutting Machine, 3D pop dots, Distress Markers (flowers – faded jeans, shaded lilac, stormy sky, old paper), distress markers (leaves – iced spruce, frayed burlap)

To begin with project, paint canvas and set aside to dry.  Choose two complimenting papers from the Country Side Evening Collection Paper Pack in the color scheme you wish to work with.  Also choose a sentiment from the verse/sentiment panels from the paper pack that you wish to feature in the center of your creation.  Cut the patterned paper (beige on my canvas) that you wish to have as your background to 8 ¾” x 6 ¾ “.  The second complimentary paper that you have chosen (blue in my example) will be cut to 8 ½” x 6 ½”.  Ink all edges of these papers including the sentiment panel with brown ink for an aged vintage feel.  Continuing to work with the smaller of the two background pieces, proceed to stamp the Tattered Collage PreCut stamp onto the center of the patterned paper with the Northern Pink Memento Ink.  Allow to dry.  Cut the largest die cut from the Spellbinders Majestic Squares die set in a coordinating solid color of your choice from the Country Side Evening paper pack.  Ink edges with the brown ink and adhere the sentiment panel to the die cut.  Now adhere the two background papers together.  Use a spray adhesive to adhere these assembled papers to the canvas.  Set aside to let adhesive set.  Moving back to the die cut and sentiment panel piece, apply 3D pop up dots to the piece.  Position and adhere to center of canvas. 
Cut 2 corner die cuts using the Cut Mat Create 2B Set from a soft cream color within the paper pack.  Adhere to bottom left corner, and top right corner (directions are looking at the canvas head on).  Moving along to the embellishing, stamp each image in the Sun Kissed Fleur Swirls PreCut set in the Northern Pine ink and allow to dry.  Once dried, color greenery and florals with distress markers listed above and fussy cut out the images.  Stamp Sun Kissed Fleur PreCut Set twice for the flowers shown on this sample.  Use the colors listed above to color the leaf and flower images (I have chosen to use two colors on some flowers and three on others to create depth and different looks).  Cut out images with the coordinating Sun Kissed Fleur Die.  Shape flowers using molding mat and shaping tools, creating as many dimensional flowers as you desire on your creation as well as leaving some just as single layer blooms. A few tiny flowers can be let unshaped and will be added to vines just as they are.  Working with the larger blooms, cover each petal and center with Glossy Accents to give them a beautiful shine.  Allow to dry.  (Leave smaller flowers that will go onto vines just as they are with no gloss added).  Snip apart the leaf die cuts to create 3 single leaves from each.  Die cut the floral flourish from the Cut Mat Created 2B Set three times with green patterned paper included in the collection.  One full die cut will be used on the bottom of the creation, the other two cut outs can be snipped to place them within the design on both top and bottom corners.  Ink each floral flourish die cut with the Northern Pine Memento ink trying not to be too careful as you want the green patterned paper to show through as well.  Now begin arranging your fussy cut images from the stamp set, the flowers, leaves and the flourishes until you are happy with the arrangement.  Once the final placement has been determined begin to adhere to the canvas.  Set aside for adhesive to dry.  Find the perfect spot on your wall to hang, or stand on easel stand!

Clean and Simple Vintage Fun

I'm back today with my last post for Pile it On Challenges.
I have enjoyed working with this wonderful group of ladies so much and this was such a tough decision to leave.

We have a fabulous challenge for you today...

"Vintage"

One of my faves of course.
I didn't have a lot of time to create this week, so I decided to go with more of a CAS style vintage.  The stamp set I received from Rogue Redhead Designs was just fabulous!  A big Thank You!
The ladies in this stamp collection reminded me of days gone by catalogue or pattern ads.
I wanted the image I chose to be the centre of the design.

Here's how it came out...


I've stamped her and the sentiments in black ink.  Once dried, I applied brown ink on the paper to give it an aged feeling.  I've chosen patterned papers that I felt represented eras gone by and that were quite feminine and complimented the gorgeous image.  I've added just a bit of color to the image, not coloring too perfectly as I wanted it to appear old.  All of the layered edges have been roughed up around the edges.  The final touch was the metal flower which so reminded me of a brooch from years ago when it was fashionable to be wearing them.

Our sponsor for the challenge this week is Rogue Redhead Designs!


They have some fabulous new stamps out for Christmas as well...be sure to stop by and check them out!

That's it for me today!
Hope you'll enjoy what's left of your weekend!
Be sure to take the time to check out the other wonderful creations at the Pile it On blog!
While you're at it, maybe take some time to play along!
I'd love to see your vintage creation!

 Until next time...

This card has been shared in the following challenges...


Thanks for visiting!

Thanks for visiting!