Showing posts with label Christmas. Show all posts

Happy Holidays with Amazing Paper Grace...


 Hello and Welcome!
I'm so glad you've popped by for a visit today!

For this week's share, I am featuring the Mosaic Bracket Card Builder from Amazing Paper Grace! I love this collection of dies, and couldn't wait to try it out on an A2 sized holiday card. I so appreciate that the dies from Amazing Paper Grace are designed to work with a multitude of card sizes!

I chose to use some fun decorative papers to do a more non traditional colored holiday card! I love how the striped paper plays off the bottom snowflake design...I love how the mosaic die cut looks over top the snowflake design!

-this project has been created with dies supplied by Amazing Paper Grace-


I chose to go with some gold card stock to add an extra touch of elegance to today's design. I love how the layers on the top bracket portion turned out...what a beautiful way to break up two decorative patterned papers! I opted to die cut some snowflakes from the Silent Night Make a Scene Die Collection to tie in the with the snowflake theme on the bottom. I thought it turned out kinda cute!

And of course, I just couldn't resist adding some white poinsettias created with the Shapeabilities Cinch and Go Poinsettias! I love the subtle embossing these dies create on each petal! And don't they look awesome with glittered white flower stamens in the center!


The Happy Holiday Sentiment has been cut from white card stock twice and then layered onto the gold backing! By layering your sentiments, they have more of a presence and look a little more substantial look on your card! It's a quick and easy technique that gives a great impact...the little extra work is definitely worth it!

Well, I do hope you've enjoyed today's share! It's been great spending a few minutes with you today! I hope to see you again soon!

Until next time...

APG Supply List


Quick Holiday Inspiration with Amazing Paper Grace...


Hello and Welcome! 

I'm so glad we get to spend some time together today! 

I'm popping in with a quick holiday card I created using several dies from Amazing Paper Grace!


     -the dies for this project have been graciously provided by Amazing Paper Grace

I opted to use the gorgeous scrollwork die from the Celebrate Scrollwork Card Builder, and pair it with the Flourished Sonata Notecard. First I die cut a shaped card base using the notecard base...I chose to use it to create a slimline card shape rather than a smaller note card. I simply omitted the bar you'd put in for the fold, popped one of the long cutting edges off a piece of folded cardstock large enough to fit the card onto, and die cut it using my die cutting machine. 


Next I die cut the scrolling background...I took a slimline sized piece of white card stock, die cut one end with the scrollwork die, then realigned it to die cut the other end so that I was left with one long scrolling die cut with a diamond shape in the middle. This is the layer that I'll be adding next on top of my decorative paper. 


I then grabbed some gold card stock and die cut the decorative border from the Flourished Sonata Notecard. I love the richness the gold color lends to the card! We now have a gorgeous background ready to layer up with our sentiment and flowers!


I then die cut the petal pieces for the poinsettias! I've used the Shapeabilities Cinch and Go Poinsettia Set to create this pretty Christmas flowers! I've die cut them in a cream colored card stock to match the paper I've stamped the sentiment on...and then inked the petals with Red Geranium Archival Ink, and the leaves (which I've created using the largest poinsettia flower) in Olive Archival Ink! I decided to bling them up with some pretty pearl and rhinestone centers that I purchased from Etsy!


I then added some white accent flowers that I created using the Petite Floral Potpourri Collection! A simple glittered flower stamen in the center was the perfect finishing touch for them! Subtle and not in competition with the bold poinsettia flower centers!


I'm always so impressed how quickly and easily a card comes together with the Amazing Paper Grace dies! I do hope you've enjoyed today's share!

Until next time...

AGP Supplies

Other Products Used:
white card stock, gold card stock, cream card stock, Ranger Archival Inks - Olive, Red Geranium, Jet Black, & Leaf Green, Graphic 45 decorative Christmas paper, pearl/rhinestone flower centers, glittered white stamens, Gemini Die Cutting Machine, flower stylus


Holiday Creating with the NEW Pop Up 3D Vignette Christmas Tree Die of the Month from Amazing Paper Grace...


What a magical sight to see a beautifully decorated Christmas tree with gifts piled high around its trunk! The Pop Up 3D Vignette Christmas Tree includes a set of graduated trees for a full dimensional design, along with details of presents, bows, and ornaments to complete this set. Change up the colors for an elegant or casual look. Best of all, it folds for easy mailing. Use just the elements to work with a flat card format from A2 to A7. Detailed die cuts make it easy to personalize for the holidays. The choice is yours!

Dies for my creations today were supplied by Amazing Paper Grace.


There are 21 dies included in the Pop Up 3D Vignette Christmas Tree.
 

My Project Today using Pop Up 3D Vignette Christmas Tree.


Can you believe that this is the first time I've worked with one of the 3D vignette designs by Becca Feeken?!?! I'd been a long time admirer of them, but had just never gotten around choosing a favorite, purchasing it and creating with it! I was super impressed with how easily this whole design came together! 

I created the 3D Vignette Christmas Tree card as it was intended to be put together...but I also created a quick and easy card to show you that these elements work beautifully for traditional card making as well!

Let's start with the original version...


I decided to go with a shabby chic/Victorian kind of theme and opted to use a teal patterned paper for my main tree base...and accent it with a lighter printed patterned paper as the tree front. I've used silver foil for all of my accents...and I love the monochromatic look of the ornaments and how they match the outline of the tree!

I opted to use cream card stock to give the entire project a softer and more antiqued look to go along with the Victorian style. The base was super easy to build and holds the tree pieces in place very well! I chose to die cut the sentiment using card card stock as well, and back it with silver to match the color on the tree. 


The dimension in this design is absolutely amazing! In the photo above you can see how all the layers come together...and I love how this super dimensional card folds flat so you can still mail it!

Moving along, let's talk about the second card creation I made with this wonderful set of dies!


For my second creation I wanted to do something super simple! I chose a 6x6 card...I love how the layered tree works really well for a card front! It's a great size that you can customize for your smaller cards to all of your larger sizes!

I wanted a pretty lace like die cut to coordinate with the lace on the card panel I chose to use! The delicate die cut from the Celebrate Scrollwork Card Builder from the Holiday Medley Collection was perfect!


I wanted to do something a little different with the sentiment...so I chose to cut it into pieces and use all of the words included in the set! I thought it turned out pretty cute...especially with the cream colored buttons I added as a vintage style embellishment!


I also love that I was able to keep the tree dimensional even though I was adding it to a card front! Just think...you could use the tree in a single layer, a double layer, create a forest...the possibilities are almost endless!!!
 
Designer Tip:  Let's talk about those adorable gifts under the tree! They work beautifully when die cut in sold colors, but I wanted to give them the appearance of actually being giftwrapped...so I die cut them from some patterned papers within the collection I was using so that they would coordinate with the tree! I thought they turned out super cute!
 

Stamps: n/a  
Paper: cream card stock, silver card stock, Pink Christmas - Stamperia
Ink: n/a
 
For more Pop Up 3D Vignette Christmas Tree Inspiration
Visit each Creative Team blog linked below for their take on creative paper crafting ideas with Pop Up 3D Vignette Christmas Tree, the Amazing Paper Grace November 2021 Die of the Month!
 
 
The Amazing Paper Grace Die of the Month is available exclusively at Spellbinders Paper Arts during November 2021. Pop Up 3D Vignette Christmas Tree at the special kit club price, along with other membership perks.
 
View this month's Amazing Paper Grace Die of the Month! https://youtu.be/SDbd5BaWq8U
 
Would love to hear from you! Comment on how will you use the dies!
 

Introducing the Sweet Serenade Notecard Collection from Amazing Paper Grace...


The Sweet Serenade Notecard Collection is simply to extend a sweet thought or warm greeting to let them know you’re thinking of them through a heartwarming notecard. The inspiration behind this collection is the ability to create beautiful notecards. Everything in this collection coordinates together from the card base to the embellishments to the stamps to make wonderful notecard creations! Notecards also make a wonderful gift as a boxed set! Swoon your family and friends with a special handmade gift! Make it seasonal for fall or for the holidays. Maybe a specific style such as soft vintage, clean and simple, or even a mixed media twist!


Today's projects were created with dies provided by Becca Feeken of Amazing Paper Grace.

My Projects for Today

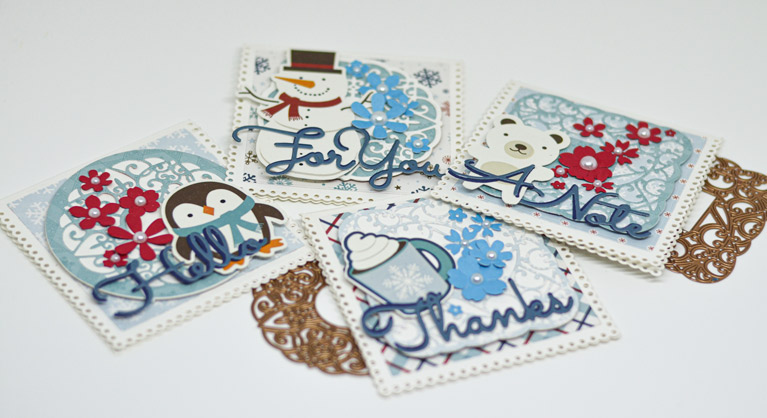
Today I'm using the Scalloped Symphony Notecard S6-177 to create my fun filled note cards! I know when I think of creations done with Amazing Paper Grace products, I tend to think of ultra feminine, beautifully delicate and detailed creations...and today I wanted to share how easily this little note card ensemble of dies could be used to create a more cutesy note card set!


I love that this set has so many different ways you can layer/cut the different shapes! I thought the beautiful scrollwork worked perfectly for winter themed projects! And I cannot tell how easy it is to create a notecard using this set! I love the scoring bar that you put in place before running the notecard die through your die cutting machine! It gives you a beautiful and professional score mark that takes all the stress out of trying to get the card scored perfectly if you were trying to do it by hand after die cutting the notecard shape! I also love that I have the option of using this larger sized notecard is for a slimline card! Talk about great options!

And let's talk about card matting for just a moment...there's no measuring as all of the beautiful shapes in this collection have been sized to nest and give you flawless results each and every time! There's no redoing because you cut the square crooked, or you didn't quite get that circle shape you desired when you tried to cut it out by hand!

I also created some matching envelopes from the same paper I used for the notecards so the collection completely matches! For this I hauled out my envelope punch...can you believe it has sat in my craft room for years and was never opened! I know...what a shame! It sure came in handy for this project! 


So, for this little batch of notecards, I opted to design them with a winter theme and use the Sweet Sayings Notecard Sentiments S4-1148 on the front of each! 


They are terrific generic, larger sized sentiments that work perfectly if you're going to be gifting a little notecard set! I love to gift handmade notecard sets to "the dreaded" Christmas work party gift exchange. I usually pair them with a nice hand lotion, or candy...and I've created the matching box designed with this in mind...there would totally be room to add some nice chocolates to this little gift set!


I totally love to be able to gift things that are useable and won't take up space! These little notecards are the perfect size to have on hand waiting for when you need one in a pinch! Plus, I love that when the notecards are all gone, you still have an adorable gift box to pass along to someone else to enjoy!

Now, while these little notecards are winter themed...I thought it would be fun to use the Petite Floral Potpourri Flowers S3-420! I thought they would add a hint of whimsy, and I tried to adhere them to the notecards so they almost looked like falling snow!


I added a simple white pearl to the center of each to finish off these dainty flowers!


I thought they turned out super cute! What do you think?


Designers Tip: I had so much fun working with this notecard collection! I found it was great to play around with the various shapes and one of the first things I did when I received it was to sit down and just die cut all of the different ways that you could use these dies...you can die cut into your notecard to that you have a decorative background, you can die cut as several different shaped embellishments, etc. I encourage you to do the same to see how many different looks you can create! 

Sweet Serenade Notecards Availability:
These dies and plates are available from Spellbinders right now! Click here: Sweet Serenade Notecards Collection.


Supplies:
Stamps:  n/a
Paper: Echo Park - Love Winter Collection Kit, white card stock, red card stock, blue card stock
Ink: n/a


For more Sweet Serenade
Notecards Collection Inspiration
Visit each Creative Team blog linked below for their take on creative paper crafting ideas using the Sweet Serenade Notecards Collection!

Please comment: Which Sweet Serenade Notecards set speaks to you?

Introducing the Seasonal Wreath Collection from Heartfelt Creations...


Hello and Welcome Friends!


I'm so very excited to be sharing the NEW Seasonal Wreath Collection from Heartfelt Creations! To debut this collection, I shared in a livestream this morning how to create this pretty little A2 sized card! I wanted to show you how perfectly this wreath fits onto this smaller sized card, and would be perfect for sending your holiday wishes via snail mail! The beauty of this collection is that it includes stamps and dies for all of the different seasons....you can create a wreath for spring, summer, autumn and winter! It's perfect for any occasion....and is so very versatile!


The first thing that struck me about this collection when I started working with it was how much FUN it was to build this little wreath! You get to design and customize a wreath exactly how you would like to! You can make it busy, you can add less embellishments...you can mix elements from the different seasons, etc. I loved stamping up, coloring, die cutting and then playing around to create the exact style of wreath I was wanting for this particular creation! I can just see this style of wreath hanging on the front door during the holiday, can't you?!?!


Now, if you know me, you know that I love the plaids when it comes to the holiday season...and I just had to use that pretty green plaid paper in the Seasonal Wreath Paper Collection. I thought cutting apart the Simply Elegant Centerpiece Die would be the perfect way to frame out the rectangle shaped die cuts I created using the Eyelet Rectangle & Basics Die


I loved playing with all of the different foliage and elements in the Winter Wreath Accents Cling Stamp Set! It was so much fun to mix and match and see what I wanted where! Aren't those little ornaments just darling peeking out of the greenery?!?!


I do hope you've enjoyed today's creation! If you missed the livestream with all the instructions on how to create this little holiday card, you can find it here! 


I can't wait until we get to craft together again!


Until next time...


Introducing the Candlelit Christmas Collection...

Hello and Happy Wednesday!
It's a super exciting day as we are celebrating Christmas in July with Heartfelt Creations!
Have you seen the sneak peek of the gorgeous Candlelit Christmas Collection?
Beautiful glowing candles, pretty decorations and of course festive poinsettias!
What's not to love?!?!

...here's a little more about the collection...

The snow is gently falling, the decorating has been done, and the soft glow from the candles in the window invite you to just sit, relax and enjoy the peaceful side of the holiday season! Flickering candlelight is always a cozy welcome addition to any Christmas festivities, and is a lovely way to create a warm and welcoming ambiance, allowing for a stillness that leads to reflections of the season! Steeped in traditions for centuries, illuminated candles have been associated with the yuletide season in various ways…from being placed in the window offering a warm welcome to travelers from afar, to representing the Star of Bethlehem guiding the Wise Men to the birthplace of Jesus Christ, to setting the ambiance to a family Christmas dinner! Whether you enjoy the brilliance of candlelit lanterns, grand candelabras or a glowing votive, there is no denying the beautiful luminescence candles bring to the advent season! Join us as we leave behind the hustle and bustle and take time to reflect on the calmer side of the holiday season with the new Candlelit Christmas Collection! Become enraptured in a glimmering paper collection hued in brilliant blues, garland greens and holly berry reds, ensconced in illustrations of glowing candlelit lanterns, pretty centerpieces, and gladdening poinsettias, all dipped in elegant snowflake patterns, breathtaking brocades and festive floral clusters! A brilliant assembling of cling stamp sets, along with coordinating dies, offer radiant illustrations of festive lanterns, stunning ornamental centerpieces and beautifully scripted sentiments, perfect for embellishing all of your Christmas themed paper crafting creations. Stamp, die cut and shape an assortment of traditional flowering poinsettias, along with decorative holly accents quickly and easily with the coordinating cling stamp set, dies and dimensional shaping mold, allowing you to assemble realistic holiday poinsettias ideal for accenting handmade holiday greeting cards, scrapbook layouts, and heirloom albums!  So, join us as we light our favorite candles, take in the beauty of the holiday season, and enjoy the shimmer and incandescence of the Candlelit Christmas Collection!

Since I didn't have time to work with this collection before I went away on vacation, I opted to create a super simple card creation for my first inspiration project!
Did you know that in each Heartfelt Creations paper collection there are an abundance of premade card panels? They are perfect for the times that you don't have time to do complicated design and need a card quickly!

...here's a peek at my first project using this glorious collection...I've used one of the premade card panels which made it super quick and easy....


(I apologize for the somewhat blurry photo...for some reason when it uploads, it does not upload clearly as it appears in my photo editor...and I'm super frustrated with it at the moment!)

First I die cut the circle center using one of the dies from the Circle Basics Large Die. 
I've trimmed a mat for the background just slightly smaller than the 4.25" x 5.5" card base, and have then used dimensional tape to add the rectangle portion of the card to the card base. Using my Designer Dries Clear Adhesive, I've added the center portion back into the center where it was originally was...this way it is recessed into the card panel and gives you that element of additional dimension! 

To give the card a delicate feel, I chose to die cut the border die from the Starry Night Decorative Die twice from white card stock. Using scissors, I trimmed them down so that they would fit the top and bottom of the card panel. 

I've stamped the pretty poinsettias onto Deluxe Flower Shaping Paper using Ranger Archival Ink - Geranium Red. Using my Stack and Store Daubers, I've added Ranger Archival Ink - Sunflower to the flower centers, Ranger Archival Ink - Geranium Red to all petals, and lastly a hint of Ranger Archival Ink - Leaf Green to a few places on the flower petals. I've then die cut them using the coordinating dies. For a finishing touch, I've inked all of the edges of each petal with Ranger Archival Ink - Geranium Red so they would pop a little more.

Once again using the Deluxe Flower shaping Paper, I stamped the holly illustrations using Ranger Archival Ink - Library Green. I've then colored the holly leaves using a combination of Ranger Archival Ink - Leaf Green and Vivid Chartreuse. The berries I have inked using 
Ranger Archival Ink - Vermillion. Once die cut using the coordinating dies, I inked all of the edges on each leaf using Ranger Archival Ink - Library Green.

The shaping for both the poinsettias and the holly leaves are super quick and easy using the coordinating Christmas Poinsettia Shaping Mold! I actually shaped two layers at once, and they all came out beautifully detailed! The molds are such a time (and hand) saver!

I assembled double poinsettias using two of the same sized poinsettia flowers. I've created one of the largest, a mid sized and a small version as well. I then created a cluster on the top of the card as shown, placing holly berry foliage around the flowers...and have added a small flower slightly lower near the sentiment. The sentiment is a part of the paper collection and is a super easy way to incorporate your well wishes when you don't have the time to get stamping!

Lastly, I've added Go Mango Prills to all of the poinsettia centers, and have accented all of the flowers, foliage and preprinted images using Designer Dries Clear Adhesive and Crystal Ultrafine Transparent Glitter!

I hope you've enjoyed today's share and I've inspired you to get a jump on your holiday card creations!
The premade card panels are perfect for the holiday season as there are usually an abundance of cards to design! 
Be sure to pop on over to the Heartfelt Creations blog to take in the rest of the festive designs the rest of the design team have put together to get your creative juices flowing!

Until next time...
Project Supplies
HCDP1-2104 Candlelit Christmas Paper Collection
HCFB1-478 3D Christmas Poinsettia Shaping Mold
HCPC-3881 Christmas Poinsettia & Holly Cling Stamp Set
HCD1-7249 Christmas Poinsettia & Holly Die
HCD1-7252 Starry Night Decorative Die


Thanks for visiting!

Thanks for visiting!