Showing posts with label tags. Show all posts

Oakberry Lane Tag Shaped Note Card...

Hello and Welcome!
Grab your coffee, tea, hot chocolate, and make yourself comfortable...I'm so glad you're here for a visit!

It's another Heartfelt Creations Wednesday, and it's a special one this week indeed!
Today is the special release of the new sentiments and tags stamps and dies!

I wanted to try to think outside of the box a little for this release, so I opted to create a shaped note card with the largest of the tag dies. I love uniquely shaped note cards...and I think they are so much fun to give and to receive. 

I chose to work with the Oakberry Lane Collection, as I had not had time to play with that adorable fall themed collection yet!

Here's how my little note card turned out...


I love how quickly I was able to mat both the inside and the outside of the card using the smaller matching die to the card base. 

I decided before I would adhere the front die cut to the card base, I would die cut one of the fancy tag dies into the center of the card so I could add a nice sentiment and make it stand out as a focal point. I then used the coordinating eyelet border die cut to create an eyelet frame for around the sentiment. I then opted to use the rectangle portion of one of the die cuts to add a birthday sentiment. 

The adorable squirrel images were colored up quickly and easily with the Stack and Store Daubers from Heartfelt Creations, while those pretty flowers were stamped, colored, die cut and then put through the shaping process using the coordinating shaping mold. I have totally fallen in love with these pretty wildflowers from the Oakberry Lane Collection! 

Of course, the icing on the cake is always the glitter. I've used Crystal Stickles on the frame around the main sentiment, and have used the Designer Dries Clear Glue and Crystal Transparent Glitter to add a touch of sparkle to the floral cluster and preprinted image on the front of the card. 

I hope I've been able to inspire you to use your tag dies for more than just tags...they can make awesome little note cards as well.

Until next time...
Supplies & Instructions

For more tips on creating with the Oakberry Lane collection, watch the tutorial at https://youtu.be/HirfUN8NEYY

 For more tips on creating with the tags & sentiments, watch the tutorial at https://youtu.be/eAfLuNkRda4. 

 For more tips on creating with the flower shaping molds, watch the tutorial at https://youtu.be/FSdPL7nXvQE.

Other Products Used: white card stock, Stickles - Crystal, paper trimmer, scissors, MISTI, Gemini Die Cutting Machine, BigShot, pop dots

Begin with a piece of white card stock folded in half. To create the shaped card, lay one edge of the large tag die over the fold of the white card stock and secure in place using a low tack tape. Die cut using your die cutting machine.

Choose the papers you wish to use for the card front and inside from the Oakberry Lane Paper Collection. Die cut using the coordinating smaller size tag die. Ink all edges using Ranger Archival Ink - Deep Purple. 

Die cut the center of the card front using the decorative die shown in photo. Adhere mat to front of card and inside panel to inside card as well. 

Next, using a piece of white card stock, die cut the eyelet frame for the front of the card around the sentiment. Adhere to card base.

Stamp sentiment into center die cut on card front using Ranger Archival Ink - Deep Purple. 

Stamp one inking of the squirrel on tire swing, squirrel gifting the acorn, as well as two acorn images onto white card stock using Ranger Archival Ink - Jet Black. Using Stack and Store Daubers, color acorn and squirrels using Ranger Archival Ink - Sepia and Coffee. Color tire swing using Ranger Archival Ink - Jet Black. 

Stamp one inking of each size of the Oakberry Blossoms onto white card stock using Ranger Archival Ink - Deep Purple. Color centers of flowers using the same Deep Purple, and the rest of the petals lightly with Ranger Archival Ink - Majestic Violet. Die cut using coordinating die and then edge flower petals using a Stack and Store Dauber to apply Ranger Archival Ink - Dark Purple. 

Stamp three to four inkings of the leaves found in the Oakberry Blossoms Cling Stamp Set onto white card stock using Ranger Archival Ink - Fern Green. Using Stack and Store Daubers, add Ranger Archival Ink - Leaf Green to center of leaves and then color remaining portions of leaves using Ranger Archival Ink - Fern Green. Die cut using coordinating dies.

Shape Oakberry Lane Blossoms and foliage using coordinating 3D Blossoms Shaping Mold. 

Assemble one large flower using two of the largest petals and one of the next side down. Assemble one mid sized flower using two of the mid sized petals one one smaller petal piece. Assemble one small flower blossom using two of the smallest petal pieces. 

Shape squirrel images slightly using Deluxe Flower Shaping Kit. Adhere squirrel on tire swing onto card front as shown, making sure it does not cover up your sentiment. Arrange leaves to create a cluster for tire swing to hang from. Adhere large and mid sized flowers, along with acorn die cuts as shown. 

Stamp Happy Birthday Sentiment onto white card stock using Ranger Archival Ink - Majestic Violet, and die cut using the rectangle portion from the fancy die found in the Ornamental Tags Die.
Adhere to card front using dimensional pop dots. Adhere squirrel and smallest flower to card front as shown.  

Lastly, adhere prills to flower centers, glitter to flower clusters and preprinted images on paper, and Crystal Stickles to frame around sentiment.


Wedding Tag with the Heartfelt Creations Sentiments & Tags Special Release...

Hello, hello, hello!
I'm so glad you're joining me today!

It's another Heartfelt Creations Wednesday, and this is a special one...with a very special release!
Today we are releasing the Tags and Sentiments Collection! It is a fabulous assembling of tags and coordinating sentiments! It's everything you need for album making, scrapbooking or cardmaking!

Many of you already know that I made a wedding album for my niece as her wedding gift...well, these beautiful tag dies came just in time that I was able to incorporate them into the gift!

Here's a wedding album tag I created...


I've used the large tag and it's coordinating counter part from the Album Tags and Accents Dies. I've used the Classic Wedding paper collection to mat the tag base. I chose a portion of paper that had a beautiful image along the top and side that would go with my floral cluster. I've inked all of the edges with the Ranger Archival Ink - Pink Peony. Once the two pieces were adhered together, I die cut the hole for the tag with the horizontal die included in the same tag collection. 

I then die cut the pretty swirling die from the Ornamental Tags Collection and stamped the Congratulations sentiment from the Celebrate Love Cling Stamp set onto the die cut using Ranger Archival Ink - Jet Black and heat embossed it with a rose gold embossing powder. I opted to dust the embossing powder on very light as I was wanting some of the black ink to show through to give the sentiment an aged look. 

Before adding the sentiment to the tag, I've used a sponge to add some dries clear glue to the swirling portions and have then sprinkled it with Crystal Clear Powder. 

I added a floral cluster on the top corner consisting of a Sweet Peony, several smaller Classic Rose single blossoms, as well as a few Lush Lilacs scattered throughout. The foliage used in the cluster comes from the Classic Rose Collection, as well as the Leafy Accents Collection. 

Lastly, I've added a Crystal Transparent Glitter to the preprinted images on the tag, as well as the floral cluster. The sparkle was incredible, and this picture does not do it justice!

I hope I've inspired you to get creating some specialized tags for your albums, scrapbook pages and one of a kind handmade cards! Be sure to hop on over to the Heartfelt Creations blog to check out the amazing samples the design team have created for your inspiration!

Until next time...
Project Supplies & Instructions


To see how to shape the peony, watch the video at https://youtu.be/L9_MLkvpGPQ. 

To see how to shape the roses, watch the video at https://youtu.be/Z8P070kC3oo.  

For more tips on creating with the flower shaping molds, watch the tutorial at https://youtu.be/FSdPL7nXvQE

 For more tips on creating with the tags & sentiments, watch the tutorial at https://youtu.be/eAfLuNkRda4. 

 For more tips on creating with the Lush Lilac collection, watch the tutorial at https://youtu.be/KDbdzC0MnAI.

Other Products Used: white card stock, Lawn Fawn Rose Gold Embossing Powder, scissors, BigShot die cutting machine, MISTI, paper trimmer, ribbon, VersaMark Ink, heat tool, glue gun

Cut tag base from white card stock. Cut smaller coordinating tag mat from your choice of paper from the Classic Wedding Paper Collection. Ink edges of both tag pieces using Ranger Archival Ink - Pink Peony. Adhere pieces together and then die cut the hole for the ribbon using the small horizontal die. 

Stamp the large and small peony petals onto white card stock using Ranger Archival Ink - Majenta Hue. Color center Stack and Store Daubers using Ranger Archival Ink - Buttercup, and petals using a combination of Ranger Archival Ink - Rose Madder and Pink Peony. Color backside of petals as well. Die cut using coordinating diess Shape one larger peony as shown in peony shaping video listed above. 

Stamp one inking of lilac petals onto white card stock using VersaMark ink. Sprinkle with white embossing powder and then heat set with heat tool. Die cut using coordinating die. Follow shaping instructions as per Lilac Shaping Mold as listed above. Attach a white wired stamen to each flower by poking hole through center and then affixing with glue gun. Once glue has set, snip off wire. 

Stamp one inking of the small and mid sized Classic Rose onto white card stock using Ranger Archival Ink - Plum. Color using Stack and Store Daubers alternating Ranger Archival Ink - Plum and Tea Rose inks. Color back of petals as well. Die cut using coordinating dies. Follow instructions for shaping using the rose mold in video listed above. 

Stamp several inkings of the vine image in the Rose Vine Cling Stamp Set, as well as the foliage in the Leafy Accents Cling Stamp Set onto white card stock using Ranger Archival Ink - Fern Green. Using Stack and Store Daubers, color centers of leaves with Ranger Archival Ink - Leaf Green and then outer edges using Ranger Archival Ink - Fern Green. Die cut using coordinating dies. Shape rose vines using Deluxe Flower Shaping Kit, and Leafy Accents using the 3D Leafy Accents Shaping Mold.

Arrange floral cluster as shown on sample. 

Die cut the fancy swirling tag from the Ornamental Tags Die from white paper. Stamp sentiment onto tag using Ranger Archival Ink - Jet Black, and sprinkle lightly with Rose Gold Embossing Powder. Set with heat tool. 

Using a piece of Hydra Sponge, apply dries clear adhesive to the swirling embellishment portions of the die cut. Sprinkle with Crystal Clear and set aside to dry. Once dry, adhere to tag base as shown. 

Lastly, using Designer Dries Clear Adhesive and fine metal tip for adhesive bottles, apply Crystal Transparent Glitter to floral cluster as well as preprinted images on tag, and loop ribbon through tag opening.

Pocket Letter Craze

Hi Everyone!
Thanks for stopping by today!
It's Wednesday, which means I'm here to share with you another Heartfelt Creations project!
I have a quick question for you...have you jumped on the band wagon with the pocket letter craze?
I just recently discovered this new addiction and thought this would be a great way to showcase the Heartfelt Creations "Everyday Heroes" collection!

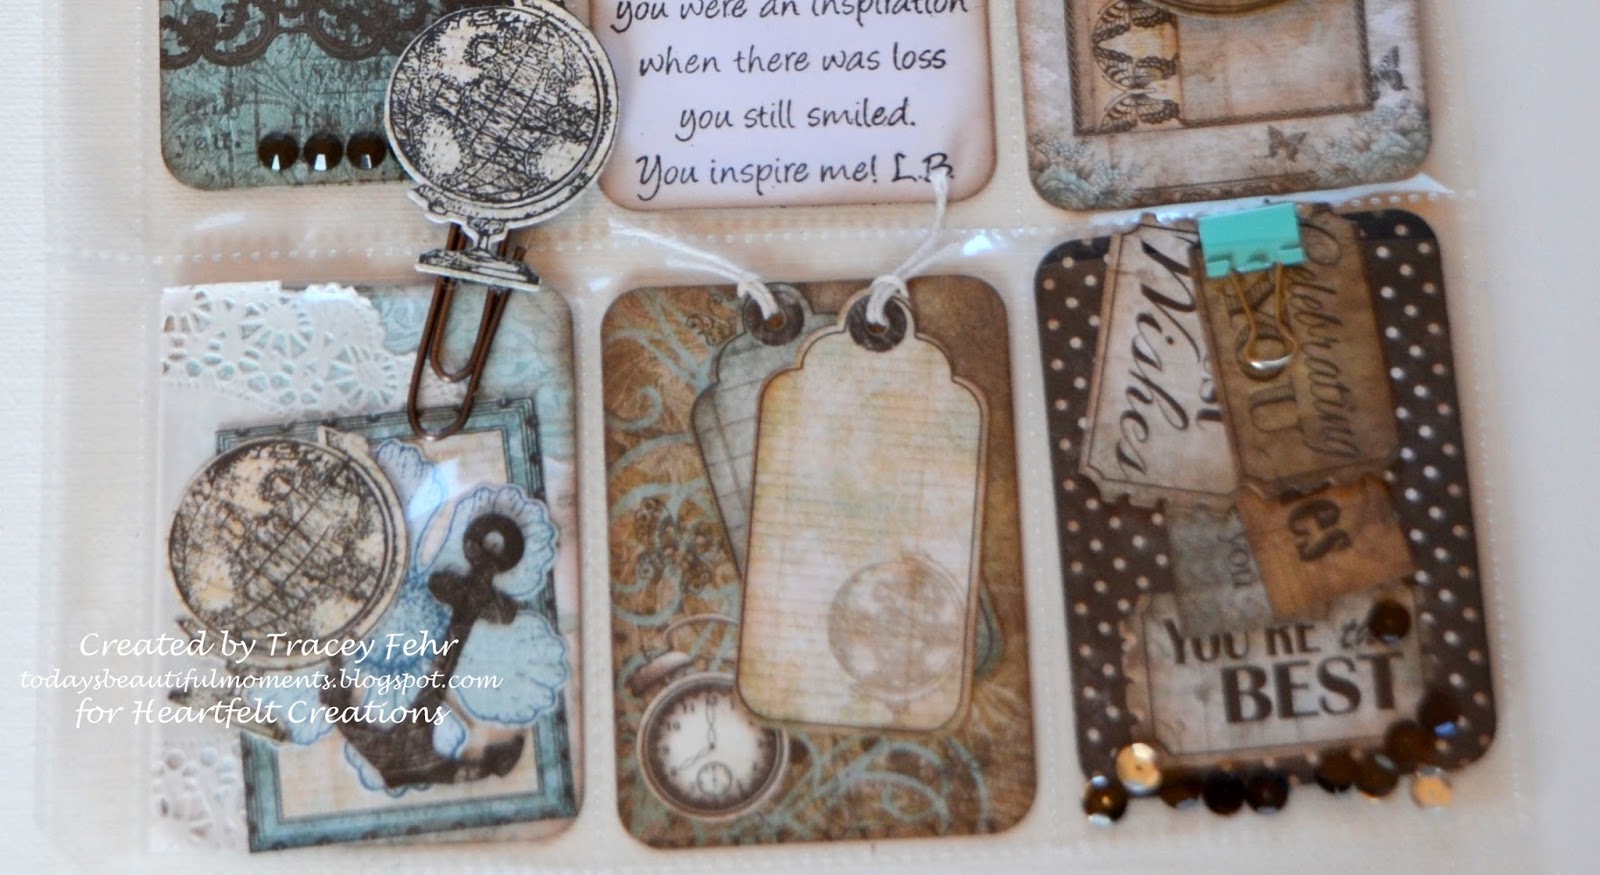
I had a few scraps laying around from the collection that were the perfect size to use in a pocket letter.  Using the Cut Mat Create 1B die cut set, I was able to cut the pieces out quickly to the perfect size I was needing for the pockets. I set about to embellishing them and started adding small gifts to send in the letter.  The gifts make this so much fun...and the possibilities are really endless!  Great items to include are buttons, washi tape, ribbons, die cut...and how about a tea bag, or even flower seeds!

Here's a peek at how it turned out...


I think this collection makes a beautiful color palette for a pocket letter!

Here's a few more close up pics as well...


Now I suppose I should put a disclaimer on this blog post...if you decide to venture out into this pocket letter craze, be very aware that it is addictive!  They are so much fun to make!

Lastly, I decided to try making a YouTube video tour of this project!
Now be kind...this is my first video and I know it is not perfect...but ok for a first attempt I hope!
Feel free to come see!

https://youtu.be/J_NXvEBRYO


And remember, the Heartfelt Creations blog holds so many more creative ideas for you to browse today!  Be sure to take some time to head over there and take a peek...and maybe leave some blog love for the designers.  I know we all appreciate it!

Until next time...

Project Supplies and Instructions
HCDP1-253  Everyday Heroes Paper Collection
HCD1-761  Everyday Heroes Die
HCD1-745  Luggage and Tags Die
HCD2-750  Cut Mat Create 1B Die
HCD1-758  Botanical Wings Die
HCPC-3667  You Inspire Me Cling Stamp Set
HCPC-3663  My World Cling Stamp Set
HCPC-3662  My Anchor Cling Stamp Set
HCPC-3651  Botanical Rose Cling Stamp Set

Other Products Used:  scor tape, Stampin Up Basic Black Ink, scissors, Big Shot Die Cutting Machine, Electronic Die Cutting Machine, Silhouette Design Store Design ID #50783, VersaColor Pine Cone ink, metal clip, paper clip, twine, sequins, buttons, washi tape, star brad, mini clothespin, charm, doily, ribbon, black gems, seam binding ribbon, Stampin Up small circle punch

Assemble all of your left over papers from the Everyday Heroes paper collection and using the 2 1/2" x 3 1/2" die from the Cut Mat Create 1B die set, cut 8 assorted patterned papers to use as your base cards.  Embellish each card as you wish, keeping in mind that when the small gifts have been removed from the Pocket Letter the cards will remain visible and you want them to be visually appealing.  Die cut one of the large tags from the paperpack to use as a journaling card to include questions for your pen pal. Add ribbon to the tag. Ink all of the edges on the cards on both front and back using a brown colored ink. Once you have created and embellished all of your pocket cards,  begin arranging and including the small tokens.  You may add buttons, sequins, ribbon, charms, etc.  Use the circle die and sentiment stamp from the Everyday Heros collection to spool your ribbon in an interesting way.  Include stamped die cut images, die cut ticket sentiments from the paper collection, die cut tags, flowers, etc.  Create a cute paper clip by gluing on a stamped die cut globe image to the paper clip with a hot glue gun.  Add a small circle punch in matching paper on the back of the image covering the mechanics of the paper clip.   Using an electronic die cutting machine, cut the envelope pattern and assemble.  You are now ready to bless someone with a beautiful pocket letter anywhere in the world.

An Encouraging Word for You Today...

Welcome, Welcome, Welcome!
Happy Wednesday!

I'm back with a second project today with the Birds and Blooms Collection by Heartfelt Creations!
If you haven't checked out this collection yet, be sure to head over to the blog and the store for a peek!  It's fabulous...and very popular...the "I Want It All" packages have already sold out in one week!!!
So, don't wait if you're contemplating a purchase of any of the remaining products!

I came across a tutorial at SplitCoast Stampers that I wanted to give a try.  It was an ATC booklet created out of one piece of cardstock or designer paper.  You can find that tutorial here.  I created one as a mock up and decided that it was just a little too tiny to do much embellishing, and that I really wanted to make more of in interactive booklet.  I decided to give the same technique a try with a full 12x12 piece of designer paper and came out with a creation just slightly smaller than your average cheque book.  
This I was able to work with!

Now, I wasn't sure exactly how I wanted to theme it...make it for an occasion such as birthday, thinking of you, etc. when it popped into my mind to create an encouragement booklet! 
So many people in my life lately have been discouraged with certain circumstances, receiving bad news of loved ones falling ill, loved ones passing away, or being cooped up sick with colds, flu, etc. and I thought what I neat idea if I could create something to encourage them!
I wanted to incorporate Scripture verses, pockets, tags, glitter and sparkle...and how can you not be cheered and encouraged when you see the beautiful Birds and Blooms papers and stamps!
So I set to work!

Here's a look at the little encouragement booklet I created!


Would you be so gracious as to allow me to give you a tour of this tiny creation?
My apologies as the post will get a little picture heavy!

Let's begin with a close up of the front cover...


The little birds and the blooms in this
collection are totally awesome!
I've water colored the little birdie after the stamped image was dry.
After the flowers were shaped I glittered just the edges with Glitter Ritz and added Prills to the centre of each bloom.  
The little cover panel has been applied with 3D pop dots to give the project some dimension.

Let's move along to the first set of pages!
First the left side with the pocket and tag...


...and then the right side with the encouraging verse...


...moving along to the centre portion of the booklet...
again a scripture sentiment and another tag


The tags in this creation give you plenty of journaling space for you to add in your
own handwritten messages of encouragement!
And another idea...why not place a gift card in one of the tag pockets as well!
Who doesn't love a gift card to their favorite coffee house, and it's another way to encourage someone and remind them how special they are!

...and the last pages...


Each of the pages and tags have been embellished with a little bit of Glitter Ritz to give them the sparkle factor...wish the pics showed it a little more!
This little project has so many endless possibilities... anniversarys, birthdays, just because, thinking of you, etc.  It would make a wonderful present for a prayer partner or someone special in your church as well.  It's a wonderful alternative to a card and yet not an overwhelming creation that needs a bunch of time...but still packs a presentation punch!

Well, that's all from me today!
So glad you were able to pop by and visit!
I hope I've been able to brighten your day a little with this beautiful collection. 
And if you're someone who is going through a rough patch, feeling blue or just needing an extra dose of sunshine to put the spring back in your step...I hope that this booklet has spoken to your heart and reminded you that you are loved and special!
I'd love to know what you think of this creation...so please feel free to leave a comment below!
I have also included the instructions and a link to the tutorial I used below!

Until next time...

Project Instructions & Supplies

Other Products Used:  ribbon, Glitter Ritz, paper cutter, Stampin Up Garden Green ink,  Stampin Up Basic Black ink, Antique Linen and Faded Jeans distress markers, water color blending pen, water mist spray bottle, finger daubers, funnel tray, 3D pop up dots,

Locate one of the 12x12 premade scrapbook pages in the Birds and Blooms collection paper pack as the base of this project is created from one card stock sheet.  For folding instructions please see the SplitCoast Stampers tutorial here.
Please keep in mind that you will need to follow the measurements for this size booklet located at the bottom of the SplitCoast Stampers tutorial as this is a larger version of the ATC example shown.  (This booklet measures 5 3/4" x 3").  Once your folding is completed, add a piece of coordinating card stock over the outside of the booklet covering the spine to give it added strength.  Select a decorative strip from the paper pack to cover the mechanics of adding the extra cover over the spine.  You will need a matching strip for both front and back.   Select the sentiment strips from the paper pack that you wish to use on top of booklet pages.  Adhere to tops of pages and allow glue to dry.  Begin cutting your 3 layering panels for the inside of the booklet.  Each panel should measure 4 3/4" x 2 1/2".  Score around the edges as shown in the tutorial and stamp one uplifting sentiment on each panel. Adhere one panel to one of the first pages, one of the second and one of the third.  To create simple pockets to go on the opposite page of the sentiment panels, cut two squares 4 1/2" x 3".  Then cut these in half on the diagonal.  Adhere pockets to booklet remembering to not put glue on the side where you will want to slip in your tags.  Select the sentiment tickets from the paper pack that you wish to use on the bottom of each pocket and adhere.  Cut out three premade tags from the collection that you wish to use and thread with ribbon.  Moving along to the cover, cut a piece of floral cardstock 3 3/4" x 2 3/8".  Score around the edges as you previously did with the sentiment panels.  Stamp sentiment and add bow to the top corner as shown. Adhere to the front of the booklet using 3D pop up dots. Stamp flowers (Rose Bud Memento ink), leaves (Bamboo Leaves Memento ink), and fluffy bird image (Stampin Up Basic Black ink) and allow to dry. Die cut the images with the coordinating dies.  Shape flowers and add Glitter Ritz around the edges for some sparkle and all yellow prills to the centre of each bloom.  Ink the edges of the leaves with Stampin Up Garden Green ink using a finger dauber.  Shape leaves.  Water color the fluffy bird using distress markers.  Die cut one of the branches and trim to suit size of booklet.  Apply small amounts of glue to the printed flowers on the cover panel and then sprinkle with Glitter Ritz.  Once dry, you can begin arranging your little bird on the branch and floral cluster.  Once happy with your layout adhere to booklet.  Lastly, going through the booklet, add small amounts of Glitter Ritz to the flowers on the pages as well as on the tags to give them a beautiful subtle shimmer.  Remember to handwrite your own encouraging messages on the tags before gifting to a friend or loved one...another way to make it extra special would be to enclose a gift card in one of the pockets! 

This project has been shared in the following challenges...

Thanks for visiting!

Thanks for visiting!