Showing posts with label winter. Show all posts

Introducing the Sweet Serenade Notecard Collection from Amazing Paper Grace...


The Sweet Serenade Notecard Collection is simply to extend a sweet thought or warm greeting to let them know you’re thinking of them through a heartwarming notecard. The inspiration behind this collection is the ability to create beautiful notecards. Everything in this collection coordinates together from the card base to the embellishments to the stamps to make wonderful notecard creations! Notecards also make a wonderful gift as a boxed set! Swoon your family and friends with a special handmade gift! Make it seasonal for fall or for the holidays. Maybe a specific style such as soft vintage, clean and simple, or even a mixed media twist!


Today's projects were created with dies provided by Becca Feeken of Amazing Paper Grace.

My Projects for Today

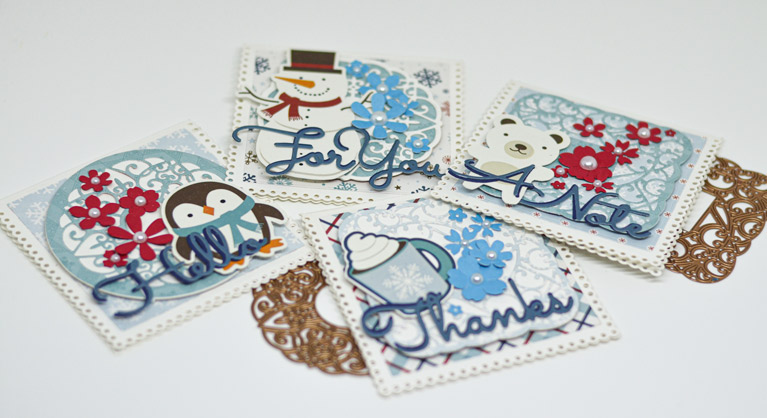
Today I'm using the Scalloped Symphony Notecard S6-177 to create my fun filled note cards! I know when I think of creations done with Amazing Paper Grace products, I tend to think of ultra feminine, beautifully delicate and detailed creations...and today I wanted to share how easily this little note card ensemble of dies could be used to create a more cutesy note card set!


I love that this set has so many different ways you can layer/cut the different shapes! I thought the beautiful scrollwork worked perfectly for winter themed projects! And I cannot tell how easy it is to create a notecard using this set! I love the scoring bar that you put in place before running the notecard die through your die cutting machine! It gives you a beautiful and professional score mark that takes all the stress out of trying to get the card scored perfectly if you were trying to do it by hand after die cutting the notecard shape! I also love that I have the option of using this larger sized notecard is for a slimline card! Talk about great options!

And let's talk about card matting for just a moment...there's no measuring as all of the beautiful shapes in this collection have been sized to nest and give you flawless results each and every time! There's no redoing because you cut the square crooked, or you didn't quite get that circle shape you desired when you tried to cut it out by hand!

I also created some matching envelopes from the same paper I used for the notecards so the collection completely matches! For this I hauled out my envelope punch...can you believe it has sat in my craft room for years and was never opened! I know...what a shame! It sure came in handy for this project! 


So, for this little batch of notecards, I opted to design them with a winter theme and use the Sweet Sayings Notecard Sentiments S4-1148 on the front of each! 


They are terrific generic, larger sized sentiments that work perfectly if you're going to be gifting a little notecard set! I love to gift handmade notecard sets to "the dreaded" Christmas work party gift exchange. I usually pair them with a nice hand lotion, or candy...and I've created the matching box designed with this in mind...there would totally be room to add some nice chocolates to this little gift set!

I totally love to be able to gift things that are useable and won't take up space! These little notecards are the perfect size to have on hand waiting for when you need one in a pinch! Plus, I love that when the notecards are all gone, you still have an adorable gift box to pass along to someone else to enjoy!

Now, while these little notecards are winter themed...I thought it would be fun to use the Petite Floral Potpourri Flowers S3-420! I thought they would add a hint of whimsy, and I tried to adhere them to the notecards so they almost looked like falling snow!


I added a simple white pearl to the center of each to finish off these dainty flowers!


I thought they turned out super cute! What do you think?


Designers Tip: I had so much fun working with this notecard collection! I found it was great to play around with the various shapes and one of the first things I did when I received it was to sit down and just die cut all of the different ways that you could use these dies...you can die cut into your notecard to that you have a decorative background, you can die cut as several different shaped embellishments, etc. I encourage you to do the same to see how many different looks you can create! 

Sweet Serenade Notecards Availability:
These dies and plates are available from Spellbinders right now! Click here: Sweet Serenade Notecards Collection.


Supplies:
Stamps:  n/a
Paper: Echo Park - Love Winter Collection Kit, white card stock, red card stock, blue card stock
Ink: n/a


For more Sweet Serenade
Notecards Collection Inspiration
Visit each Creative Team blog linked below for their take on creative paper crafting ideas using the Sweet Serenade Notecards Collection!

Please comment: Which Sweet Serenade Notecards set speaks to you?

A Little Playtime in the Craft Room...

Hello Everyone!
Just a quick pop in today to show you a little something I threw together in the craft room this morning!

We woke up to no hydro, gusty winds and ....SNOW!!!
Now, I know I live in Manitoba, Canada and can expect the white stuff any time now...but this seems super early!  

Well, the kiddos managed to get ready through the use of flashlights and candlelight and caught the bus in time.  But, don't you know that the hydro came back on just a few minutes after they left!  LOL

I decided I would allow myself 1 hour in the craft room to feel sorry
 for myself about the weather!

I had a new Penny Black stamp that I had been wanting to ink up and decided this would be the perfect time...after all...the stamp looked like my yard with all the snow, etc.  However, I decided that even though my card would depict a snowy scene I could still add a lovely sunset and not the blustery wind I was enduring!

Are you ready to see how it all came together?


I really enjoyed working on this and got to try a few new techniques that I had discovered on the Penny Black YouTube channel! It came together quite quickly and easily!


I had a Christmas card in mind when I started creating this, but think that really this would work as a winter birthday or thinking of you card as well!

Now, I've added this card to my Etsy shop...so if you're interested act quickly, as each card I produce is a one of a kind!  I never make the same exact card twice...and never create the same in bulk!

I do hope you've enjoyed today's share!
I wish you warm and sunny weather wherever you are...I guess I'll keep the snow and not try to pass it along to you!

Until next time...
This card has been entered in the following challenges...
 

A Winter's Eve Country Christmas...

Welcome! 
I'm so glad you're here!
It's another Heartfelt Creations Wednesday, and I have a little project to share with you featuring the beautiful Winter's Eve Collection!
Tell me...have you started your holiday cards already?
I hope so...because there's really nothing worse than trying to get it done in December!  LOL

The Winter's Eve Collection is so soft and peaceful and I just couldn't resist the opportunity to create a winter scene card with several of the preprinted card panels that are included in the paper collection.  What is more peaceful and serene than a little country church and some gorgeous deer.

Here's how this week's project turned out...


I thought the bells from the Classic Wedding Collection were the perfect embellishment to pair with the church image...who doesn't love to hear the church bells ring on Christmas morning?

Here's a closer look at the bell and foliage cluster...


I've colored the bell embellishment with my Copic markers...just quick coloring with not too much blending of colors.  I've used some of the foliage pieces found within the Window Box Fillers Cling Stamp Set and Dies to give it a holiday feel.  

As you can see I've also added some snow effects with the Dries White Glue and crystal clear powder on the window, foliage and bells themselves to give it all a wintry feeling.  
Thanks to the preprinted backgrounds and quick coloring, this card really didn't take me to long to complete!  

I hope you've enjoyed my share today!  
Be sure to pop on over to the Heartfelt Creations blog to take in the other amazing projects the rest of the design team have come up with...they never disappoint!

Until next time...
 Project Supplies and Instructions

Other Products: white cardstock, VersaFine Grey Ink, VersaColor Pine Cone Ink, Copic Markers - C3, B93, R37, R22, R32, YG03, YG63, G94, Gemini Die Cutting Machine, paper trimmer, scissors, pop dots, Glitter Ritz

Instructions: Create a 6"x6" card base from white card stock. Trim preprinted background panel slightly smaller than card base, ink all edges with a soft brown colored ink and adhere to card base. Trim down small premade card panel featuring church as shown. Ink all edges with a brown colored ink. Die cut decorative oval style die from Window Box Elements die and cut in half. Adhere halves to each side of church scene as shown. Adhere to card base using pop dots. Stamp window frame image onto white card stock using a grey ink. Die cut using coordinating die and adhere over church scene as shown. Trim out preprinted sentiment and ink all edges with a brown ink. Adhere to base of window die cut. Stamp one inking of church bells from the Classic Wedding Bells Cling Stamp Set along with one inking of each of the rose style leaves and one holly berry style foliage cluster from Window Box Fillers Cling Stamp Set. Color and then die cut using coordinating dies. Shape bells and all foliage die cuts slightly with flower shaping tools and adhere to card front as shown. Using a dries clear glue and crystal clear glitter add snow effects to window, bells and greenery. Using a dries clear glue and a transparent glitter add some glitter accents to the background panel.

Announcing the Winter's Eve Collection...

Welcome to my blog!
I'm so glad you're here!
What have you been up to lately?
As I schedule this post we are in the midst of a crazy heat wave and there are severe thunderstorm warnings and heat warnings all over the place!
It's kinda humorous to be working on Christmas cards during all this summer heat!  LOL

As you know, it's another Heartfelt Creations Wednesday!
This week we're releasing the new Winter's Eve Collection!
It's another beautiful winter/holiday assembling!

Here's a little more about it...

Celebrate the more simple side of the holiday season, and add a touch of nostalgia and wonder to all of your holiday themed greeting cards, scrapbook layouts and altered art pieces with the new Winter’s Eve Collection by Heartfelt Creations. Reminisce Christmas blessings from years gone by with a tranquil collection featuring an array of illustrations bringing back memories of silent nights by candlelight, choir voices resonating from the little church in the wildwood, woodland creatures foraging for food beneath the glistening snow, windows illuminated with the soft glow of a warming fireplace, and beautifully decorated Christmas trees ready to engage the imagination and excitement of little boys and girls eager to see what lies beneath them on Christmas morning! A charming and peaceful paper collection delivering a color palette of icy blues, pine greens, poinsettia pinks, berry reds and frosty whites filled with decorative elements including delicate swirls, subtle checks, bold stripes, dainty florals and lace like accents will whisk you away to a peaceful winter wonderland overwhelming your heart with the comfort and joy of the season! Three wintry themed cling stamp sets along with coordinating dies bring a further touch of simplicity to the season with bouquets of petite flowers and foliage, an old fashioned sled and a window frame with dimensional box ideal for creating warm and inviting scenes featuring a beautifully illustrated candle arrangement, Christmas tree or glowing fireplace. Three intricate and ornamental dies lend themselves beautifully to creating breathtaking decorative die cuts for accenting all of your winter wishes. Come along with us as we set the scene for a tranquil winter’s eve and a happy holiday season!

I chose to use the small window box die cut on my first card featuring this pretty collection.
 I thought a winter floral box would be so adorable paired up with one of the pre printed card images featuring a glowing fireplace and the window die cut.

Here's how the project turned out...


I've used a 6"x6" preprinted card panel as the base for this creation.  I've added some VersaMark ink to the edges and then added a mixture of embossing powder and glitter and then sprinkled it on and heat embossed it giving the card and aged look with some texture!

Here's a closer look at the dimension of the piece...


I think a window box idea is such a unique and different element to add to a Christmas card, don't you?  It's sure to stand out among the rest of the cards received during the holiday season!
I love those snow covered branches mixed with just a few of the last florals remaining after a first snow fall!

I added several of the smaller Sparkling Poinsettias to complete the look as I wanted to tie in the poinsettia background images.  And, of course I couldn't resist having a bird sitting nearby being such the bird lover I am!
 
...and here's another close up view...


Isn't that fireplace scene so cool in the window? 
I didn't have time to color the stamped image of the scene, so I opted to use one of the premade card panels which made it quick and easy to get that look of peeking inside from the outdoors!

Well, that's all for me today!
I hope you've enjoyed the project I've shared with you today!
Be sure to pop by the Heartfelt Creations blog to take in the amazing projects the rest of the design team have created!

Take care, and enjoy getting a jump on all of your holiday creating!

Until next time...
Project Supplies and Instructions
Winter's Eve Paper Collection, HCDP1-281
Window Box Fillers Cling Stamp Set, HCPC-3795
Window Frame Die, HCD1-7148
Window Box Fillers Die, HCD1-7149
Window Box Elements Die, HCD1-7150
Festive Holly and Cardinals Cling Stamp Set, HCPC-3791
Festive Holly and Cardinals Die, HCD1-7145
Sparkling Poinsettia Cling Stamp Set, HCPC-3680
Large Sparkling Poinsettia Cling Stamp Set, HCPC-3679
Sparkling Poinsettia Die, HCD1-766
Large Sparkling Poinsettia Die, HCD1-765
Deluxe Flower Shaping Kit, HCST1-401
Stack and Store Daubers, HCDA2-450
ColorBox Fluid Chalk Ink - Lime Pastel, 71026
ColorBox Fluid Chalk Ink - Rouge, 71015
ColorBox Fluid Chalk Ink - Lipstick Red, 71037
ColorBox Fluid Chalk Ink - Creamy Brown, 71036
ColorBox Fluid Chalk Ink - Olive Pastel, 71012
Memento Dye Ink Pad - Cantaloupe, TSMP103
Rock N' Roll Prills - 12 Pack, ANC851
Designer Dries Clear Adhesive, 159723
Designer Dries White Adhesive, 159951
Metal Tip for Adhesive Bottles, 352854
Rajni Chawla's Frosting Powder, PGM15016

Other Products: Gemini die cutting machine, VersaFine Black Ink, white card stock, VersaColor Pine Cone Ink, Yellow Stickles, Glitter Ritz, Distress Embossing Powder - Pumice Stone, heat tool, scissors, paper trimmer, VersaMark Ink Pad, pop dots

Learn how to shape the Sparkling Poinsettia here 


Instructions: Create a 6"x6" card base using a white card stock. Locate 6"x6" premade card panel shown on sample in Festive Holly Paper Collection. Ink all edges with a light brown colored ink. Using a VersaMark ink pad, ink around edges and into card front and sprinkle with a mixture of vintage embossing powder and glitter. Heat emboss with heat tool and then adhere to card front. Next locate smaller premade card panel within paper collection that features the indoor fireplace scene. Ink all edges with a soft brown colored ink and apply to center of card front with dimensional pop dots. Die cut the window frame using white card stock, as well as one decorative window topper embellishment and the window box. Use window filler die cut to cut out center of window box and adhere sentiment from paper collection into die cut opening. Ink all edges lightly with a brown colored ink on all window embellishments. Adhere to card base. Stamp one inking of the small poinsettia cling stamp set, the leaves from the Large Sparkling Poinsettia Cling Stamp Set as well as the holly and berry with cardinal illustration from the Festive Holly Collection and several flower and branch illustrations from the Window Box Fillers Cling Stamp Set with a black ink onto white card stock. Die cut using coordinating dies and then color using Stack and Store Daubers. Shape all elements with flower shaping tools and create window scene as shown on card front. Using a dries white glue, adhere frosting powder to branches, window box and poinsettias. Heat set with a heat tool. Adhere prills to poinsettia centers using a dries clear glue and add yellow stickles to flower centers in flower box arrangement.

Cardinal Christmas...

Hello and Welcome once again!
I hope you are keeping well!
I can't believe that it's another Heartfelt Creations Wednesday!
They seem to come faster and faster all the time!

As you are probably well aware, it's Christmas in July with us over at Heartfelt Creations and we've been sharing projects created with the Festive Holly Collection!
It is divine!

For this week's share I decided to attempt something a little different with the collection!
I am a lover of blue Christmas cards, and with all the reds and greens going on in this collection, I chose to challenge myself to get some blue in there somehow!
The idea to create a softer hued, water colored card came to mind and I got busy!

I hope you like how I've incorporated my blue interpretation into this project...


I've stamped the cardinal image onto watercolor paper using a permanent ink.  I've used my distress markers scribbled on an acrylic block and slightly watered down to color my image.  I've done the same with the die cut images around the Christmas bauble.


In the close up above you can see that the images are really water colored and have that look to them.
Once the images were all dry, I've gone in and then added a bit more color where I wanted portions to be darker!  Due to photo editing the colors are appearing slightly darker here on the cardinals than they really do on the card.

Using a dries white glue I've added some glitter to create snow where needed, and I've used a dries clear glue on the card background on the snowflakes and then applied a transparent glittter!
You can never have to much sparkle and shine around the holidays!


The Christmas bauble is a Spellbinders die that I purchased last year and never got around to using!
So, when I thought about how to add an extra touch of the holidays to this card...as well as some more blue and silver...these dies came to mind!
They are so delicate and pretty!
I've snipped apart and arranged the holly and berry die cuts around the ornament which has been popped up with pop dots to give the card some dimension.
I've created a multi loop bow as a finishing touch so the bauble didn't look like it was just there, but rather that it was hanging off the card.

I hope you've enjoyed my unique design for this newest holiday collection!
You now know that you can incorporate different colors by creating your own stamped background and bringing in different coloring mediums!
I also hope that you'll pop by the Heartfelt Creations blog to see what the rest of the uber talented design team has created!

Until next time...
Project Supplies and Instructions
Festive Holiday Cling Stamp Set, HCPC-3792
Holly Berry Jingle Cling Stamp Set, HCPC-3793
Festive Holly and Cardinals Cling Stamp Set, HCPC-3791
Holly Berry Jingle Die, HCD1-7147
Festive Holly and Cardinals Die, HCD1-7145
Snow Kissed Flakes and Tag Cling Stamp Set, HCD1-3751
Deluxe Flower Shaping Kit, HCST1-401
Memento Dye Ink Pad - Summer Sky, TSMP604
Designer Dries White Adhesive, 159951
Designer Dries Clear Adhesive, 159723
Metal Tip for Adhesive Bottles, 352854

Other Products: 5"x 6.5" white card base, Gemini Die Cutting Machine, paper trimmer, water color paper, water color paint brush, water, Distress Markers - Barn Door Red, Fired Brick, Ripe Persimmon, Peeled Paint, Stormy Sky, and Mermaid Lagoon, Spellbinders Heirloom Reflections Ornament Die, silver card stock, silver twine, Glitter Ritz, blue card stock, VersaFine Black Ink, acrylic stamp block, pop dots

Instructions: Stamp the small snowflakes from the Snow Kissed Flakes and Tag Cling Stamp Set onto white card base using a light blue ink. Set aside to dry. Cut a piece of water color paper just slightly smaller than 4.25" x 5.5" and stamp the main cardinal image using a permanent black ink. Water color using distress markers. (Apply color from marker to acrylic stamp block and then spray a bit of water onto it to get a lighter color, then use a wet water color brush to apply color to image.) Once dry, stamp sentiment onto card front panel using a permanent black ink. Water color background with shades of blues. Once dry, adhere to a blue card stock panel just slightly larger than the card front. Adhere to card base using pop dots. Stamp one inking of the corner cardinal with holly and berries as shown in sample and one corner of plain holly and berries onto water color paper using a black permanent ink. Die cut using coordinating dies, water color and shape using flower shaping kit. Die cut ornament cuts from silver and blue card stock. Adhere together using a dries clear glue. Adhere to card front as shown using pop dots. Snip apart both holly and berry die cuts and position around Christmas bauble as shown. Create a looped bow and adhere to top of ornament. Using a dries clear glue, add transparent glitter to stamped snowflake background. Allow to dry. Using a dries white glue, add snow where desired on images and then sprinkle with glitter.

Thanks for visiting!

Thanks for visiting!