Showing posts with label Echo Park. Show all posts

Introducing the Sweet Serenade Notecard Collection from Amazing Paper Grace...


The Sweet Serenade Notecard Collection is simply to extend a sweet thought or warm greeting to let them know you’re thinking of them through a heartwarming notecard. The inspiration behind this collection is the ability to create beautiful notecards. Everything in this collection coordinates together from the card base to the embellishments to the stamps to make wonderful notecard creations! Notecards also make a wonderful gift as a boxed set! Swoon your family and friends with a special handmade gift! Make it seasonal for fall or for the holidays. Maybe a specific style such as soft vintage, clean and simple, or even a mixed media twist!


Today's projects were created with dies provided by Becca Feeken of Amazing Paper Grace.

My Projects for Today

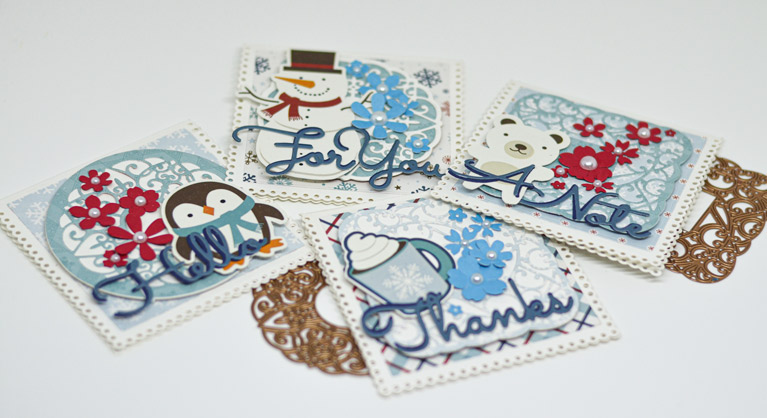
Today I'm using the Scalloped Symphony Notecard S6-177 to create my fun filled note cards! I know when I think of creations done with Amazing Paper Grace products, I tend to think of ultra feminine, beautifully delicate and detailed creations...and today I wanted to share how easily this little note card ensemble of dies could be used to create a more cutesy note card set!


I love that this set has so many different ways you can layer/cut the different shapes! I thought the beautiful scrollwork worked perfectly for winter themed projects! And I cannot tell how easy it is to create a notecard using this set! I love the scoring bar that you put in place before running the notecard die through your die cutting machine! It gives you a beautiful and professional score mark that takes all the stress out of trying to get the card scored perfectly if you were trying to do it by hand after die cutting the notecard shape! I also love that I have the option of using this larger sized notecard is for a slimline card! Talk about great options!

And let's talk about card matting for just a moment...there's no measuring as all of the beautiful shapes in this collection have been sized to nest and give you flawless results each and every time! There's no redoing because you cut the square crooked, or you didn't quite get that circle shape you desired when you tried to cut it out by hand!

I also created some matching envelopes from the same paper I used for the notecards so the collection completely matches! For this I hauled out my envelope punch...can you believe it has sat in my craft room for years and was never opened! I know...what a shame! It sure came in handy for this project! 


So, for this little batch of notecards, I opted to design them with a winter theme and use the Sweet Sayings Notecard Sentiments S4-1148 on the front of each! 


They are terrific generic, larger sized sentiments that work perfectly if you're going to be gifting a little notecard set! I love to gift handmade notecard sets to "the dreaded" Christmas work party gift exchange. I usually pair them with a nice hand lotion, or candy...and I've created the matching box designed with this in mind...there would totally be room to add some nice chocolates to this little gift set!

I totally love to be able to gift things that are useable and won't take up space! These little notecards are the perfect size to have on hand waiting for when you need one in a pinch! Plus, I love that when the notecards are all gone, you still have an adorable gift box to pass along to someone else to enjoy!

Now, while these little notecards are winter themed...I thought it would be fun to use the Petite Floral Potpourri Flowers S3-420! I thought they would add a hint of whimsy, and I tried to adhere them to the notecards so they almost looked like falling snow!


I added a simple white pearl to the center of each to finish off these dainty flowers!


I thought they turned out super cute! What do you think?


Designers Tip: I had so much fun working with this notecard collection! I found it was great to play around with the various shapes and one of the first things I did when I received it was to sit down and just die cut all of the different ways that you could use these dies...you can die cut into your notecard to that you have a decorative background, you can die cut as several different shaped embellishments, etc. I encourage you to do the same to see how many different looks you can create! 

Sweet Serenade Notecards Availability:
These dies and plates are available from Spellbinders right now! Click here: Sweet Serenade Notecards Collection.


Supplies:
Stamps:  n/a
Paper: Echo Park - Love Winter Collection Kit, white card stock, red card stock, blue card stock
Ink: n/a


For more Sweet Serenade
Notecards Collection Inspiration
Visit each Creative Team blog linked below for their take on creative paper crafting ideas using the Sweet Serenade Notecards Collection!

Please comment: Which Sweet Serenade Notecards set speaks to you?

Echo Park Bundle of Joy Baby Album

Happy Friday!
I'm popping by today to share a post for Scrapbooks by Design!

Our church recently had an auction sale to raise money for missions. 
It's always a lot of fun and there's always so many crafty items that turn up....from knitting projects to beautiful wood work items, sewn baby blankets, doll clothes, quilts, etc.  Well, this year I decided I would donate a baby album.  I had been drooling over the new baby lines by Echo Park and when I mentioned to a friend what I was thinking of doing, she suggested that I do an album for a baby girl.  

Well, I jumped on it and chose the "Bundle of Joy/A New Addition - Baby Girl Collection Kit".
I decided to create an album from a written tutorial I had purchased from Paper Phenomenon/Kathy Orta, so I actually needed two of these kits...I still have a few leftovers for some cute cards yet though!  The thing I love about the kits is that you have all the coordinating paper from the entire collection, and you have the matching stickers and alphas!
I've also used some of the chipboard elements as well as a decorative brad from the collection.

Well enough chit chat...how about some pics...sorry there's quite a few!

Let's begin with the front cover...


...as you can see I've used a chipboard piece paired with a sticker to create a little medallion.  
The blue floral piece as well as the pink polka dotted piece are photo mats that pull out of the front cover.  


The first flap on the cover opens up to reveal those photo mats as well as a second flap.  
That adorable little sentiment card is one of several that are included in this fabulous paper line. 


This is what the cover looks like fully open.  I've added a mat for a 3.5"x5" photo along the side flap and a 5"x7" photo in the centre.

Now moving along to opening the album itself...


When you open the the album, the first thing you see is some fun paper and images from the paper collection and a place to mount two 4"x6" photos.  However it doesn't stop there...each of these pages open up to display more pretty goodness!


Remember those cute matted pieces with the barn and the alphabet...well they fold over to have more photos mounted on the back of them.  Once they are folded out, you find a pocket that will hold more photos or even a few special cards you'd like to keep from all those well wishes you receive when baby is born.  I've included five photo mats in the pocket...four 4"x6" and one 5"x7" mat...some of them have been created from left over scrap paper and some of them are journaling cards included in the paper collection. 

Moving along, let's flip open the other side of the album!


As you can see, the previously viewed side has been closed up and the other side of the album has been opened to show even more areas for photos.  The centre will fit a larger photo, and the half page will hold a 3.5"x5" in the upper pocket and a 4"x6" in the bottom pocket. 


When you flip the half page, you will see there is once again more photo mounting opportunities.
On the side adjacent to the half page, I've created just a fun page where parents or grandparents can record baby stats.  The little barn scene has been created using the stickers included in the collection.  


Flipping the pages once again, I've created a page ready for a 4"x6" photo and a decorative page featuring one of the small sentiment cards.  The "Baby" sentiment on the second page are once again stickers from the collection.  The bird above the sentiment card is from the chipboard accents.  


Another flip of the centre page reveals another pocket where I have once again added five photo mats of various sizes.   The flipped page has been prepared for another 4"x6" photo.  Once again I've used stickers here...the sentiment on the pocket as well as the adorable owl and sentiment on the other page.  

And lastly, the matching gift/storage box for the album.  I featured this several days ago, however thought I'd give you a quick peek once again with this posting.  


I hope you've enjoyed the tour of today's creation.

I also hope you will stop by Scrapbooks by Design's online store and treat yourself.  This collection boasts so much more...including washi tape as well as enamel dots!  There's even 6"x6" paper packs and add on paper packs that are perfect for card making!  And, let's not leave the baby boys out of this all...they have an adorable collection by Echo Park all of their own.  You can view the boys line here.

Well, that's all for me today!
Thanks for stopping by!
I'd love to hear what you think about this gift set!
Please feel free to leave me a comment!

Oh Baby!

Hi There!
Nice to visit with you today!

I'm back to share with you that we have a new challenge starting over at Unstampabelles Challenge blog today!
It's a super cute and fun theme...

"Oh Baby"

....you can make something for a baby, you can incorporate baby animals, or simply interpret the theme the way you see fit...just explain to us in your blog post how it fits our theme.
As you know, we always include a twist in our challenge, and for this month we are welcoming you to create something in a more non traditional style.
And a quick reminder that your project cannot have any stamping on it...we want you to think outside the box and come up with a creation that has not been touched by a stamp!

Now I have to admit that I had a hard time trying to think of something non traditional.
The best my creative mind would come up with was a gift box for a baby mini album I've been working on.  (Mini album will preview here on April 10 should you want to see what's going into the box!)  Oh, I suppose as a stretch, I could say that my non traditional style for this project would be that I've actually used cutesy baby paper...instead of my usual vintage styled paper lines.  I never use cutesy paper packs so this was interesting and fun!  LOL

Here's a look at how the gift box came out...


I really enjoyed working with this paper line!
It really did lend itself well to create a cute gift box!

But, before I go....let me remind you that you can get all the deets about the prize and sponsorship happening for this challenge on the Unstampabelles blog!

One lucky winner will be awarded this adorable baby onesie die...(adhesive just pictured to show size of die and is not included)


Remember that you have the entire month of April to complete this task should you choose to participate!  I hope I've encouraged you to give it a go!

Until next time...

This project has been shared in the following challenges...
 Come and Get It..."and Baby Makes 3 or More" 
Crafts 4 Eternity..."Baby Baby"


Thanks for visiting!

Thanks for visiting!