Showing posts with label diecutting. Show all posts

Debuting the Floral Sentiments Collection from Heartfelt Creations

Hello my friend!

It's been forever since we've met here, hasn't it!


With having stepped away from my livestreaming commitments with Heartfelt Creations, this will once again become the place to catch up with me on what I've been creating! I'm hoping to still meet with you here to inspire you from time to time!


Today is another release day with Heartfelt Creations! Have you seen the beautiful Floral Sentiments Collection? It's a new release that is sure to be used time and time again...with it's beautiful florals and stunning sentiments!


Let's take a peek at my creations featuring this newest collection...


The Floral Sentiments Collection allows you to create full sentiment floral pieces, or stunning floral frames depending on how you choose to use your die cuts! I love that Heartfelt always gives us several ways to use their products!


For this creation I've opted to stamp the Friend Floral Cling Stamp Set and Grateful Floral Cling Stamp Set onto bristol smooth marker paper using Jet Black Ranger Archival Ink. I've then colored the illustrations with my Zig Markers. I've die cut the sentiments so that I'm left with just the floral frames for both of these stamp sets. I wanted to show you how to create beautiful floral clusters using the flower images from these two stamps by snipping the sections apart! Snipping apart your die cuts is a great way to use your stamped and die cut images in a different and creative way!


As you look at your stamped images, you will find that there are natural breaks within the illustration where it is easy to snip apart the die cut into sections. You can create larger and smaller floral clusters depending on what you're wanting to design. 


Here's a closer peek at the flower sections I've clustered together for this design...


To give the cluster a hint of dimension, I've gone ahead and adhered the first group of flowers to the card front, added the gold frame overtop, and then using some dimensional foam tape have applied the last layer of flowers. This gives your floral cluster a beautiful effect...the flowers look like they are growing together and appear multi dimensional! This tiny bit of dimension still even allows you to make this a mailable card...perfect for those friends and loved ones who live further away!


For the sentiment, you'll notice that it appears alone, and not as illustrated on the stamp! This is a super easy technique to achieve and again allows you to use the sentiment portion of the stamp in a new and exciting way! Using your stamp tool/acrylic block, simply ink the sentiment only using a Zig marker. I've used the MISTI to achieve this, and have actually had to ink the sentiment with the marker twice to achieve a nice dark appearance. 


I chose the Fancy Classic Rectangle Frame Die to create the embellishments on the card base! It's such a beautiful die that yields such pretty results! I love the die cut frame that I did from the bold floral paper within the Floral Sentiments paper collection. It gives the card a nice pop of color and interest!


The gold layer within the matting and the inner gold frame die cut from the Luxe Gold Cardstock gives this design such an elegant appearance. I wish you could really see this card in person, as the photos don't do it justice!


The finishing touch of course is the application of the Crystal Ultrafine Transparent Glitter! It is one of my favorite glitters...it lends such a beautiful shimmer and shine while not being "over the top"!


I do hope you've been inspired today! I'd love to know what you love about this newest collection and the project that I've shared with you...feel free to leave a comment below! I'd love to know that you stopped by!


I've also included the instructions to this card below for your inspiration! For the printable version, as well as the full list of products used in the creation of this project, please see the Heartfelt Creations blog or gallery! And, while you're there, be sure to check out the rest of the designs created by our super talented design team and leave them some love!


Until next time...


Instructions

Finished top fold card measures 6”x8”. To create card base, using white card stock cut card front panel measuring 6”x8”, and back panel measuring 6”x8 1/2”. Score back panel at 1/2” and using Dries Clear Adhesive adhere two card panels together to create top fold card base.


Create first matting layer using light green decorative paper from the Floral Sentiments Paper Collection. Adhere to front of card base.


For next section of matting layers, cut a piece of white card stock measuring 5 1/2” x 7 1/2", a piece of Luxe Gold Cardstock measuring 1/16” smaller, and a piece of multi colored patterned decorative paper from the Floral Sentiments Paper Collection another 1/16” smaller. Adhere together in the order that has been listed for cutting. Apply dimensional foam tape to back of layered section and adhere to card base.


Die cut larger decorative frame from the Fancy Classic Rectangle Frame Die using one of the bold floral pages within the Floral Sentiments Paper Collection. Adhere to card base using Designer Dries Clear Adhesive. Next, die cut the center portion of the Fancy Classic Rectangle Frame Die using the same light green decorative paper used in the first layer on the card base.


Using the Grateful Floral Sentiment Cling Stamp set and stamp tool/acrylic block, position where sentiment placement should be on center die cut, ink sentiment portion only using black Zig Marker and stamp sentiment. Adhere to card base using dimensional foam tape.


Die cut center frame from Fancy Classic Rectangle Frame Die using Luxe Gold Cardstock, and set aside until ready to arrange stamped floral images.


Stamp one inking of the Grateful Floral Sentiment Cling Stamp Set, along with one inking of the Friend Floral Cling Stamp Set onto white Bristol Smooth marker paper using Ranger Archival Jet Black Ink. Color with Zig Markers or coloring medium of your choice. Die cut both images using coordinating dies including center portions to create two floral frames.


Snip apart floral frames to create smaller floral clusters. You will see that there are natural breaks within the illustration where snipping apart will be easy, lending the smaller pieces to be layered to create pretty mixed floral clusters.


Locate gold frame cut out earlier, and place (not adhere) on design. Create a cluster of florals from the Grateful Floral Sentiment Cling Stamp Set at the top left corner of the raised sentiment, as well as the bottom left corner, arranging them under the gold frame. Once happy with placement, adhere to card front. Next, adhere gold frame to card front.


Finish floral clusters with the flower sections snipped from the Friend Floral Cling Stamp Set using double sided foam tape.


Lastly, using a piece of Hydra Sponge, apply a small amount of Dries Clear Adhesive to floral clusters and sprinkle with Crystal Ultrafine Transparent Glitter. 


Holiday Creating with the NEW Pop Up 3D Vignette Christmas Tree Die of the Month from Amazing Paper Grace...


What a magical sight to see a beautifully decorated Christmas tree with gifts piled high around its trunk! The Pop Up 3D Vignette Christmas Tree includes a set of graduated trees for a full dimensional design, along with details of presents, bows, and ornaments to complete this set. Change up the colors for an elegant or casual look. Best of all, it folds for easy mailing. Use just the elements to work with a flat card format from A2 to A7. Detailed die cuts make it easy to personalize for the holidays. The choice is yours!

Dies for my creations today were supplied by Amazing Paper Grace.


There are 21 dies included in the Pop Up 3D Vignette Christmas Tree.
 

My Project Today using Pop Up 3D Vignette Christmas Tree.


Can you believe that this is the first time I've worked with one of the 3D vignette designs by Becca Feeken?!?! I'd been a long time admirer of them, but had just never gotten around choosing a favorite, purchasing it and creating with it! I was super impressed with how easily this whole design came together! 

I created the 3D Vignette Christmas Tree card as it was intended to be put together...but I also created a quick and easy card to show you that these elements work beautifully for traditional card making as well!

Let's start with the original version...


I decided to go with a shabby chic/Victorian kind of theme and opted to use a teal patterned paper for my main tree base...and accent it with a lighter printed patterned paper as the tree front. I've used silver foil for all of my accents...and I love the monochromatic look of the ornaments and how they match the outline of the tree!

I opted to use cream card stock to give the entire project a softer and more antiqued look to go along with the Victorian style. The base was super easy to build and holds the tree pieces in place very well! I chose to die cut the sentiment using card card stock as well, and back it with silver to match the color on the tree. 


The dimension in this design is absolutely amazing! In the photo above you can see how all the layers come together...and I love how this super dimensional card folds flat so you can still mail it!

Moving along, let's talk about the second card creation I made with this wonderful set of dies!


For my second creation I wanted to do something super simple! I chose a 6x6 card...I love how the layered tree works really well for a card front! It's a great size that you can customize for your smaller cards to all of your larger sizes!

I wanted a pretty lace like die cut to coordinate with the lace on the card panel I chose to use! The delicate die cut from the Celebrate Scrollwork Card Builder from the Holiday Medley Collection was perfect!


I wanted to do something a little different with the sentiment...so I chose to cut it into pieces and use all of the words included in the set! I thought it turned out pretty cute...especially with the cream colored buttons I added as a vintage style embellishment!


I also love that I was able to keep the tree dimensional even though I was adding it to a card front! Just think...you could use the tree in a single layer, a double layer, create a forest...the possibilities are almost endless!!!
 
Designer Tip:  Let's talk about those adorable gifts under the tree! They work beautifully when die cut in sold colors, but I wanted to give them the appearance of actually being giftwrapped...so I die cut them from some patterned papers within the collection I was using so that they would coordinate with the tree! I thought they turned out super cute!
 

Stamps: n/a  
Paper: cream card stock, silver card stock, Pink Christmas - Stamperia
Ink: n/a
 
For more Pop Up 3D Vignette Christmas Tree Inspiration
Visit each Creative Team blog linked below for their take on creative paper crafting ideas with Pop Up 3D Vignette Christmas Tree, the Amazing Paper Grace November 2021 Die of the Month!
 
 
The Amazing Paper Grace Die of the Month is available exclusively at Spellbinders Paper Arts during November 2021. Pop Up 3D Vignette Christmas Tree at the special kit club price, along with other membership perks.
 
View this month's Amazing Paper Grace Die of the Month! https://youtu.be/SDbd5BaWq8U
 
Would love to hear from you! Comment on how will you use the dies!
 

Silent Night Christmas Village Fun Featuring Amazing Paper Grace...


Hello and Welcome!

I have a fun holiday card to share with you today featuring the Silent Night Make a Scene Die from the Holiday Medley Collection by Becca Feeken! 


You'll see that this set has been designed to create an interactive card, however I opted to create a little village scene with it on a simple A2 sized card! I began by picking out some patterned paper from a Recollections Collection that my kids had gifted me years ago! I wanted this card to be festive, so I went with some brighter greens, a pretty reddish burghandy, a hint of brown, and of course some winter whites! 


I opted to die cut an rounded shape in the center of the card using the decorative circle die from the Sweet Serenade Notecard Collection! It is from the Scalloped Symphony Notecard! I thought it was a pretty shape that added more interest than just a circular shape. I then used the same dark green paper that I used as the background mat to cut a frame using the regular circle and the fancy version to create a frame which I adhered around the front! It really draws the eye into the scene this way! 


*the dies for this creation have been graciously supplied by Becca Feeken of Amazing Paper Grace*


So, to give this creation a little bit of dimension, I've matted the dark green background paper to the card front, but have used some foam tape to add the bright green layer. This way my little village appeared further back as if you were gazing into the scene!


I got busy cutting my village pieces. I chose to stick with the same paper collection and use some pretty polka dotted paper in browns, greens, and reds. Do you ever die cut your focal die cuts from patterned paper, or do you opt to stick to solid card stock colors? I love the way this little polka dotted village turned out...I think it's adorable!


Now, you'll notice that I did cut the sleigh die cut as I knew I wouldn't have room for the full team of reindeer...but I didn't want to leave Santa off the card! Cutting your die cuts is a great way to get different uses out of them...it's like customizing them to your card creation! 


I love how the scene actually almost turned out like a little snow globe scene! I thought the holly and berry die cuts would be the finishing touch and balance out the design! And, let's talk about that great sentiment which I pulled from the Mosaic Bracket Card Builder! I opted to die cut it twice...once in a red color and again in white...I've layered the two pieces of each together and have them applied them to the front of the card! Doesn't the sentiment just finish out the card beautifully!?!


For the finishing touch, I used some Stickles to give the scene the look of falling snow! It was the perfect way to add some sparkle and shine to the finished card!


I do hope you've enjoyed today's share! I'd love to know what you think! Feel free to leave me a comment below!


APG Supplies Used: 

S5-462 Silent Night Make a Scene

S5-461 Mosaic Bracket Card Builder

S6-177 Scalloped Symphony Notecard


Until next time...


Introducing the Sweet Serenade Notecard Collection from Amazing Paper Grace...


The Sweet Serenade Notecard Collection is simply to extend a sweet thought or warm greeting to let them know you’re thinking of them through a heartwarming notecard. The inspiration behind this collection is the ability to create beautiful notecards. Everything in this collection coordinates together from the card base to the embellishments to the stamps to make wonderful notecard creations! Notecards also make a wonderful gift as a boxed set! Swoon your family and friends with a special handmade gift! Make it seasonal for fall or for the holidays. Maybe a specific style such as soft vintage, clean and simple, or even a mixed media twist!


Today's projects were created with dies provided by Becca Feeken of Amazing Paper Grace.

My Projects for Today

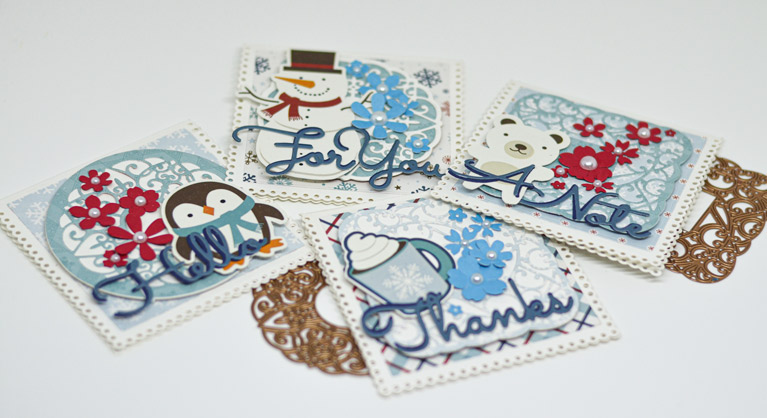
Today I'm using the Scalloped Symphony Notecard S6-177 to create my fun filled note cards! I know when I think of creations done with Amazing Paper Grace products, I tend to think of ultra feminine, beautifully delicate and detailed creations...and today I wanted to share how easily this little note card ensemble of dies could be used to create a more cutesy note card set!


I love that this set has so many different ways you can layer/cut the different shapes! I thought the beautiful scrollwork worked perfectly for winter themed projects! And I cannot tell how easy it is to create a notecard using this set! I love the scoring bar that you put in place before running the notecard die through your die cutting machine! It gives you a beautiful and professional score mark that takes all the stress out of trying to get the card scored perfectly if you were trying to do it by hand after die cutting the notecard shape! I also love that I have the option of using this larger sized notecard is for a slimline card! Talk about great options!

And let's talk about card matting for just a moment...there's no measuring as all of the beautiful shapes in this collection have been sized to nest and give you flawless results each and every time! There's no redoing because you cut the square crooked, or you didn't quite get that circle shape you desired when you tried to cut it out by hand!

I also created some matching envelopes from the same paper I used for the notecards so the collection completely matches! For this I hauled out my envelope punch...can you believe it has sat in my craft room for years and was never opened! I know...what a shame! It sure came in handy for this project! 


So, for this little batch of notecards, I opted to design them with a winter theme and use the Sweet Sayings Notecard Sentiments S4-1148 on the front of each! 


They are terrific generic, larger sized sentiments that work perfectly if you're going to be gifting a little notecard set! I love to gift handmade notecard sets to "the dreaded" Christmas work party gift exchange. I usually pair them with a nice hand lotion, or candy...and I've created the matching box designed with this in mind...there would totally be room to add some nice chocolates to this little gift set!


I totally love to be able to gift things that are useable and won't take up space! These little notecards are the perfect size to have on hand waiting for when you need one in a pinch! Plus, I love that when the notecards are all gone, you still have an adorable gift box to pass along to someone else to enjoy!

Now, while these little notecards are winter themed...I thought it would be fun to use the Petite Floral Potpourri Flowers S3-420! I thought they would add a hint of whimsy, and I tried to adhere them to the notecards so they almost looked like falling snow!


I added a simple white pearl to the center of each to finish off these dainty flowers!


I thought they turned out super cute! What do you think?


Designers Tip: I had so much fun working with this notecard collection! I found it was great to play around with the various shapes and one of the first things I did when I received it was to sit down and just die cut all of the different ways that you could use these dies...you can die cut into your notecard to that you have a decorative background, you can die cut as several different shaped embellishments, etc. I encourage you to do the same to see how many different looks you can create! 

Sweet Serenade Notecards Availability:
These dies and plates are available from Spellbinders right now! Click here: Sweet Serenade Notecards Collection.


Supplies:
Stamps:  n/a
Paper: Echo Park - Love Winter Collection Kit, white card stock, red card stock, blue card stock
Ink: n/a


For more Sweet Serenade
Notecards Collection Inspiration
Visit each Creative Team blog linked below for their take on creative paper crafting ideas using the Sweet Serenade Notecards Collection!

Please comment: Which Sweet Serenade Notecards set speaks to you?

Purr-fectly Sweet Times Together...

Happy Wednesday!
I'm so happy you're here!
It's another Heartfelt Creations inspiration day, and I have a project to share with you featuring the adorable Purr-fect Posies Collection!
This collection is just so cute!

...here's a peek at my project for this week...


I've relied quite heavily on the paper collection for this one...I've done quite a bit of layering! I opted to die cut an oval window into the card front and have the kittens on the swing as the center focal point. I've used a piece of decorative paper behind the oval that had some leaves and florals to mimic a tree. I've used some decorative die cuts as layering pieces around the oval window to give the card a soft and whimsical feel!


I've colored up the kitten image with my Zig Clean Color Real Brush Markers. I opted to go with a water color technique. They were stamped onto smooth water color paper using Ranger Archival - Jet Black. I've added a bit of color to the image and have then moved it around using my water brush.

I then stamped the cute little flowers and foliage onto Deluxe Flower Shaping Paper...I stamped one set in Ranger Archival Ink - Magenta Hue and another in Ranger Archival Ink - Deep Purple. The leaves I have stamped in Ranger Archival Ink - Olive. I've then colored up the pinkish florals with Ranger Archival Ink - Pink Peony, the purple in Ranger Archival Ink - Majestic Violet, and the leaves using Ranger Archival Ink - Leaf Green. I've then die cut them all with the coordinating dies and shaped them using the 3D Purr-fect Posies Shaping Mold.


The shaping mold makes creating these little posies so quick and easy. I love that you can build double blossoms as well as single blooms...they are so pretty either way!

I loved the little sentiment in the paper collection ..."Sweet Times Together". I thought it suited these adorable little kitties...don't you think this would make the most adorable and unique anniversary card!

I hope you have enjoyed my project today!
Be sure to stop over at the Heartfelt Creations blog to take a peek at the wonderful projects the rest of the design team have created for your inspiration!

Until next time...
Project Supplies & Instructions


Other Products Used: white card stock, BigShot Die Cutting Machine, paper trimmer, scissors, water, mist bottle, foam tape, low tack tape, smooth water color paper

Create a 6” x 6” card base from white card stock. Trim down the plaid square premade card panel in the Purr-fect Posies Paper Collection to be just slightly smaller than the card base. Using Stack and Store Dauber, ink all edges using Ranger Archival Ink – Deep Purple. Adhere to card base.

Locate patterned premade card panel shown in card sample and trim down to be slightly smaller than first mat. Using the largest oval die from the Eyelet Oval & Basics Large die that does not have the eyelet edging, die cut an oval into the side of the second mat. Ink all edges using Stack and Store Dauber and Ranger Archival Ink – Deep Purple. Trim sentiment strip and main sentiment from Purr-fect Posies Paper Collection. Trim sentiment strip to fit down side of card opposite of oval window. Using scissors, snip out ribbon banner ends on main sentiment. Ink all edges as done on previous pieces. Adhere sentiment strip to side as shown.

Choose a piece of decorative paper from the Purr-fect Posies Paper Collection that has some blossoms and foliage. Adhere to back mat where oval window will be placed once adhered to card front.

Die cut a fancy decorative pocket embellishment from the Elegant Pocket Accents Die from white card stock. Die cut a background for the embellishment piece for the pocket embellishment from purple patterned paper in Purr-fect Posies Paper Collection. Adhere the two die cuts together using Designer Dries Clear Adhesive.

Die cut an oval frame from white card stock using the large oval die used previously and the large eyelet oval die.

Stamp two inkings of each size posies from the Purr-fect Posies Cling Stamp Set onto Deluxe Flower Shaping Paper using Ranger Archival Ink – Magenta Hue and Deep Purple. Color the posy centers with Stack and Store Daubers using Ranger Archival Ink – Buttercup, the purple flower petals with Ranger Archival Ink – Majestic Violet, and the pinkish flower petals with Ranger Archival Ink – Pink Peony. Stamp two inkings of the posy foliage from the Purr-fect Posies Cling Stamp Set onto Deluxe Flower Shaping Paper using Ranger Archival Ink – Olive. Color using Stack and Store Daubers and Ranger Archival Ink – Leaf Green. Die cut all posies and foliage pieces using coordinating dies. Place in 3D Purr-fect Posies Shaping Mold, spritz lightly with water and pass through die cutting machine to shape. Set aside to dry. Create one double blossom in purple, and one double blossom in pink. Leave remaining flowers as single posies.

Stamp the kittens on swing image from the Purr-fect Playdate Cling Stamp Set onto smooth white water color paper using Ranger Archival Ink – Jet Black. Water color using Zig Clean Color Real Brush Markers and water brush. Die cut using coordinating die. Apply dimensional pop dots to back of die cut image.

Using dimensional foam tape or pop dots, adhere second mat with oval window to card base. Adhere decorative pocket die cut to side of oval as shown. Layer oval frame over top of opening. Remove pop dot backings and tuck kitten image into oval window opening. Adhere main sentiment to card base using dimensional foam tape or pop dots.

Arrange floral clusters, with one double blossom on bottom of side of oval and second double posy along top side as shown in card sample. Assemble single blossoms and foliage as shown.

Apply Baby’s Breath Ultrafine Transparent Glitter to all posy petals and preprinted images on decorative papers using a fine metal tip and Designer Dries Clear Adhesive. Adhere Heart of Gold Prills to posy centers.

Thanks for visiting!

Thanks for visiting!