Join Me for a Cup of Tea...

Welcome!
I'm so glad you could stop in today!
I'm about bursting at the seams...because I'm finally able to share some very exciting news with you!
So grab you favorite beverage, snuggle up in a big chair and make yourself comfortable...this post is bound to get a little long and hopefully has you doing a happy dance along with me by the time we're finished!

For those of you who have been following along with me for some time, you will remember that I sent in two submissions to the Heartfelt Creations design team call.  You will also recall that I had my dream come true being selected as a semi finalist. (You can read about that here!)   Just making it onto the short list was amazing to me!

Well today is the day!
If you are a follower of the Heartfelt Creations blog, you will know that today the finalists have been announced...and I am so flattered and excited to say that I am lucky and blessed to be among them!
(Insert happy dance here!) 

I have always loved Heartfelt Creations ...the papers, the dies, the beautiful projects that their design team create.  However, the one thing that I admire most about the owners of Heartfelt Creations is their faith.  They are open, never afraid to share about it and even incorporate it into their products.  
I am honored to work with a company who shares so openly about our Lord and Saviour. 
God is good!

Now, you will all remember that I was required to submit two projects as a semi finalist to send directly to Heartfelt.  I've been sitting on posting these creations and am so happy to finally be able to share them with you today.  

I was sent some products from the "Classic Sunflower Collection".  
This collection is absolutely breathtaking!
And, it was just so fitting as I love sunflowers and country/vintage type papers, etc.
When I looked at the collection, I was immediately struck by the idea of cooler autumn days...and along with that cozy sweaters and warm beverages.  With that inspiration, my first creation was born!

Let's have a tea party!
Please join me for a warm and soothing beverage...

 *cutting files purchased from SVG Cuts

How about I take you on a bit of a closer tour!
Let's start with the tea pot...

*cutting files purchased from SVG Cuts

...each of these flowers has been hand colored and hand shaped!
The entire tea pot has been covered with designer paper from the "Classic Sunflower Collection".

Moving along...you can't have tea without a cup and saucer...

*cutting files purchased from SVG Cuts

...and what good would a tea bag be without a specially created matching tag?
Again, all designer papers are from this stunning collection.  Even the tag is included in the paper pack and was just begging to be fussy cut!

And how will we display the tea bags and keep them all collected in one place?
Don't worry, I have you covered with that as well!

*cutting files purchased from SVG Cuts

The image on the tea bag dispenser has been hand stamped and hand colored with one of the stamps included in the "Classic Sunflower Collection".  I've colored it with my Spectrum Noir pencils.

I had so much fun making these projects. 
Here are some detailed instructions for you should you be wanting to try your hand at this beautiful tea setting...

Classic Sunflowers Collection Tea Party Setting

Products Used:

Project Instructions:

Other Products: tan colored cardstock, deep yellow colored cardstock, white cardstock, distress markers (mustard seed, wild honey, vintage photo, tea dye, rusty hinge), watercolor pencils, brown ink, black ink, embossing powder, heat gun, Tombow glue, raffia ribbon, clear acrylic stamp block, BigShot die cutting machine, Silhouette Cameo, Tea Pot 3D SVG cutting file template, cup & saucer 3D SVG cutting file template, tea bag dispenser 3D SVG cutting file template, tea bags, 4 gold colored brads

Instructions: 
Begin with cutting out the base pieces of the tea pot with the tea pot SVG cutting file and your electronic cutting machine using white cardstock.  Build tea pot according to the file directions allowing time for the pieces to dry.  Select the matching patterned paper that you wish to work with from the Classic Sunflowers Paper Collection, and begin cutting the decorative coverings for the altered art project.  Ink all of the edges on each piece with brown ink.  Adhere to 3D tea pot base shape as per file instructions, allowing pieces to dry.  Locate the rooster image panel in the paper collection and fussy cut and adhere to the centre of the tea pot.

Stamp the Classic Sunflower PreCut background set several times on tan, and deep yellow cardstock depending on how embellished you’d like the altered art to be.  While still wet, cover the image with embossing powder.  Remove excess powder and set with the embossing powder on the images with heat gun.  Do this until all images you have stamped are completed.  Next, proceed to coloring with distress markers and shaping flowers.  For an excellent instructional video on how to shape the flowers in this collection, please go here.  Set them aside and allow them to dry. *Please note that you may have to repeat this step several times until you are happy with the flower arrangement on your altered art*

Once flowers are dry and you are ready to design, begin with tying a raffia ribbon around the knob of the tea pot and begin adhering flowers one by one to the lid.  Once you are happy with the design, and have decided the flow of the floral cascade begin working down the tea pot layering flowers of all sizes and repeating the process to create more if necessary. 

Proceed to the second project in the collection which is the tea cup and saucer.  As you did with the tea pot, begin cutting out the base pieces using white cardstock and assemble. Allow time to dry between pieces.  Once again choose the decorative paper you wish to use and begin cutting the decorative covering pieces, ink all edges with brown ink, and adhere them to the 3D base of the altered art piece.  Using flowers that are left over from the tea pot project, choose two and adhere them to the saucer alongside the tea cup.  Take two tea bags and create paper tags for the end of them by fussy cutting two sentiment ticket stub images from the paper collection for each tea bag. Ink all edges with brown ink and proceed to glue them onto the end of the tea bag.

Lastly, move onto creating the tea bag dispenser.  Choose the designer paper you wish to work with and cut out the 3D tea bag dispenser template with you electronic die cutting machine.  Assemble according to the file instructions. Take a piece of matching designer paper and stamp the butterfly and flower image from the Summers Day PreCut set.  Size to the front of the dispenser and then stamp the image onto the paper.  Once the image has dried, proceed to coloring with watercolor pencils and adhere to the front of the dispenser. 

Set up display as a centerpiece, and invite friends and loved ones to a special tea party! 

********
 
Well, I just couldn't stop there and kept on playing with this gorgeous floral collection.  There were so many more elements I wanted to use and explore.  

I decided I just had to create several cards as well.  Card making is my passion after all!
I loved the rooster image I had fussy cut and used on the tea pot, and had also been sent this image in a rubber stamp.  I decided it would be so much fun to color....so I got busy creating a card based on that image as well.

Here's how it turned out!


...and a bit of a closer peek...


Here are the project instructions for this card...

Birthday Blessings Rooster Card

Products Used:

Project Instructions:

Other Products: tan colored cardstock, deep yellow colored cardstock, white cardstock, Ranger distress markers (mustard seed, wild honey, vintage photo, tea dye, rusty hinge), watercolor pencils, brown ink, black ink, embossing powder, heat gun, Tombow glue, double sided tape, 5”x7” pre folded card base, 3D foam dots, raffia ribbon, clear acrylic stamp block, BigShot die cutting machine, chipboard swirls

Instructions: 
Begin with a 5”x7” pre folded card base.  Select a smaller decorator panel from the Sunflower Paper Collection page which could be used as a photo mounting scrapbook background. Mount the rooster stamp on your acrylic stamp block and stamp image onto card panel using black ink.  Allow to dry.  Locate your Classic Sunflower PreCut background stamp and stamp in black ink several times onto tan colored card stock as well as a darker yellow colored card stock covering with embossing powder while still wet.  Heat with heat gun to set embossing powder. (You will need enough images to create a large 3 layered sunflower, a large 2 layered sunflower, a mid sized 2 layer flower and a small 2 layered flower.  Keep the tiny single flowers handy as you will use them for layering as single images later on).

Once all stamped images are dry, you are ready to proceed with cutting and coloring.  Returning to the handstamped rooster image, proceed to coloring with watercolor pencils.  I opted to blend the colors while just coloring with the pencils rather than watercoloring.  Moving along to your Sunflower PreCut set images, using a manual die cutting machine cut the flower images using the Classic Sunflower Die.  Once all elements you are wanting to use have been die cut, proceed to coloring with distress markers.
It is now time to begin shaping you flowers.  For an excellent instructional video on how to shape the flowers in this collection, please go here.  Set them aside and allow them to dry. 

Returning once again to the rooster panel, choose two coordinating papers to use as matting backgrounds.  One to cover the 5”x7” card front, and the second slightly larger than the stamped image panel itself.  Ink all of the edges of the pieces with a brown ink.  Assemble and adhere to front panel of pre folded 5”x7” card.  On the same scrapbook page you cut the blank photo panel from, fussy cut the large corner sunflower image and ink the edges with brown ink as well.  Adhere this cut out piece to a white piece of cardstock.  This will allow the back of the card to look completely finished as it will now match the white cardstock.  Allow to dry, then position on the corner of the card. Once happy with the layout adhere to the card being careful to not put glue on the portions of the fussy cut image that will extend beyond the card. 

Locate the paper embellishments, sentiments, leaves, etc. you wish to use on the card in the paper pad.  Fussy cut them and once again ink all edges with brown ink.  Create your raffia bow and ink your chip board flourishes. Begin working with the flowers to determine positioning.  Glue to card, starting with your larger 3D flowers, being sure to use a strong paper glue. Adhere small one dimensional flowers as needed in areas needing filling.  Adhere corner image (sentiment) and bow now as well.   Curl several of the leaf images you fussy cut so that once glued down they will look like they are curling up from behind flowers.  Determine placement for chip board swirls. Once you’ve determined all of the placements for all of the elements, proceed to securing them down.   Select sentiment strip and adhere to bottom portion of card.  Lastly, adhere the main focal sentiment fussy cut image (ticket stub) with 3D pop up dots. 

Send your special birthday creation to a friend or loved one!

********

 Are you still with me?  LOL
I told you this would be an intense post!
We're just about to the end though...you won't want to miss this last card either...so keep forging ahead!

Here it is...

 
 ...let's have a closer peek...


 Interested in creating something similar?  
Here's the project instructions...


Butterfly Dreams Any Occasion Card

Products Used:

Project Instructions:

Other Products: tan colored cardstock, deep yellow colored cardstock, white cardstock, Ranger distress markers (mustard seed, wild honey, vintage photo, tea dye, rusty hinge, fired brick, dried marigold and spiced marmalade), brown ink, black ink, embossing powder, heat gun, Tombow glue, double sided tape, 5x7 pre folded card base, 3D foam dots, raffia ribbon, clear acrylic stamp block, BigShot die cutting machine, thin gold cording, scissors

Instructions:
Begin with a pre folded 5”x7” card base.  Select a large 5”x7” blank decorator panel from the Sunflower Paper Collection pack.  Select a smaller sunflower and butterfly image panel as well as a piece of designer paper to use as matting behind the sunflower image panel.  Lastly, choose a tag image that you wish to incorporate into the design as well as a sunflower strip and several leaves from a panel that you will fussy cut to use along the bottom of the creation and a sentiment.  Proceed with inking all of the edges of these pieces with a brown ink.  Put pieces aside and move on to stamping the large Classic Sunflower PreCut background.  Cover it with embossing powder, remove excess and then heat with heat gun.  Use distress markers to color flowers.  You will need one midsized double layer flower, two midsized single flowers and 2 small single sunflowers.   Shape flowers.  For an excellent instructional video on how to shape the flowers in this collection, please go here.  Set them aside and allow them to dry.  Shape the leaves you have fussy cut at this time as well.  Take two of the small ladybug images that have been die cut when you die cut the flowers from the background stamp, color them red and set them aside.  Stamp butterfly image twice and set aside to dry. 

Going back to the base card panels, take the sunflower image you have fussy cut and adhere to the bottom of the card background panel as pictured.  Then adhere the background to the 5”x7” card base. Taking the image panel and the matting designer paper which is just slightly larger than the image panel, proceed to adhere them together.  Measure out some thin gold cording by looping it around the image panel you have just matted approximately 4 times.  Tie tag on with cording.  Position the sentiment you have chosen above the sunflower image and adhere to panel.  Adhere the decorator panel to the card front with 3D pop up dots. 

Arrange shaped and dried flowers loosely on the card until you are happy with the arrangement, adding in several leaves you have fussy cut and shaped as well.  Adhere them to the card.  Adhere the two ladybug die cuts tucked in among the flowers and leaves.

Returning to the two stamped butterfly images, color them exactly the same with distress markers.  Attach one on top of the other by gluing only the body of the butterfly, allowing wings to bend up so the butterfly becomes 3D and resembles the insect in flight.  Place in the top corner of the card above the tag with 3D pop up dots as pictured. 

Send to a friend or loved one to enjoy!


 ********
 Well, thanks so much for sticking with me to the end of this post....and a huge thank you to everyone who has supported me in this adventure of a life time.  Your words of encouragement, your votes during the semi finalist announcement...they all mean more to me than you will ever know.  
Be sure to check out the HC blog to see the full list of very talented and creative new design team members.  You are sure to find some wonderful inspiration.  

Until next time...

These creations have been shared in the following challenges...

It's Time for....Christmas Bingo!

Ahhh...it's been a crazy day as I finally have time to sit down here and schedule this post.
I've been in my craft room pretty much all day listening to Christmas carols and creating holiday cards! It's going to be a crazy week as I'm down to the crunch time to create last minute items for the craft sale on the weekend!

Anyhooo...
Let me quickly share with you about the new challenge starting at Holly Jolly Christmas Challenges.
We have a fun theme for you to partake in for the next two weeks...

"Christmas Bingo"

Ribbon
Texture
Glitter
Rhinestones
2 designer papers
Twine
Die cuts
Punches
Pearls


So many options for you to choose from!

For my card I decided I was going to go diagonal...I have used die cuts, 2 designer papers and glitter!

Here's a peek at my creation...

The poinsettia die cuts are a new Memory Box die that I picked up recently and just had the chance to use.  I've also used a new swirl die cut that too was waiting to be tried out.  I've added some Crystal Stickles to the tip of the flowers and have also added some soft fuzzy bits to the centers of the flowers as well.  The finishing touch is the few dabs of liquid pearls around the flower bunch!

Onto the business at hand... 
We are joined again by two wonderful sponsors for this challenge...

Please Join... 

as well as...


Be sure to check out the Holly Jolly blog to get details on the prizes being offered to two lucky winners!

Well, it's short and sweet today as I think I hear my pillow calling me!
Now here's hoping this tiredness doesn't leave the minute I lay my head on it!
Don't you just hate it when that happens?

Until next time...

Did You Hear About Santa?

Happy Friday!
Are you ready for some festive season inspiration...and to hear about what happened to Santa?

Well, it's a new challenge beginning at Christmas Stampin' All Year Long this week!
We have a photo inspiration challenge for you...


...what will you draw your inspiration from in this festive photo?

I decided to to with a traditional red and green color palette for my card!
I loved the different designs in the table cloth and plates and tried to incorporate different designer papers into my creation as well.  

Here's what I did...


I've colored up the digi with my Spectrum Noir markers and have tried to stick to the reds and greens.  I've kept the same color palette with the designer papers and have used several different ones with different patterns.  I've added three green sequins to the card for some sparkle and to mimic the polka dots on the plates.  
A quick and simple creation once again. 

We would like to once again welcome back Bugaboo as our sponsor for this challenge.
 

They are offering one lucky winner 7 digis of their choice!
One can never have too many Bugaboo stamps!
I love them!

Well, that's all for me today!
I hope you've found some inspiration here today, and your mojo to create is up and running.
Be sure to check out the other DT creations on the CSAYL blog as well.
Have a great weekend!

Until next time...

This card has been shared in the following challenges...

Spread a Little Cheer...

Welcome!
Sit, relax and stay awhile!
This is the second posting for me today!
That doesn't happen very often anymore does it?
A quick reminder that today is also the mid way blog post for our current challenge at Unstampabelles.  Please scroll down to see the details for that challenge and to see the unique creation I've made.

Getting back on track...
...we have a new challenge starting today at Pile it On!
It's a terrific one!
Ready?

"Cheerful/Uplifting Message"

We all have days where we could use a smile from a stranger, a face to face visit with a close friend or ladies night out with a bunch of friends...you know something positive to lift our spirit.
Well, this week you have a chance to create a card to do exactly that for someone.

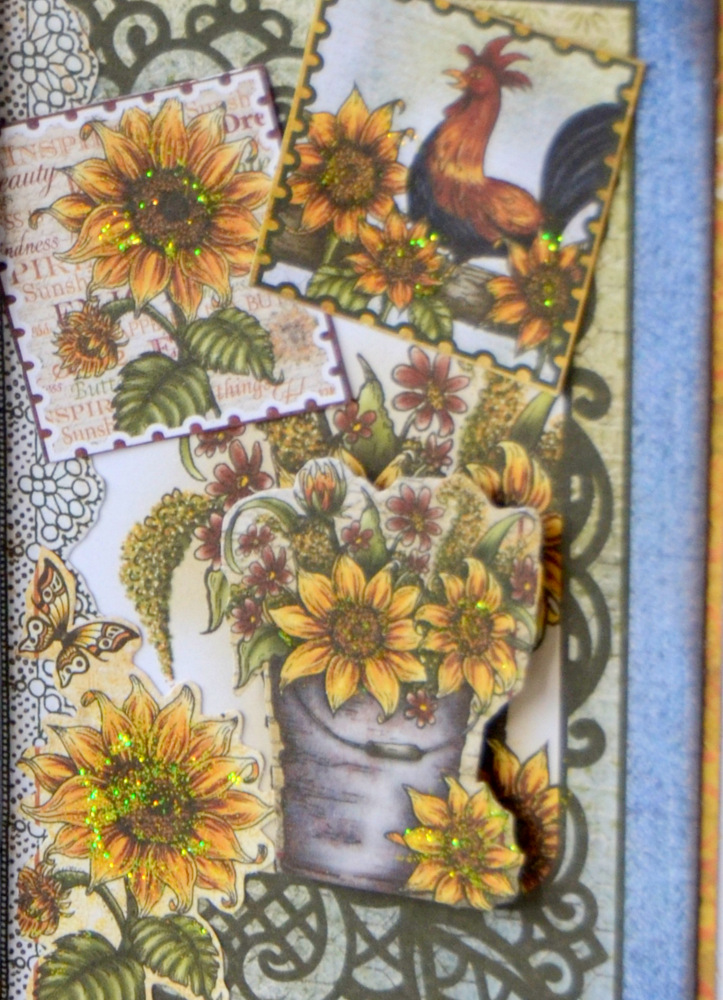
I was working with some beautiful sunflower papers from Heartfelt Creations the other night and decided that the uplifting sentiments they had included in the Classic Sunflower Collection paper pack would be perfect for this challenge.  I came across a sentiment that read "Sending you Sunshine"...and got to thinking that the bright and cheerful rays from the sun are one of the fastest ways for one to feel great about life.  It always amazes me how on a cloudy day you can feel nothing but doom and gloom...but bring on the sun and the whole world just becomes a better and brighter place!  Throw in a beautiful flower garden with those rays of sunshine and life is good!

Here's how I used the sentiment and some sunflower florals to create my cheerful and uplifting card!


I've done some fussy cutting of various elements and have popped up the bucket over a larger version of the same image with 3D pop up dots, giving the card some dimension.  
I've added some yellow Stickles to the sunflowers to give the card an extra dose of cheer!
 

I've also popped up the sentiment on the card to add further dimension.

 Before I go, a few housekeeping tid bits about this weeks challenge.
We are sponsored by...


...who is offering one lucky winner 3 single digis of their choice!

I hope I've been able to inspire you to create a cheerful and uplifting project for a friend or loved one. 
Wouldn't it just brighten your day to receive a card of encouragement in the snail mail...so go ahead and make that feeling happen for someone!
We all need encouragement from time to time.
Then remember to link up with us at Pile it On!

Until next time...

This card has been shared in the following challenges...

Time for an Unstampabelles Challenge Reminder...

I'm back today with a mid way reminder for our current challenge at Unstampabelles...the challenge blog where we encourage you to create a project without using any type of stamps!
Don't be afraid...it's easier than it may seem!

I missed joining in at the beginning of the challenge as I was super busy with life, and busy creating my semi finalist project for Heartfelt Creations!
One of these days I will have to get down to blogging what I created and give you all a little peek!

If you've kept up with checking out the Unstampabelles blog, you will know that our current challenge is...

"Shabby Chic with the twist of Time!"

The Belles have made some very lovely creations you must check out if you haven't already, and more have been added to the blog today...so be sure to check those out as well.  You will also notice some new names and faces there, as there was recently a DT call and we have added new members to the team.  Be sure to give them a welcome! 

I had the idea of creating a 3D mantle clock for my project.  I didn't think it would be a problem finding an SVG cutting file for this...but it proved to be much harder than I thought....that is until I came across a blog post done by a designer for SVG Cuts that sparked my interest and imagination.  You really have to check out this post featuring the grandfather clock that this designer used several SVG Cuts cutting files to create.  It is amazing!
 You can find it here.
I decided that the Juke Box file would be perfect to turn into the mantle clock piece that I was envisioning.  I got busy cutting the pieces with my Silhouette Cameo that I knew I would be needing and started assembling. I used an Elizabeth Crafts Design metal die for the clock face and the hands. I then dug through all of my flowers and laces, etc. to see how I could shabby chic this project up.  

Ready?

 
...here's another peek from a different angle...


...and a few photos of the details...


I found these beautiful lace stickers at Michaels a few shopping trips ago and was just waiting for the right project to use them on.  I thought the added a nice touch of elegance to the clock.  


I loved having the chance to play with all of my pretty flowers again!  I added a chipboard swirl to the side of the creation.  I looped some lace in several spots among the flowers and for my finishing touches I used a hat pin and an antiqued button.  If you look very closely in this last photo, you will also see that I've used some transparency paper in the clock body.  I embossed it using an embossing folder and my BigShot.  There is an opening in the back of the clock to place a battery powered candle inside...so the whole creation is able to glow and have light shine through that transparent window.  I created this mantle clock with my upcoming craft show in mind.  I think it will make an elegant prop for on my vintage style table display!

Before I go, I should make mention that we are sponsored by...

Website Banner 

Check out the Unstampabelles blog to see the prize being offered!

I hope I've been able to inspire you today!  
And, did you take note...not one stamp was used on the entire project!
Told you it wasn't that hard to do!
I hope to see you joining in with us at Unstampabelles.  Remember that you have until the end of October to play along with this current challenge!

Until next time...


Reminder...December is Fast Approaching!

It's Friday!  It's Friday!
And I'm extra excited because I'm headed to a weekend scrapbooking/cardmaking crop!
Nothing but crafting goodness for a whole weekend....no cooking, no cleaning....just time to be creative!  Yay!
It's crunch time to do the last minute creating for the upcoming Christmas craft sale I'm in on Novemeber 01.  I'll be busy pumping out vintage and retro style Christmas cards as those are definitely my best sellers!

But, since it's Friday, that also means a new challenge begins today at Christmas Stampin' All Year Long!  December is fast approaching and we want you to be well prepared with a stack of holiday cards that have been created long before the busy season.  Don't worry, if you haven't gotten around to starting...there's no time like the present.  We have a great theme to get you going this week...

"Anything Goes - Use Your Imagination"

Not too hard...or at least I thought!  
LOL

It seems that my imagination and creative juices have been running a little low lately.
I decided to just keep my design easy and simple this week. 

Here's my creation...


I decided to go with more non traditional Christmas colors and a shaped card.  I've colored the sponsor image with my Distress Markers to give the coloring a more vintage feel.  The sentiment is from TLC Creations.  For a bit of sparkle, I added three simple rhinestones. 

This week we are sponsored by...

Etsy Shop Anne's Digital Art

Please stop by the CSAYL blog to see the prize being offered to one lucky winner...and to check out the other DT creations!  It's fun to see where their imaginations have led them!

Hope you've been inspired!  Create something quick and simple...or go more elaborate...just don't forget to link up with us at CSAYL!

Until next time...

This card has been shared in the following challenges...

Just Because...

How about an unscheduled blog post today!
It seems like its been forever that I just sat down and created a card that wasn't tied to a design team or a creation that I needed to create to fill an order, etc.  
Now don't get me wrong...I love doing all of those things...but sometimes it's nice to just create for no reason!
Today I sat down at my kitchen table and created something just because...call it therapy if you will!  

I decided to use some beautiful paper from the Classic Sunflower Collection by Heartfelt Creations.  
To play with this gorgeous fall color palette and stunning images... and never mind the fact that I love sunflowers...it just seemed like delightful, no stress crafting at its best!

Wanna see what I created?


I had the most fun just crafting this card!
Some flower making, some fussy cutting, some layering and some glitter!
All my faves!
A sentiment that really works for any occasion makes it a handy card to have ready to give away!

I hope you've enjoyed taking a peek!

Until next time...

This card has been shared in the following challenges...

"Do You Wanna Build a Snowman?"

Hello and Welcome!

Today begins a new challenge at Holly Jolly Christmas Challenges!
The title of my blog post should give you a bit of a hint as to our new challenge theme...and should also leave you humming that very popular song from the movie "Frozen"!  LOL

Our new challenge theme this week is...

"Snowmen"

A fun, cool and frosty idea for a Christmas card creation!

Let's begin by having a peek at my card for this challenge...

I had the pleasure of creating with a Bugaboo Stamps image called "Brats - Winter Snowman".  
This image just reminded me of our son and daughter playing in the front yard working on building a snowman together.  
I colored up the image with my Spectrum Noir markers and chose a Recollections snowflake paper from a Christmas paper pack I picked up on sale at Michaels last week to use as the background.  I then cut some snowflakes and swirl die cuts with various dies and my BigShot.  I then glittered up the two corner snowflakes with some Crystal Stickles and applied a white sequin to the centre of each.  I found a vellum sentiment among my stash that I'd had for quite some time and felt that it suited the image....kids always delight in making a snowman don't they?
For the finishing touch, I added some Aleene's Glitter Snow to the bottom of the image to give it some extra shine and texture. 
I think this would make a great card to give to a child during the holiday season along with a gift card or some cash enclosed.  

Now...how about we move along to the sponsor details for this challenge...
Please welcome ...

"Bugaboo Stamps"
along with...

"The Stamping Boutique"
store

Please be sure to check out the Holly Jolly Challenge Blog to see the wonderful prizes these awesome companies are offering two lucky winners!
While you're there, be sure to check out the fantastic creations the rest of the lovely and talented DT members have created.

Before I go...I quickly wanted to share with you one more Snowman project my daughter, my mom and I worked on this past Thanksgiving weekend.  We were busy finishing the sock snowmen my daughter had suggested we build for the upcoming Christmas Craft Sale I will be doing the first Saturday in November.

Here's a pic of two of them...


We had so much fun creating them.  We made 13 in total...and it was so much fun to watch as each snowman took on it's own look and personality as it was dressed and different embellishments added.  We even created a few that landed up reminding us of family members!

So...the rest is up to you!
Rummage through your digis, rubber stamps, clear stamps, collage images and find that perfect snowman to create a special Christmas card.  Then be sure to link up with us at Holly Jolly so we can see what you've created!

Until next time...

This card has been shared in the following challenges...
Crafting at the Weekend..."Anything Goes"
Little Claire's Designs Monthly Challenge..."Christmas Theme"
We Do Doobadoo Challenges..."Christmas"
The Crafty Bloggers Network..."Christmas"
My Craft Creations..."Anything Goes"
The Paper Nest Dolls Challenge..."Anything Goes"
613 Avenue Create Challenge Blog..."Anything Goes/CAS"
The Glory of Christmas Challenge..."Snowman"
Christmas at Sweet Stampin'..."Snowflakes"


Thinking about Snow...

Happy Friday!
Welcome...I'm so glad you could pop in for a visit today!
Can you believe that they have been already talking about snow here in Southern Manitoba?
It seems way too early for my liking!
However, when I saw the digital stamp I had the pleasure of playing with for todays blog post, I couldn't help but think of snow and big cozy sweaters!

As you will know by now, Friday brings our new challenge over at Christmas Stampin' All Year Long!
We have a fun challenge once again for you...

"Use This Color Combo"


Lots of color to play with there!

We are delighted to welcome back once again as our sponsor...

http://www.meljensdesigns.com/

who is offering one lucky winner 4 digis of their choice!

 I had the privilege to work with the digital stamp "Big Sweater Kid"!
I love the way he has his nose tucked into his sweater.  I wanted to find a really great sentiment to go with this image...so I turned to Create with TLC Art Fire store.
I found exactly what I was looking for...

Here's how the card turned out...


I'm hoping I've managed to capture all of the colors from our color combo.  The pink is not represented too visibly...but it is in there among the snowflakes on the background paper, in the letters of the Merry Christmas sentiment strip, and in the striped paper behind the sentiment strip. 
The digi has been colored up with Spectrum Noir markers and the snowflakes are from a Martha Stewart punch.

I hope you've been inspired now as well!
For more inspiration and beautiful projects, be sure to check out the CSAYL blog!

Until next time...

This card has been shared in the following challenges...
Crafty Hazelnut's Christmas Challenge Extra..."October Challenge"
Crafty Hazelnut's Patterned Paper Challenge..."October Challenge"
Doodle Pantry..."Any Digi Goes"
Sparkles Christmas Challenges..."For a Child"
Christmas At Sweet Stampin'... "Snowflakes" 
Alphabet Challenge Blog..."R is for Round or Rectangle"
Delicious Doodles Challenge Blog..."Christmas in October"
C.R.A.F.T Challenge..."Christmas"
Christmas Card Challenges..."Layer it Up"
Merry Monday Christmas Challenges..."Neon Colors"
Crimbo Crackers Challenge Blog..."Anything Christmas Goes"


Giving Thanks...

Here in Canada we are preparing for our Thanksgiving which is approaching very quickly. 
The leaves have almost come off the trees signifying that autumn is certainly here and old man winter isn't far behind.  
The last produce from the gardens has been coming in and it's time to start doing fall cleanup around the yard.

Before autumn decides to leave us, we at Pile it On wanted to have a seasonal challenge for you showcasing the beautiful season.
So...our theme this week is...

"Autumn"

I chose to use a thanksgiving digi from our sponsor.

Let's have a peek...


I colored up the image with my Spectrum Noir markers and decided that I would make a smaller sized note card.  I chose some patterned paper that just reminded me of a warm and cozy quilt.  I then added a little sparkle with some sequins! (Sorry the picture has such a glare on them!)
There you go...quick and easy!

Before I go, I have some sponsor details for you!
We are sponsored this week by ....


 Now, although the shop has closed, one lucky winner will still be receiving the four digis that the design team have showcased for this challenge. 
To see all of the prize digis, be sure to check out the DT creations at the Pile it On blog!

That's all for me today!
Glad you could stop by!

Until next time...

This card has been shared in the following challenges...
Just Wanted to Share...

I met a milestone for my little Etsy shop this week!

I received a custom order for some Christmas cards a few weeks ago, and finished them a few days ago!  Today they shipped out to Knoxville, Tennessee!
Needless to say that I am so excited and I hope my lovely customer will enjoy them and have fun sending them during the holiday season!

Here's a peek at the cards that were sent out...


That's it for me today!
Just wanted to include you in the excitement!

Until next time...

A Little Something...

Hi Everyone!
Just popping in with a quick post today!

It should be a Christmas Stampin' All Year Long post coming at you today...however, not feeling well and life have gotten in the way this week so I have no creation for the challenge.
My apologies!

I will however share with you the theme...

"Use Lots of Snowflakes"

It will be a fun one, and I anticipate lots of participation.
Even though I haven't been able to create, I still look forward to coming to visit and seeing your creations!

Be sure to check out the CSAYL blog to see the wonderful prize being offered!

Now...I don't want to send you away empty handed, so I will show you a card I worked on awhile back and have just had time to add to my Etsy store.

It's another vintage/victorian inspired creation...you know those are my favorite kind to create!

Here goes...


This photo actually features an awesome clock and lace table cloth that I scored on a visit to our local thrift store yesterday!  Love them!

Thanks so much for stopping by for a visit today!
Hope to see you again soon!

Until next time...


Following a Dream...

*This post will remain as a sticky post at the top of the blog until October 01/14*

Good Morning!
Today I have some most exciting news to share with you...I'm practically bursting!

A few weeks back I decided I would send in a Design Team application for the current call they were running over at Heartfelt Creations!  I have always loved their products!  Their papers are so beautiful and the stamps and dies exquisite.  

I had a paper pack from this awesome company in my craft room and decided I would design several cards with it and send them in.  You may remember seeing them here on the blog...if not...here's the two Christmas cards I created and submitted.


Well, yesterday I received the exciting news that I am one of the semifinalists!

WooHoo!
You can read all about it here on the Heartfelt Creations blog...and take in the beautiful creations that their current design team members have created with the new Christmas line that has been released...(and yes, my received order is sitting in my craft room waiting for the kiddos to be in school full time so I can get creating with it!  Yay!)  There is a voting component to this Design Team call where Heartfelt Creations is asking you to vote for your favorite top 5 semifinalists!  Be sure to check out all of the blogs and when you submit your vote you will be entered to win a $50 Heartfelt Creations gift certificate!  Voting will end September 30, 2014.
I'd sure be honored to be counted among your vote!

I'm so excited to create for the next phase in the Design Team application!  
I'm also so honored & flattered that I have made it to the semifinalist list.  
I took a chance, followed a dream...and got further than I ever imagined!

Until next time...

Thanks for visiting!

Thanks for visiting!