Thinking of You...

Hi There!
I'm so glad you've taken the time to visit and to take a look around today!
If you're a regular follower, you know that today is Heartfelt Creations Wednesday!
We're currently still creating with the Enchanted Mum Collection, and take my word for it, the design team has certainly created some enchanting works of art with this stunning collection.  The Heartfelt Creations blog is just full of a fresh dose of inspiration each and every Wednesday!

This week I have used the paper collection, and several of the stamps to create a "box card".  I found a cutting file in the Silhouette Design Store and decided this would make a unique paper craft.  

Here's how this creation turned out...


It is super cool how this card opens into a box and reveals the message inside!

Here's a look at the card when closed and secured with the belly band...


...and how about a bit of a closer look at the belly band...


I've included the full instructions at the end of this blog post should you be interested in recreating a version yourself!

Be sure to stop by the Heartfelt Creations blog today when you have an extra moment...there will be so much to ohhhh and ahhh over!  

Until next time...

Project Supplies and Instructions
HCDP1-258  Enchanted Mum Paper Collection
HCPC-3695  Enchanted Mum Clusters Cling Stamp Set
HCPC-3693  Enchanted Dragonflies Cling Stamp Set
HCPC-3692  Enchanted Mum Bouquet Cling Stamp Set
HCPC-3691  Enchanted Mum Cling Stamp Set
HCD1-768  Enchanted Mum Die
HCD1-769  Enchanted Mum Bouquet Die
HCD1-770  Enchanted Dragonflies Die
HCD1-747  Arianna Lace Die
HCST1-401  Deluxe Flower Shaping Kit
SMP001  Stamp Mat Pad
TSMP704  Memento Dye Ink Pad - New Sprout
TSMP707  Memento Dye Ink Pad - Bamboo Leaves
TSMP708  Memento Dye Ink Pad - Olive Grove
ANC850  Spring Bling Pearls
159723  Art Instititue Glue - Dries Clear
352854  Metal Glue Tip - Art Institute

Other Products Used:  Silhouette Cameo Electronic Die Cutting Machine, Silhouette Design Store Design ID #78280, BigShot Manual Die Cutting Machine, white card stock,  Distress Markers - Worn Lipstick, Spun Sugar, Victorian Velvet, Aged Mahogany, Broken China, Tumbled Glass, Peeled Paint, Forest Moss, Black Soot, sponge daubers, Glitter Ritz, VersaColor Pine Cone Ink, Stampin Up Cameo Coral Ink, Prima Marketing Crystals, paper trimmer, scissors, water brush, Zig Two Way Glue Pen, 3D pop dots, water, mist bottle

Choose a 12"x12" designer paper from within the Enchanted Mum Collection to use as the card base and belly band.  Cut card base and band using your electronic die cutter and cutting file.  For the side panels, choose a patterned paper with some larger images and cut using paper trimmer so you are able to pick out the specific area of designs you are wanting to use.  Ink all edges of card pieces and card base using a light brown colored ink.  Assemble card base and apply side panels.  Choose a small pre made card panel from the paper collection and trim to fit centre of box card.  Ink all edges using the same brown colored ink and apply to inside of card.  Color the dragonfly and mum image pictured using distress markers straight onto the rubber stamp.  Gently huff on rubber stamp to reactivate ink and stamp onto white colored card stock.  Allow to dry slightly and then gently pass a wet water brush over the image to blend slightly. Adhere prills.  Stamp a second dragonfly image, color and fussy cut. Using a glue pen brush over the dragonfly lightly and apply Glitter Ritz.  Bend the wings up gently and adhere body over the original stamped image, allowing the wings to rise creating a 3D effect.  Adhere flower image to card.  Choose a ticket sentiment to add to the bottom of the flower image, ink all edges with brown ink  and then apply to card using 3D pop dots. Die cut one of the  large dies from the Arianna Lace Die Set in a light pattened colored paper from the Enchanted Mum Paper Collection, as well as two of the petal style dies and two of the longer detailed die.  Adhere large die cut to the centre of thte belly band, along with the two petal style die cuts one on each side of the large die cut.  Place one of the long detailed die cuts onto each side of the belly band which will fold to be the wrap around to the back.  Stamp the mum image using a light coral color.  Using a sponge dauber, apply the same color lightly to both the front and the back of the stamped image.  Die cut using the coordinating die.  Using just the two smaller flowers, shape petals using the Deluxe Flower shaping Kit and then fold each in half.  Once folded in half, reopen and apply a small amount of glue to the fold and refold.  Now, glue the smaller half bloom to the larger.  Add prills and set aside to dry.  Stamp the smallest flower in the same coral color twice and shape into  two flower buds. Color the sentiment stamp using the same technique you used to color the dragonfly and mum image.  Stamp onto white card stock and die cut using the coordinating die.  Adhere to card using 3D pop dots, doubling them together one on top of the other so that the sentiment image stands up off the card a little further.  Adhere flower and buds to card.  Stamp the leaves from the mum image in the Enchanted Mum Bouquet Cling Stamp Set twice.  Color using several shades of green ink and die cut using the coordinating die.  Shape using the Deluxe Flower Shaping Tool Kit and a spritz of water.  Adhere leaves to card as shown.  Lastly, add in the crystal swirl embellishments. 

Friendship...

Hello Everyone!

I had some time to create a quick friendship card and I wanted to share it with you!


I love the vintage patterns in the background and the soft gorgeous color tones of the illustration.  The stunning image is a Crafty Secrets panel that I've had in my stash for a super long time!
I've inked all of the edges on the card with a light brown ink to give it the antiqued look.

This blank card is ready and waiting for a handwritten sentiment and to be sent to a special friend or loved one!  It's always the right time to let someone know you care about them!

Well, that's all for me today!

Until next time...

A Beau-Tea-Ful Gift Suggestion...

Welcome!
I'm so glad you could stop by for a visit today!
It's Wednesday, and as you all know its a Heartfelt Creations share day!
Be sure to hop on over to the Heartfelt Creations blog after you've finished here because the team has another week of inspiring creations for you!

I decided to go with a gift idea for my project this week!
Do you have any guesses as to what it might be when you look at the title of today's blog post?

I won't keep you waiting...


My inspiration for this teacup centrepiece came from the beautiful floral arrangements that my Grandma used to receive from my uncle.  I picked up a cup and saucer at the thrift store and set to work shaping flowers....daisies, roses, mums, etc.  

Here's a closer look at the flowers...


I adhered matching sentiments to a toothpick to add it among the centrepiece just as the florist does.  I added a bow to the side of the arrangement and then sprayed the flowers with glitter hairspray.  
I had so much fun creating this...it took me back to the days of when I worked in a florist shop!

Well, I decided to create a small card to go with the centrepiece as often a card does accompany a floral gift.  

Here's the small note card I created...


I chose a small card panel and trimmed it to fit the note card, allowing a small white border to remain around it.  I then chose a smaller preprinted card panel and adhered it with 3D pop dots.  I cut out the sentiment and once again adhered it with 3D pop dots as well.  Lastly, I shaped three small flowers  to add to the side of the card.  

Here's a look at the set together...


I'll leave the instructions for this project here at the bottom of the blog post for you.  This project is not difficult, just a little bit time consuming with the flower shaping...so don't be intimidated...you can replicate this easily and have a wonderful gift ready for a birthday, Mother's Day or even just a reminder to someone that you are thinking of them!

Until next time...

Project Supplies & Instructions
HCDP1-258  Enchanted Mum Paper Collection
HCPC-3691  Enchanted Mum Cling Stamp Set
HCD1-768  Enchanted Mum Die
HCPC-3656  Delightful Daisies Cling Stamp Set
HCD1-760  Delightful Daisy Die
HCPC-3644  Birds and Blooms Cling Stamp Set
HCD1-757  Leafy Branch Die
HCPC-3533  Sun Kissed Fleur Cling Stamp Set
HCD1-734  Sun Kissed Fleur Die
HCPC-3501  Bold Vintage Floret Cling Stamp Set
HCPC-3502  Mini Vintage Floret Cling Stamp Set
HCD1-727  Vintage Floret Die
HCPC-3545  Open Leaf Cling Stamp Set
HCD1-736  Classic Leaf Die
HCST1-401  Deluxe Flower Shaping Tool Kit
SMP001  Stamp Mat Pad
TSMP507  Memento Dye Ink Pad - Elderberry
TSMP701  Memento Dye Ink Pad - Cottage Ivy
TSMP707  Memento Dye Ink Pad - Bamboo Leaves
TSMP103  Memento Dye Ink Pad - Cantaloupe
TSMP704  Memento Dye Ink Pad - New Sprout
TSMP301  Memento Dye Ink Pad - Rhubarb Stalk
TSMP400  Memento Dye Ink Pad - Rose Bud
ANC850  Spring Bling Prills
ANC852  Bright Idea Prills
159723  Art Institute Glue - Dries Clear
352854  Metal Glue Tip - Art Institute


Other Products Used:  white card stock, small note card base, tea cup and saucer, BigShot die cutting machine,  Memento Dye Ink Pad - Sweet Plum, Angel Pink, Grey Flannel, Stampin Up - Positively Pink, glitter hairspray, toothpick, ribbon, styrofoam ball, water, mist bottle, sponge daubers, Glossy Accents, 3D pop dots, VersaColor Pine Cone ink, decorative moss, scor tape

Watch the following videos to learn the various flowershaping techniques for the flowers in this project...Enchanted Mum here,  Delightful Daisies here , mini Birds and Blooms here, Sun Kissed Fleur here, and the Vintage Floret here.

Tea Cup Centrepiece Instructions:  Cut a small styrofoam ball in half to fill the tea cup with the rounded shape on top. Glue in place and allow to dry.  Adhere a small amount of decorative moss to the styrofoam ball with Glossy Accents and allow to dry. Select the flower stamps and dies, along with the various color inks that you wish to use to create your arrangement.  Stamp, die cut, color and shape your assorted flowers.  Arrange flowers in a way that is pleasing to you, allowing some of the flowers to drape over the sides of the tea cup, and some to sit on top of one another to add dimension.  Once happy with the floral bunch, adhere one by one using Glossy Accents allowing some time for the adhesive to dry before adding more flowers.  Stamp and die cut a few leaves to add randomly throughout the centrepiece. Adhere leaves in place with Glossy Accents. Add bow to side of arrangement.  Lastly, select two of the same sentiment pieces from the Enchanted Mum paper collection and adhere both back to back onto a toothpick.  Insert sentiment into arrangement. 

Note Card Instructions:  Select pre made card panel from the Enchanted Mum Paper Collection, and trim to fit small sized note card, allowing a small white edge to remain seen on the card base.  Ink edges of panel with a brown colored ink, and adhere to card base.   Cut out the mum image card panel shown.  Ink all edges with a brown ink, and apply to card base using 3D pop dots.  Select the sentiment that you wish to use from the paper collection and once again ink edges with a brown colored ink and apply to card using 3D pop dots.  Stamp the small flowers from the Birds and Blooms Collection in a light pink color and cut using the coordinating die.  Shape using a small spritz of water and your deluxe flower shaping tools.  Adhere prills to centres.  Stamp, color, cut and shape leaves.  Adhere flowers and leaves to side of card as shown. 

Birds and Blossoms Blessings...

Hello!
Just popping by with a quick post today!
A few months ago I created this card which I hadn't had a chance to pop onto the blog yet!
If you've followed me for sometime you know that I love creating vintage style cards and love to work with ephemera collage sheets!

Well, here's a look at the most recent card I created using a vintage pre printed panel from Crafty Secrets featuring a picture of a lovely bird perched a top a stunning rose. 

(This card has been added to the Etsy Store)

I've added some Glitter Ritz to the rose to give it an alluring sparkle, and I've also popped up the image using 3D pop dots to add some dimension to the creation.

Here's a closer look...


...and one last picture for you to enjoy...


That's all for me today!
I hope you've enjoyed!

Until next time...

Guest Designing with Country View Challenges...

Welcome Everyone!
I'm here today with a special share!
A few months ago I was lucky enough to have one of my creations chosen to be one of the Top 3 at Country View Challenges, and was invited to be one of their guest designers for September.

When I found out the theme for the challenge was "numbers", I knew exactly what I was wanting to create...or more so decorate!  I've recently jumped on the planner bandwagon and decided that what holds more numbers than a planner...dates, times, etc.

Here's the planner spread that I designed for a week in August...


I dug into my Scarlet Lime PlannerSociety July planner subscription kit, along with Jillibean Soup "Chilled Cucumber Soup" Collection and started to get creative.  I've used the gorgeous paper from the Scarlet Lime PlannerSociety Collection to fill in some of the time blocks, added stickers and several die cuts.  I've also used some of the journaling cards, die cuts, papers and of course the decorative number blocks from the Jillibean Soup "Chilled Cucumber Soup" Collection.  Some fun washi tapes and MAMBI stickers completed the look! Planning is such a fun and creative way to keep your life organized!

Here's a closer look at each of the pages...


Don't you just love the flamingo stickers!
I Love Flamingos!

Here's a closer look at the second page as well...


I love the messages on both of these journaling cards!  And, I thought the MAMBI stickers fit in with the messages perfectly!

I do hope that you will check out the challenge at Country View Challenges and play along!
Get creative with the number theme and be sure to link up your creation!

Until next time...

A Lifetime of Memories...

Happy Wednesday!
I'm back today with another Heartfelt Creations project featuring the beautiful Enchanted Mum Collection!

I was walking through our local dollar store one day and came across a plain wooden frame that I knew would be perfect for altering...and I decided that the Enchanted Mum Collection was the perfect collection to use for this project.  

Here's how the frame turned out...


When I saw the "Memories for a Lifetime" sentiment strip in the paper collection, I knew that I needed to feature that on the frame.  After all, isn't that the reason we frame our important pictures...to remember the people, the moment, the feeling, etc.  

The mums are so much fun to create!  As you can see I've created each one just a slightly bit different to add to the interest of the piece.  I love the flower buds that have been tucked into the top of the bottom floral cluster!

Here's a closer look at some of the flowers...


...and another...


Are the pinks and purples in this collection not stunning!!!
And the adorable dragonflies are just the icing on the cake!

I really do hope you've found some inspiration here today!
I do think this would make a wonderful birthday gift for someone special...especially with a photo of you and that special person together!  Remember that even something from the dollar store can take on new life and become a wonderful piece once you've given it the Heartfelt touch!

The Heartfelt Creations blog is also full of beautiful inspiration today!  Be sure to stop by for a visit and leave the designers some love!  Everyone works so hard to bring you something fantastic each week!

I've included written instructions for this project below, and it's really easier than you may think...so feel free to give this a try yourself!  I'd love to see your finished creation!

Until next time...

Project Supplies & Instructions
HCDP1-258  Enchanted Mum Paper Collection
HCPC-3692  Enchanted Mum Bouquet Cling Stamp Set
HCPC-3693  Enchanted Dragonflies Cling Stamp Set
HCPC-3691  Enchanted Mum Cling Stamp Set
HCD1-768  Enchanted Mum Die
HCD1-769  Enchanted Mum Bouquet Die
HCD1-770  Enchanted Dragonflies Die
HCST1-401  Deluxe Flower Shaping Kit
SMP001  Stamp Mat Pad
TSMP400  Memento Dye Ink Pad - Rose Bud
TSMP802  Memento Dye Ink Pad - Peanut Brittle
TSMP708  Memento Dye Ink Pad - Olive Grove
TSMP707  Memento Dye Ink Pad - Bamboo Leaves
TSMP701  Memento Dye Ink Pad - Cottage Ivy
TSMP507  Memento Dye Ink Pad - Elderberry
TSMP602  Memento Dye Ink Pad - Teal Zeal
ANC850  Spring Bling Prills
159723  Art Institute Glue - Dries Clear
352854  Metal Glue Tip - Art Institute

Other Products Used:  Dollar Store wooden frame, BigShot die cutting machine, Elmer's Spray Adhesive,  white card stock, rhinestone strips, Stampin Up Powder - Iridescent Ice, nail file for sanding, pencil, scissors, paper trimmer, sponge daubers, water, mist bottle, Memento Dye Ink Pad - Angel Pink, Pear Tart & Sweet Plum, Zig Glue Pen, Glitter Ritz, Stampin Up Positively Pink ink

Watch this video to learn how to shape the Enchanted Mum flowers

Locate the paper for the frame background within the paper collection.  Trace the frame shape with a pencil so that the decorative florals move up the side of the frame and the pillar lays across the bottom. Leave a slight border of flowers to fussy cut around the area where you will be cutting out the centre portion of the frame, allowing them to stick out into the centre of the framed image.  Cut out traced image and fussy cut images near centre. Using a spray adhesive apply to frame. Locate sentiment strip in paper collection and adhere to frame.  Fussy cut a small group of flowers from the same paper you've used for the frame background to adhere to upper corner where flower arrangement will be placed. Adhere to frame.  Using a cheap dollar store nail file, smooth all edges of the paper around the outside and inner portion of the frame. Using a fine glue pen, adhere small amounts of Glitter Ritz to each of the flowers on the frame. Moving along to creating the dimensional mums, use a dark pink ink, stamp several inkings of the Enchanted Mum Cling Stamp Set onto white card stock.  Using a sponge dauber, apply a lighter pink color to the petals of each flower.  Cut using the coordinating die, and then ink the backside of the flowers using the same lighter pink color.  Using a small spritz of water and the deluxe flower shaping tools shape two flowers and one flower bud.  Repeat the same directions using a purple color scheme. Adhere prills to flower centres that are open. Stamp and die cut several of the mum image with leaves from the Enchanted Mum Bouquet Cling Stamp Set in a dark green ink onto white card stock.  Trim off the leaves and ink them with sponge daubers and several green colored inks. Using a spritz of water and flower shaping tools, shape leaves.  Arrange flowers, buds and leaf clusters as shown and adhere to frame.  Adhere rhinestone strips.  Stamp dragonfly images from Enchanted Dragonflies Cling Stamp Set in a purple ink and cut with coordinating die.  Color using a light purple, and light orange ink.  Shape and adhere to frame. Cut a piece of patterned paper as an insert for where your photo will be displayed and add to frame. For the finishing touch, using a fine tip glue pen, apply random spots of glue to the petals on each flower, sprinkling a fine iridescent glitter on each petal as you go. 


This project has been shared in the following challenges...
Crafty Cardmakers..."Floral Embellishments"
Fan-Tastic Tuesday..."Bright and Colorful"
Through the Craft Room Door..."Anything Goes"
Crafty Hazelnut's Patterned Paper Challenge..."Anything Goes with Patterned Paper"
Crafty Time..."Anything but a Card"


A Little Planning...

Hello and Welcome!
I'm here with a late night post to share with you the fun I had doing some memory keeping in my Happy Planner last night while the kiddos were in bed and hubby was away.  

My Scarlet Lime Planner Society kit came in the mail last week and I'd been waiting to crack it open and do some decorating.  I love the colors of this kit...they are perfect for saying good bye to summer and hello to fall!

Here's a peek at what I kept myself busy with last night...


I've added in some awesome MAMBI stickers to go along with the theme!  I love that "Say Cheese" sentiment and camera...perfect for the family selfie we took all crowded into our bed in our camper.  We were watching the old classic movie "Heidi" as the rain fell having a great time!  

Here's a closer look at each of the pages...


...and the second...


I also missed posting a week in August that I had completed in my Happy Planner once again using products from the Planner Society monthly kit as well as some more fantastic stickers from Me and My Big Ideas!

Here's a quick peek at those...


Thanks for stopping by for a visit!
I hope I've been able to encourage you to do some memory keeping...and maybe even try a new style of it by using a planner!

Until next time...

Happiness is Being with You...

Welcome Everyone!
It's another exciting Wednesday with the new release at Heartfelt Creations!
I'm sure you've seen the preview of the Enchanted Mum Collection and I hope are as super excited about it as I am!  Those flowers are so much fun to shape and can be molded into so many different looks!  And...don't you just love those dragonflies!

Here's a little about the collection...

Swing open the decorative wrought iron gates and escape to serene and alluring garden surroundings with the Heartfelt Creations Enchanted Mum Collection.  Take in the beauty of shimmering dragonflies as they glide through warm and gentle breezes, landing to perch on beautiful bouquets of chrysanthemums dancing in the sunlight.  Graceful flowing floral images and exquisite die cuts along with soft hues of pinks, purples, greens and yellows are sure to bring about a sense of peace and calm to your soul.  Create your very own impeccable garden themed designs with the assortment of light and airy mums taking centre stage in five gloriously illustrated stamp sets along with swirling vines and beautifully detailed dragonflies, all of which mirror the stunning images found within this enchanting paper collection.  Create authentic, true to life blossoms and embellishments with three coordinating dies, perfect to grace your scrapbook layouts and original card creations.  Whether you are celebrating special occasions or  preserving precious family memories, an enchanting time of creativity awaits you with the Enchanting Mum Collection. 

I chose to create a 6"x6" card for this reveal.  
Since I used black to stamp the sentiment on the card, I decided that it would be interesting to stamp the flowers in black ink as well and then color them pink.  

Here's a peek at how the creation turned out...


The Enchanted Mum collection just begs to have sparkle and shine, so I've added both to the flowers as well as the dragonflies...along with some pink gems!

Here's a closer peek...


...and one more...


(For full instructions and supplies for this card, please see the Heartfelt Creations blog.)
This enchanting collection is available for purchase today in the Heartfelt Creations online store!
Be sure to stop by...and while you're there, don't forget to check out the blog to see the other amazing projects the rest of the design team wish to enchant you with!


One Last Visit to the Farmers Market...

I just cannot believe that we are starting into September... the leaves have started to change color here in Manitoba, Canada.  The evenings are starting to cool off enough that you need to have a sweater along wherever you go. The camping season is coming to an end, and our kiddos go back to school in a week!

I do have a confession though... I love fall!  I love the cooler weather...I love sweaters...I love the colors and smells of the season...and I love the routine that starts again when school is once again in session!  Now, since fall is on it's way, that means that the trips to the Farmers Markets are fast coming to an end...and I thought I would take you on one last trip to visit the Farmers Market with Heartfelt Creations!

This week I've created a card with this wonderful collection.
You'll be able to see that fall has been on my mind in the color scheme of the card and flowers.
The other inspiration that I drew my creativity from was "depression glass".  You know the colored glassware that was created during the depression era.  It comes in a variety of colors.  I love to see displays of depression glass when I visit our local thrift or antique stores.

Well...enough rambling...

...here's a peek...


I must admit that this card did not turn out exactly as I had imagined.  While I like it, I still think it's a little bit of a hot mess!  LOL

I've stamped the jar images onto the blue patterned card stock included in the Farmers Market Collection.  They have been mounted onto the card slightly overlapping one another using 3D pop dots. I've then used Glossy Accents to give a shine to different parts of the jugs.  I've stamped the olive branch images onto the same paper as well and adhered them in front of the glassware.   I've then stamped and fussy cut the sentiment stamp in the same blue paper and adhered it over the water jugs and branches using pop dots as well.  I've created several different colors of daisies and clustered them around the sentiment.  I've used Stickles and Ivory Flower Soft on the brownish toned  flowers and decided to go with a shimmering centre on the smaller blossoms.

Here's a closer look at how the flowers turned out...


I've also used some dew drops on the a few of the flower petals and leaves.

I hope I've been able to inspire you on some level today!
The Heartfelt Creations blog is chalked full of new inspiration today, so be sure to stop by there for a visit!  My teammates always do such a fantastic job coming up with new and unique ideas to inspire you!

Until next time...

Project Supplies and Instructions
HCDP1-257  Farmers Market Paper Collection
HCPC-3688  Veggie Collage Cling Stamp Set
HCPC-3686  Jars and Accents Cling Stamp Set
HCPC-3685  Jars and Vines Cling Stamp Set
HCPC-3687  Jug of Herbs Cling Stamp Set
HCD1-767  Jars and Vines Die
HCD1-777  Farmers Market Fruit Die
HCPC-3656  Delightful Daisies Cling Stamp Set
HCD1-760  Delightful Daisy Die
HCD2-751  Cut Mat Create 2A Die
HCD2-752  Cut Mat Create 2B Die
HCST1-401  Deluxe Flower Shaping Kit
SMP001  Stamp Mat Pad
TSMP607  Memento Dye Ink Pad - Nautical Blue
TSMP802  Memento Dye Ink Pad - Peanut Brittle
TSMP808  Memento Dye Ink Pad - Espresso Truffle
159723  Art Institute Glue - Dries Clear
352854  Metal Glue Tip - Art Institute

Other Products Used:  Big Shot manual die cutting machine, Ivory Flower Soft, Diamond Stickles, white card stock, kraft card stock, washi tape, Dew Drops - Sunflower, glass look flower centres,  Stampin Up Embossing Folder - Spring Flowers, scor tape, 3D pop dots, lace, scissors, paper trimmer, sponge finger daubers, water, mist bottle, Elmers Glue - Craft Bond Quick Dry, Glossy Accents

Create 5"x7" card base using white card stock.  Choose a patterned paper from within the Farmers Market Paper Collection that you wish to use as a background.  Cut slightly smaller than your card base to leave a white edge around the card front.  Cut a piece of kraft card stock slightly smaller than the background and emboss using embossing folder and manual die cutting machine.  Locate the preprinted card panel in the paper collection, and trim down as shown.  Mask off area of preprinted card panel that you do not wish to have the vegetable stamp image to overlap onto.  Stamp image using a dark blue ink.  Adhere lace strip to back of stamped image panel, and then adhere the panel to embossed kraft colored paper.  Using 3D pop dots adhere the stamped image layers to the background paper.  Adhere card front to card base.  Using the same dark blue ink, stamp the jar images once onto a blue patterned paper found in the paper collection.  Adhere to card with 3D pop dots, slightly overlapping each bottle in the grouping.  Once again using the blue ink, stamp the sentiment banner and fussy cut.  Adhere to bottle grouping using 3D pop dots.  Using craft colored card stock, die cut one fancy corner die cut from the Cut Mat Create 2B die and adhere to upper corner where flower cluster will be added. Continuing with the kraft colored card stock, die cut several cuttings of the vine border from the Cut Mat Create 2A die.  Stamp several inkings of the daisy images using a lighter brown color.  Lightly add some darker brown ink to the petals of the larger flowers using sponge finger daubers.  Apply a yellow color to each of the larger flower centres.  The smaller daisies remain white.  Using a mist of water and your deluxe flower shaping tools, shape each flower. (For full video instructions on shaping  the daisy flowers in this project, please see here.  https://www.youtube.com/watch?v=quxqv6wJRic) Arrange flowers in clusters around the bottle and sentiment images.  Once happy with arrangement, adhere to card.  Repeat for top corner flower cluster.  Next, snip into sections the kraft colored card stock vine die cuts you prepared earlier.  Shape and adhere among flower groupings as desired.  Apply Stickles to large daisies, and glass like centres to the smaller.  For the large flower centres, drop in a larger rounded mound of Elmers Glue Craft Bond - Quick Dry and place Flower Soft on top.  Allow to dry.  Apply a few dew drops onto flower petals and leaves, as well as a few pieces of decorative washi tape onto card as desired.  Lastly, apply a touch of Glossy Accents to your bottle images to give them the appearance of glass.  You now have a completed all occasion card ready to gift and bless someone with!


Old Fashioned Snailmail Stationery...

I'm back today with a post for the awesome online craft store Scrapbooks by Design!
I've recently gotten into the old art of handwriting snailmail letters to several pen pals, and I have to say it's such a nice surprise when you open your mailbox to find "happy mail" that makes you smile...and not just computer generated junk mail and bills. 
However, the problem I have encountered is purchasing cute stationery sets to write my letters on.  
I was browsing the web one day when I came across a stationery tutorial by Under a Cherry Tree.
I started reading some of the tutorials when I came across one that explained how to use your Silhouette Cameo to create your very own and unique stationery.  (You can find the tutorial here.)
Well, problem solved!  The tutorial was very clear and easy to follow and I got about to creating!

I purchased the graphics that I wanted to use through Lettering Delights, and the white copy paper was a Costco purchase.  When it comes to copy paper for a project like this, my suggestion is to go with a bright white and higher quality brand.  The cheap regular Costco brand we use for everyday printing is very thin...this last trip I purchased just one package of the bright white high quality copy paper and the printed designs did not shine through the back of the paper as it did with the cheaper version.  It just looked so much more professional! The remaining supplies I needed I was able to purchase through Scrapbooks by Design...including the white sticker paper that I also had never worked with before. 

Here's how the stationery set turned out...


I created two different paper designs as well as a cute matching envelope.  
Since this particular set was going to be sent out to a pen pal for a birthday gift, I made 4 pages of each design and 8 envelopes.  

Here's a closer look at each of the stationery pages...


I also created a few stickers to go with the collection.  Another tutorial I found at Under a Cherry Tree!  You can find the sticker tutorial here. 
Here's a peek at the coordinating stickers...


I can hardly wait until my pen pal received this in her mailbox and to hear what she thinks of it!
I hope she will enjoy using it, and that the recipients of her letters will enjoy the fun little notes as well.  (Edit:  my pen pal has received the set and absolutely adored it...just as I hope she would!)

That's all for me today!
I hope you've enjoyed my little project!
Be sure to stop by Scrapbooks by Design online store for all your stationery and sticker making supplies!

Until next time...

More Packaging Ideas with the Farmers Market Collection...

Hello and Welcome!

I'm sure by now you've seen the wonderful packaging that I've been able to create with the Heartfelt Creations "Farmers Market" Collection.  (..and if you haven't you can see them here as well as here.)

Well, I'm back this week with two more unique and inspiring ideas for you!
Nothing says Farmers Market more than bushel barrels and clear jugs and jars!  
That's where my creativity took me for this weeks posting...

Let's take a look...


Both of these packaging ideas were very quick and simple to complete!
For the barrel basket, I've done quite a bit of fussy cutting from the paper pack.  
The jar image on the oil jar has been stamped from one of the many beautiful stamps within this remarkable collection.  

Here's a close up of each of these items...


...and of the bushel barrel...


In many parts of the world, summer is winding down as well as the local Farmers Markets.  Wouldn't this just be an adorable idea to give to your favorite vendor who always has that special product waiting for you week after week!  Slip some seeds into the basket for the next upcoming growing season, and how about some pretty wildflowers neatly arranged in the oil jar for a beautiful display!  The ideas are limitless!

Well, that's all for me today!
Do be sure to stop by the Heartfelt Creations blog to see the fantastic creations the rest of the design team have come up with for your enjoyment this week!  And...I'm pretty sure there may be a sneak peek of the new September collection waiting for you there as well...maybe...

Until next time...

Project Supplies and Instructions
HCDP1-257  Farmers Market Paper Collection
HCPC-3687  Jug of Herbs Cling Stamp Set
HCPC-3626  Classic Sunflower Cling Stamp Set
HCD1-753  Classic Sunflower Die
HCDP1-247  Classic Sunflower Paper Collection
HCST1-401  Deluxe Flower Shaping Tool Kit
SMP001  Stamp Mat Pad
273900  Zip Dry Glue

Other Products Used:  Silhouette Cameo electronic die cutting machine, BigShot manual die cutting machine, Silhouette Design Store Design ID #41389 & Design ID #33329, scissors, paper trimmer, lace trim, raffia ribbon, VersaFine Black Ink, VersaColor Pine Cone ink, Spectrum Noir Blending Pencils 084, 086, 107, 103, 062, 065, 031, 046, 108, 117, 120, Spectrum Noir Blending Stumps & Blending Solution, brown and gold seed beads, Yellow Stickles, 3D pop dots, scor tape, water, mist bottle, kraft card stock, hot glue gun

Oil Jar Instructions:  Using the designer paper from the Farmers Market collection as shown , cut the jar base design using your electronic die cutting machine.  Assemble using a strong adhesive.  Once assembled, ink all edges using a brown colored ink.  Locate label image, fussy cut and ink all edges with a light brown ink.  Adhere to bottle.  Locate decorative strips, ink all edges with brown colored ink and adhere around body of bottle using a strong adhesive.  Stamp image using black colored ink and proceed to color using blendable pencils.  Fussy cut and adhere to bottle.  Stamp an inking of the Classic Sunflowers cling stamp onto a yellow patterned paper from the Classic Sunflowers Paper Collection with black ink.  Die cut using the coordinating Classic Sunflower Die.   Shape three small double flowers using the Deluxe Flower Shaping Tool Kit along with a spritz of water.  Add seed beads to each flower centre and adhere to bottle as shown. Apply Stickles to each flower.  Lastly, tie some raffia ribbon around the neck of the bottle.

Bushel Barrel Instructions:  Begin by cutting the barrel shape using your electronic die cutting machine using kraft card stock.  Assemble and ink all edges using a light brown colored ink.  Locate the blue design strip in the Farmers Market Paper Collection, cut, ink all edges with brown ink and adhere around barrel using a good adhesive.  Next adhere lace trim to top of barrel using a hot glue gun.  Fussy cut  the vegetable image from the Farmers Market Paper Collection and attach to barrel using 3D pop dots.  Locate the sentiment image from in the paper collection and fussy cut as well.  Once again, using 3D pop dots attach sentiment image over vegetable image.  Stamp the Classic Sunflower cling stamp image onto the same yellow patterned paper you used for the sunflowers on the oil jar. Die cut flowers using the coordinating Classic Sunflower die.   Shape one large double sunflower and two single sunflowers using a spritz of water and your deluxe flower shaping tool kit.  Apply seed beads to centres of each flower.  Adhere flowers to barrel as shown.  Lastly, apply Stickles to each flower.   You now have two adorable gift packaging ideas ready for your next celebration!

A Berry Happy Birthday...

I hope you've been enjoying the new Farmer's Market Collection by Heartfelt Creations.
As mentioned last week, this has to be one of my all time favorite collections!
When I first opened the sweet package of goodies, I had so many ideas running through my head, and couldn't wait to get creating!

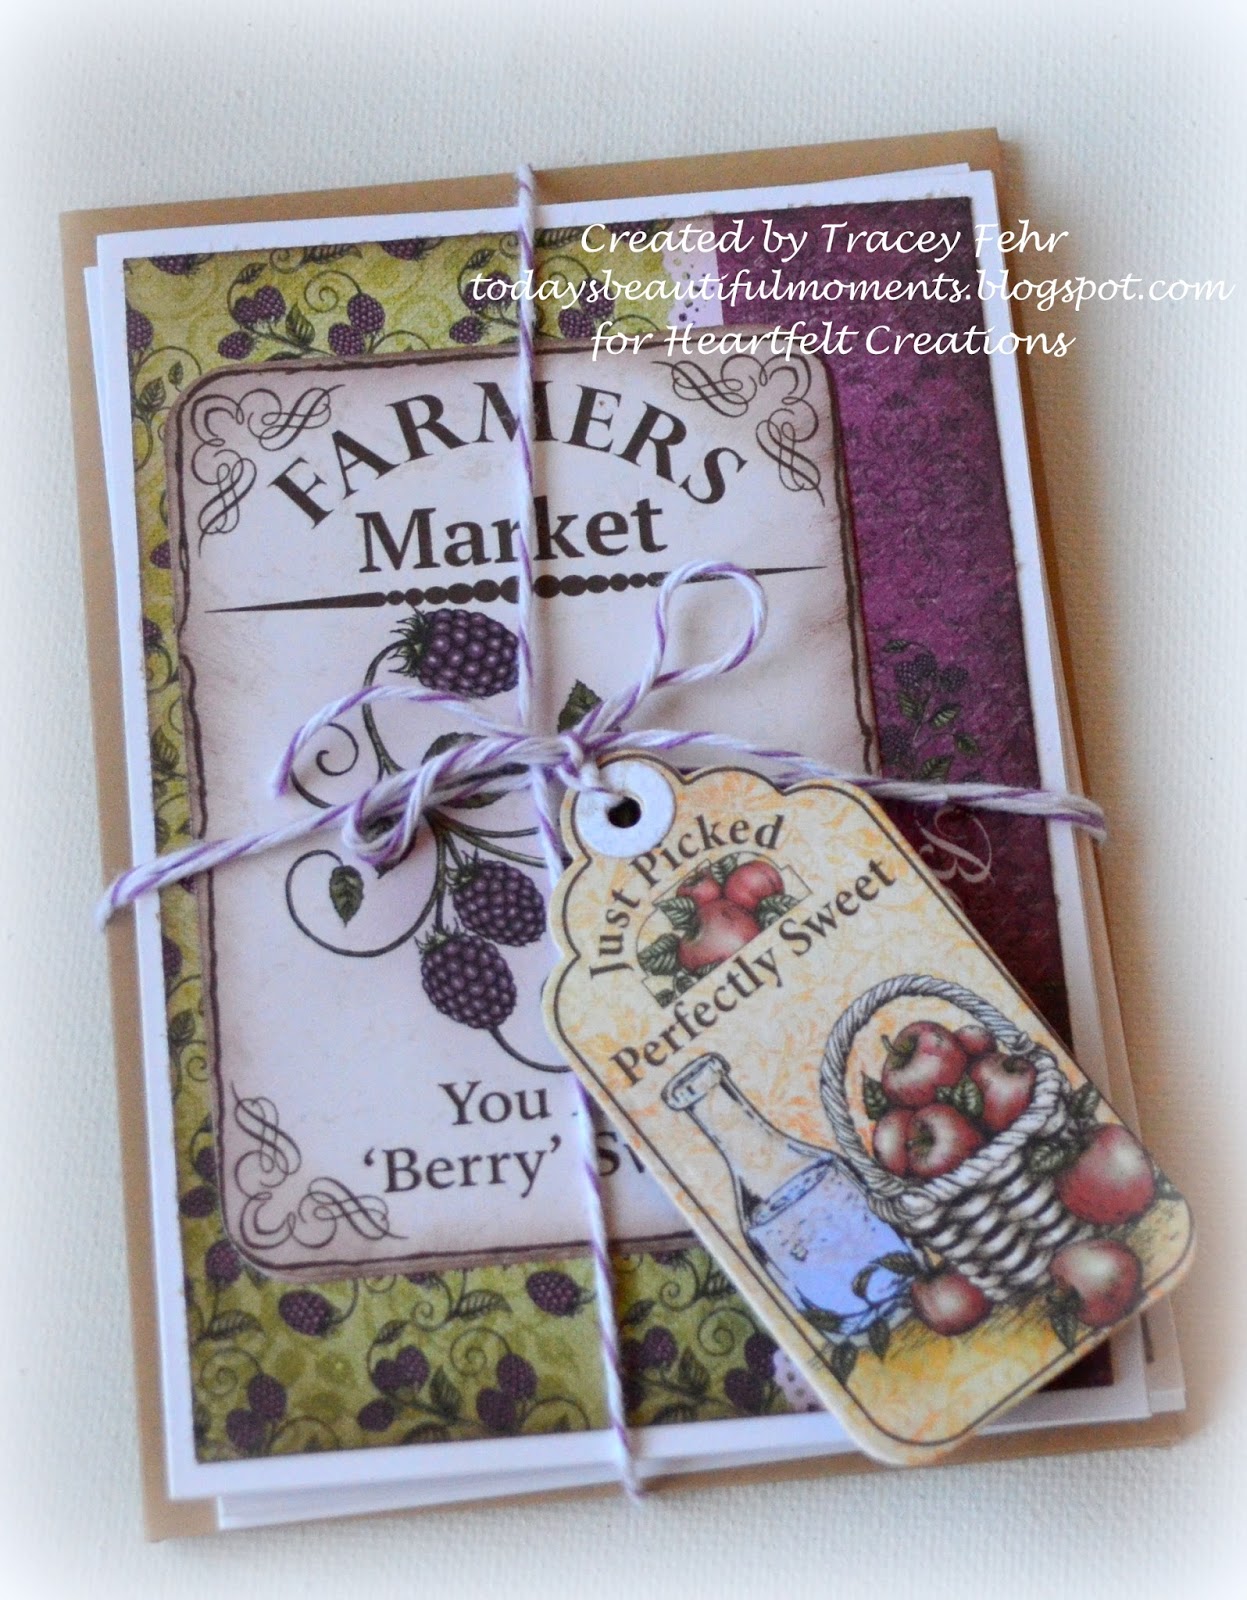
One of the ideas I had was for a Birthday Gift Set of little note cards, presented in an adorable berry basket.  I thought it would be super cute paired with a homemade jar of jam, or a nail polish that was named after raspberries. 

Well, needless to say I got the Silhouette Cameo humming and chose some of those fabulous pre made card panels that Heartfelt does so well and whipped up this little set in no time.

Here's a peek...


Wouldn't you just love to receive a little package like that!?!?
I know I sure would have fun giving a little package like that!

As you can see, I've bundled the cards together with bakers twine as well as one of the adorable tags that comes from the Farmers Market collection itself.  


And, here's a look at the three cards I've included in the gift set...


I love giving card sets as gifts...it's something that most people will use (hopefully) and are consumable rather than being more clutter that needs to be dusted, etc.  
The little premade card panels in this collection make these sweet little cards so quick and easy to make!

And who can forget those beautiful ripe raspberries on the vine!
I thought they would look perfect flowing out of the basket...


I thought some pretty lace and some moss as a finishing touch made this project adorable!
Hopefully you agree!

I do hope you've been inspired and you give this a go yourself the next time you are needing a garden party idea, or are wanting to gift a special someone who loves to garden or has a raspberry addiction!  It can be used for so many different occasions by just changing the sentiment you use on the container.  And, if raspberries is not the fruit you're calling for...Heartfelt has you covered in the apple and peach department as well in this collection!

Be sure to check out the Heartfelt Creations blog if you have not done so already today!
This collection has brought out all the extra creative juices in the design team and they have all done an amazing job with the Farmers Market products!
(P.S. Don't wait too long to purchase yours as I do believe this is gonna be extremely popular!)

That's all for me today!
Thanks for stopping in for a visit!
I'd love to hear what you think of this little project, so don't be shy...feel free to leave me a comment below!

Until next time...

Project Supplies & Instructions
 HCDP1-257  Farmers Market Designer Paper Pack
HCPC 3685  Jars and Vines Cling Stamp Set
HCPC 3689  Berries and Peaches Cling Stamp Set
HCD1-767  Jars and Vines Die
HCD1-777  Farmers Market Fruit Die
HCD1-745  Luggage and Tags Die
HCD2-750  Cut Mat Create 1B Die
HCST1-401  Deluxe Flower Shaping Tool Kit
SMP001  Rubber Stamp Mat Pad
273900  Zip Dry Paper Glue

Other Products Used:  blank note sized cards and envelopes, kraft card stock, VersaFine black ink, Silhouette Cameo electronic die cutting machine, Silhouette Design Store Design ID #30632, ruffled lace trim, bakers twine, moss, VersColor Pine Cone ink, scissors, paper trimmer, BigShot manual die cutting machine, scor tape, 3D pop dots, Spectrum Noir Pencils 107, 093, 094, 095, 097, 103, 031, 041, 042, 046, 047, 053, 058, 108. 120, Spectrum Noir blending stump and blending solution, water spritz bottle, water

Berry Basket - begin by cutting basket file with your electronic die cutting machine and kraft colored paper.  Assemble basket according to file directions. Once adhesive has dried ink all edges with a light brown ink.  Locate the image strip in the paper collection that you wish to use as the decorative edge on the basket.  Trim to size, ink all edges with light brown ink and adhere to berry basket using foam 3D pop dots.  Adhere the flat side of the  ruffled lace trim to inside of container with the ruffle facing the top of the basket.  Fill with decorative moss.  Stamp one inking of the larger raspberries image, and several of the smaller raspberry image.  Color using Spectrum Noir blendable pencils and blending solution, and then die cut using manual die cutting machine and coordinating metal dies.  Shape berries ever so slightly using deluxe flower shaping tools and a light mist of water.  Stamp several vine images, color and once again die cut using the coordinating metal die.  Shape with a light spray of water and the deluxe flower shaping tool kit.  Adhere large raspberry cluster to berry basket, allowing it to droop over to the inside as well giving them the appearance of tumbling out of the basket.  Add in several of the smaller raspberry clusters over top using foam 3D pop dots.  Add vines to berry clusters as desired.  Locate sentiment you wish to use on the gift box, trim from paper pack and ink all edges using a light brown ink color.  Adhere to gift box using foam 3D pop dots.

Cards:  Locate the three smaller pre made card panels as shown, and die cut using the Cut Mat Create die.  Choose the background paper you wish to use and trim slightly smaller than the card front to leave a small white border all the way around the background paper.   Ink edges of all card pieces with a light brown colored ink. Adhere background papers to card fronts, and then adhere small pre made card panels to coordinating card using foam 3D pop dots.  Using the Luggage and Tags die, die cut the tag you wish to use to attach to the card set.  Bundle card set using bakers twine and adhere tag.  Place cards in berry basket, and present to a special friend or loved one who is celebrating a "berry" special birthday!

Let's Visit the Farmers Market...

Hello everyone!
Welcome!

As I sit here and schedule this post, I look at the calendar and cannot believe that August is passing as quickly as it is.  We have a trip scheduled to Washington DC this month for the annual SnapOn Convention/Buying Show and I'm excited to go as we've never been to Washington, however that means when we return that school is starting just around the corner and regular routine will once again be slowly setting in!

Speaking of trips...
I'd like to take you on a little trip...actually the new release being revealed today at Heartfelt Creations has inspired me to plan this little trip for you!

For those of you who haven't seen the new collection previews...its a gorgeous collection called "Farmers Market"...and this collection just makes me giddy!  I love all of Heartfelt's Collections, but this one speaks to my soul!

  Are you ready to head to the farmers market with me?  
Let's go!

Now, one of my favorite things to look at when browsing the market is the rows and rows of canning and preserves.  That is what has inspired today's project that I will be sharing with you!
Mason jars are all the rage right now and I thought I would incorporate this into my design as well.

Are you ready?


I cannot tell you how giddy I was to discover these SVG cutting files...I knew they would be perfect for this fantastic collection.  

All of the pieces with the exception of the crate have been created with designer paper within the new release paper collection.  I love love love the colors and patterns in this gorgeous paper!
The "Home Grown with Love" has been cut from one of the papers in the paper collection as well.
And who could resist that stamped image of the apples!  Gorgeous!
Of course I had to add some of the die cut vines included with this collection and a few small white "apple blossoms".  
The apple image has been colored with my Spectrum Noir blendable pencils...and I love how the colors blended together to give those apples a realistic look.  

Here's a closer peek at the crate...


...and how about these adorable preserves...


These lovely mason jars are actually gift boxes and would be perfect for holding small gifty items such as a lip balm, nail polish, chocolates, etc.  for that special someone...and they are perfect for presenting in the adorable crate.  Not only will your recipient be left with a few small surprises, but they will have a cute little display leftover with the altered art set!
(For full instructions on how to create this set, please see the end of this blog post.)

I hope you've enjoyed our trip to the Farmers Market today!
Should you still find yourself with some time and wanting to continue to stroll, please be sure to stop by the Heartfelt Creations blog for more wonderful Farmers Market inspiration!

Until next time...

Project Supplies & Instructions 
 HCDP1-257  Farmers Market Designer Paper Collection
HCPC 3690  Apple Harvest Cling Stamp
HCPC 3685  Jars and Vines Cling Stamp Set
HCPC 3689  Berries and Peaches Cling Stamp Set
HCD1-767  Jars and Vine Dies
HCPC-3644  Birds and Blooms Cling Stamp Set
HCD1-757  Leafy Branch Die
HCD1-745  Luggage and Tags Die
HCST1-401  Deluxe Flower Shaping Tool Kit
SMP001  Rubber Stamp Mat Pad
273900  Zip Dry Glue

Other Products Used:  Silhouette Cameo Electronic Die Cutting Machine, Silhouette cutting mat,  Silhouette Design Store File Design ID #66549 - 3D Wooden Crate Box, Design ID #81153 - Mason Jar Box, BigShot Manual Die Cutting Machine, two doilies, scissors, paper trimmer, raffia ribbon, lace ribbon, VersaColor Pine Cone Ink, VersaFine Black Ink, Spellbinders Labels 20, Spectrum Noir Blendable Pencils 007, 084, 085, 086, 107, 024, 025, 026, 093, 094, 095, 097, 103, 031, 041, 042, 046, 047, 053, 058, 108. 120, Spectrum Noir blending stump and blending solution, white embossing powder, heat tool, white card stock, kraft card stock, dried moss

For full instructions on how to shape the blossoms from the  Birds and Blooms Collection used on this creation, please see video tutorial here (https://www.youtube.com/watch?v=JFrj2XialLs)

Crate Instructions:  Begin by cutting out the crate file with your electronic die cutting machine and kraft colored card stock.  Assemble pieces as per instructions.  Before assembling the crate itself, ink all edges of all the pieces with a brown colored ink.  Begin assembly piece by piece, allowing drying time between each new piece added. Locate the 12" x 12" designer paper within the collection that has the pictured sentiment.  Cut down the sentiment to apply to the bottom of the crate as shown.   From the same designer sheet, cut three more side panels the same length you have cut your sentiment and apply one to the remaining piece on the front, and the others to the back of the crate.  Adhere  a doily hanging over the side of the crate as shown on both the front and back sides.  Fill the crate with moss.  Stamp one inking of the apple image as well as several images of the vines from the collection using a black ink.  Color using blendable pencils and blending solution.  Fussy cut apple image, and die cut vines using the coordinating die.  Adhere die cut images to crate.  Stamp one inking of the flowers from the Birds and Blooms Cling Stamp Set and add white embossing powder while ink is still wet.  Set embossing powder with heat tool and proceed to die cut and shape flowers using the coordinating die and deluxe flower shaping tool kit.  Adhere blossoms to images as desired.

Mason Jar Instructions:  Begin by cutting out the mason jar files with your electronic die cutting machine and your choice of papers from the Farmers Market Designer Paper Collection.  You will cut the same file twice, only for the second jar you will decrease the size of your file slightly so it will be somewhat smaller.  Glue and assemble all pieces. Once dry,  ink all edges of the 3D jars with a brown colored ink.  Adhere a piece of white lace ribbon to the top of the largest mason jar, ensuring that the lid is still able to close snuggly over top or it.  Using you manual die cutting machine, cut a smaller die cut from the Spellbinders Labels set.   Stamp the small raspberry image onto the label die cut as well as the sentiment.  Color berry image and adhere to jar.  Choose a tag from within the paper collection and die cut using coordinating die.  Loop through raffia and tie onto smaller jar.  Add raffia ribbon to larger jar as well.  You now have a perfect gift box set ready to fill and bless that special someone who loves to garden, do home canning or sells at the local Farmers Market!

Thanks for visiting!

Thanks for visiting!