Showing posts with label Silhouette Design Store. Show all posts

Christmas Advent Calendar

Hi Everyone!
I'm so glad you could join me here today in my little area of blogland!
I have a super treat for you today....actually 24 of them if you're lucky!  LOL
It's another Snow Kissed Collection project created with Heartfelt Creations products!

I won't keep you in suspense any longer!
Here's this weeks projects....a Christmas Advent Calendar!


Now...it's not very often that I will come out and share with you that I love a project...but this one just makes me giddy with happiness!  I love the way it turned out...so much so that I've promised the kids that I will try to make them each one and include them in the designing!  

I've used my Silhouette Cameo to cut out the phrase along with the pieces for the advent calendar itself!  The entire project has been completed with the Snow Kissed Paper Collection by Heartfelt Creations with the exception of the back...which is a simple white card stock.  I chose this particular advent calendar file because I loved the fact that it had a shadow box area in which to build a scene as I love dimension!

Here's a closer look from a different angle...


I've fussy cut the upper corner greenery image from the same paper that I've cut the scene from for the backing of the shadowbox area.  I've stamped the little snowman onto white card stock and have colored him with my Ranger Distress Markers.  I've fussy cut the ornamental baubles from another of the decorative papers in the collection and applied them to make them seem that they are hanging from the greenery.  As a final touch I've added some Glitter Snow to the bottom of the shadowbox area and up the side, as well as around the greenery section.  I added some extra Glitter Ritz to the snow because I felt it needed more sparkle.  I've also used my Designer Dries Clear Glue and fine metal tip along with some more Glitter Ritz to add some sparkle to the river scene.  

Here's a closer peek...


I know I would love to fill this up with yummy chocolates and treat myself to one each day on the countdown to Christmas!

I hope you've enjoyed today's little tour of my latest creation!
I'd love to know what you think...so please feel free to leave a comment for me!

Also don't forget to head on down to the Heartfelt Creations blog where they have more wonderful Christmas inspirations for you this week!  The design team has worked hard and would love to hear from you!

Until next time...
Project Supplies and Instructions
Snow Kissed Paper Collection, HCDP1-269
Frolicking Frosty Cling Stamp Set, HCPC-3750
Designer Dries Clear Adhesive, 159723
Zip Dry Paper Glue, 273900
Metal Tip for Adhesive Bottles, 352854

Other Products Used:  white card stock, Silhouette Cameo Electronic Die Cutting Machine, SVG Attic Advent Calendar Cut File, scissors, Aleene's Glitter Snow, black card stock, Ranger Distress Markers - Aged Mahogany, Peeled Paint, Festive Berries, Dried Marigold, Spiced Marmelade, Pine Needles, Evergreen Bough, Glitter Ritz, 3D pop dots, VersaFine Black Ink, Silhouette Design Store Design ID#70864, paint brush

Using electronic die cutting machine, white card stock and instructions that accompany SVG File purchase, cut all base pieces and assemble using a strong paper glue.  Choose papers from designer paper collection to use for the various pieces of cut file.  Locate the river scene as shown to use as backing in the shadow box portion of the calendar.  Cut decorative boxes using designer paper and assemble.   Fussy cut greenery image from the top of paper that was used for the center river scene image panel.  Adhere to inside top corner of shadow box as shown using pop dots for dimension.  Fussy cut decorative baubles from paper collection and adhere to calendar as shown.  Using your electronic die cutting machine and black card stock, cut numbers and Christmas phrase.  Adhere to advent calendar using dries clear glue and fine metal tip.  Stamp snowman image onto white card stock and color using distress markers.  Fussy cut and adhere to advent calendar as shown using pop dots. Using a paint brush adhere snow all across bottom of advent calendar as well as around the greenery portion of the calendar.  Apply Glitter Ritz and allow to dry.  Using your Designer Dries Clear Adhesive and fine metal tip, apply glitter to areas in river scene you wish to have sparkle.  Advent calendar measures approx. 12" x 12".     


More Packaging Ideas with the Farmers Market Collection...

Hello and Welcome!

I'm sure by now you've seen the wonderful packaging that I've been able to create with the Heartfelt Creations "Farmers Market" Collection.  (..and if you haven't you can see them here as well as here.)

Well, I'm back this week with two more unique and inspiring ideas for you!
Nothing says Farmers Market more than bushel barrels and clear jugs and jars!  
That's where my creativity took me for this weeks posting...

Let's take a look...


Both of these packaging ideas were very quick and simple to complete!
For the barrel basket, I've done quite a bit of fussy cutting from the paper pack.  
The jar image on the oil jar has been stamped from one of the many beautiful stamps within this remarkable collection.  

Here's a close up of each of these items...


...and of the bushel barrel...


In many parts of the world, summer is winding down as well as the local Farmers Markets.  Wouldn't this just be an adorable idea to give to your favorite vendor who always has that special product waiting for you week after week!  Slip some seeds into the basket for the next upcoming growing season, and how about some pretty wildflowers neatly arranged in the oil jar for a beautiful display!  The ideas are limitless!

Well, that's all for me today!
Do be sure to stop by the Heartfelt Creations blog to see the fantastic creations the rest of the design team have come up with for your enjoyment this week!  And...I'm pretty sure there may be a sneak peek of the new September collection waiting for you there as well...maybe...

Until next time...

Project Supplies and Instructions
HCDP1-257  Farmers Market Paper Collection
HCPC-3687  Jug of Herbs Cling Stamp Set
HCPC-3626  Classic Sunflower Cling Stamp Set
HCD1-753  Classic Sunflower Die
HCDP1-247  Classic Sunflower Paper Collection
HCST1-401  Deluxe Flower Shaping Tool Kit
SMP001  Stamp Mat Pad
273900  Zip Dry Glue

Other Products Used:  Silhouette Cameo electronic die cutting machine, BigShot manual die cutting machine, Silhouette Design Store Design ID #41389 & Design ID #33329, scissors, paper trimmer, lace trim, raffia ribbon, VersaFine Black Ink, VersaColor Pine Cone ink, Spectrum Noir Blending Pencils 084, 086, 107, 103, 062, 065, 031, 046, 108, 117, 120, Spectrum Noir Blending Stumps & Blending Solution, brown and gold seed beads, Yellow Stickles, 3D pop dots, scor tape, water, mist bottle, kraft card stock, hot glue gun

Oil Jar Instructions:  Using the designer paper from the Farmers Market collection as shown , cut the jar base design using your electronic die cutting machine.  Assemble using a strong adhesive.  Once assembled, ink all edges using a brown colored ink.  Locate label image, fussy cut and ink all edges with a light brown ink.  Adhere to bottle.  Locate decorative strips, ink all edges with brown colored ink and adhere around body of bottle using a strong adhesive.  Stamp image using black colored ink and proceed to color using blendable pencils.  Fussy cut and adhere to bottle.  Stamp an inking of the Classic Sunflowers cling stamp onto a yellow patterned paper from the Classic Sunflowers Paper Collection with black ink.  Die cut using the coordinating Classic Sunflower Die.   Shape three small double flowers using the Deluxe Flower Shaping Tool Kit along with a spritz of water.  Add seed beads to each flower centre and adhere to bottle as shown. Apply Stickles to each flower.  Lastly, tie some raffia ribbon around the neck of the bottle.

Bushel Barrel Instructions:  Begin by cutting the barrel shape using your electronic die cutting machine using kraft card stock.  Assemble and ink all edges using a light brown colored ink.  Locate the blue design strip in the Farmers Market Paper Collection, cut, ink all edges with brown ink and adhere around barrel using a good adhesive.  Next adhere lace trim to top of barrel using a hot glue gun.  Fussy cut  the vegetable image from the Farmers Market Paper Collection and attach to barrel using 3D pop dots.  Locate the sentiment image from in the paper collection and fussy cut as well.  Once again, using 3D pop dots attach sentiment image over vegetable image.  Stamp the Classic Sunflower cling stamp image onto the same yellow patterned paper you used for the sunflowers on the oil jar. Die cut flowers using the coordinating Classic Sunflower die.   Shape one large double sunflower and two single sunflowers using a spritz of water and your deluxe flower shaping tool kit.  Apply seed beads to centres of each flower.  Adhere flowers to barrel as shown.  Lastly, apply Stickles to each flower.   You now have two adorable gift packaging ideas ready for your next celebration!

A Berry Happy Birthday...

I hope you've been enjoying the new Farmer's Market Collection by Heartfelt Creations.
As mentioned last week, this has to be one of my all time favorite collections!
When I first opened the sweet package of goodies, I had so many ideas running through my head, and couldn't wait to get creating!

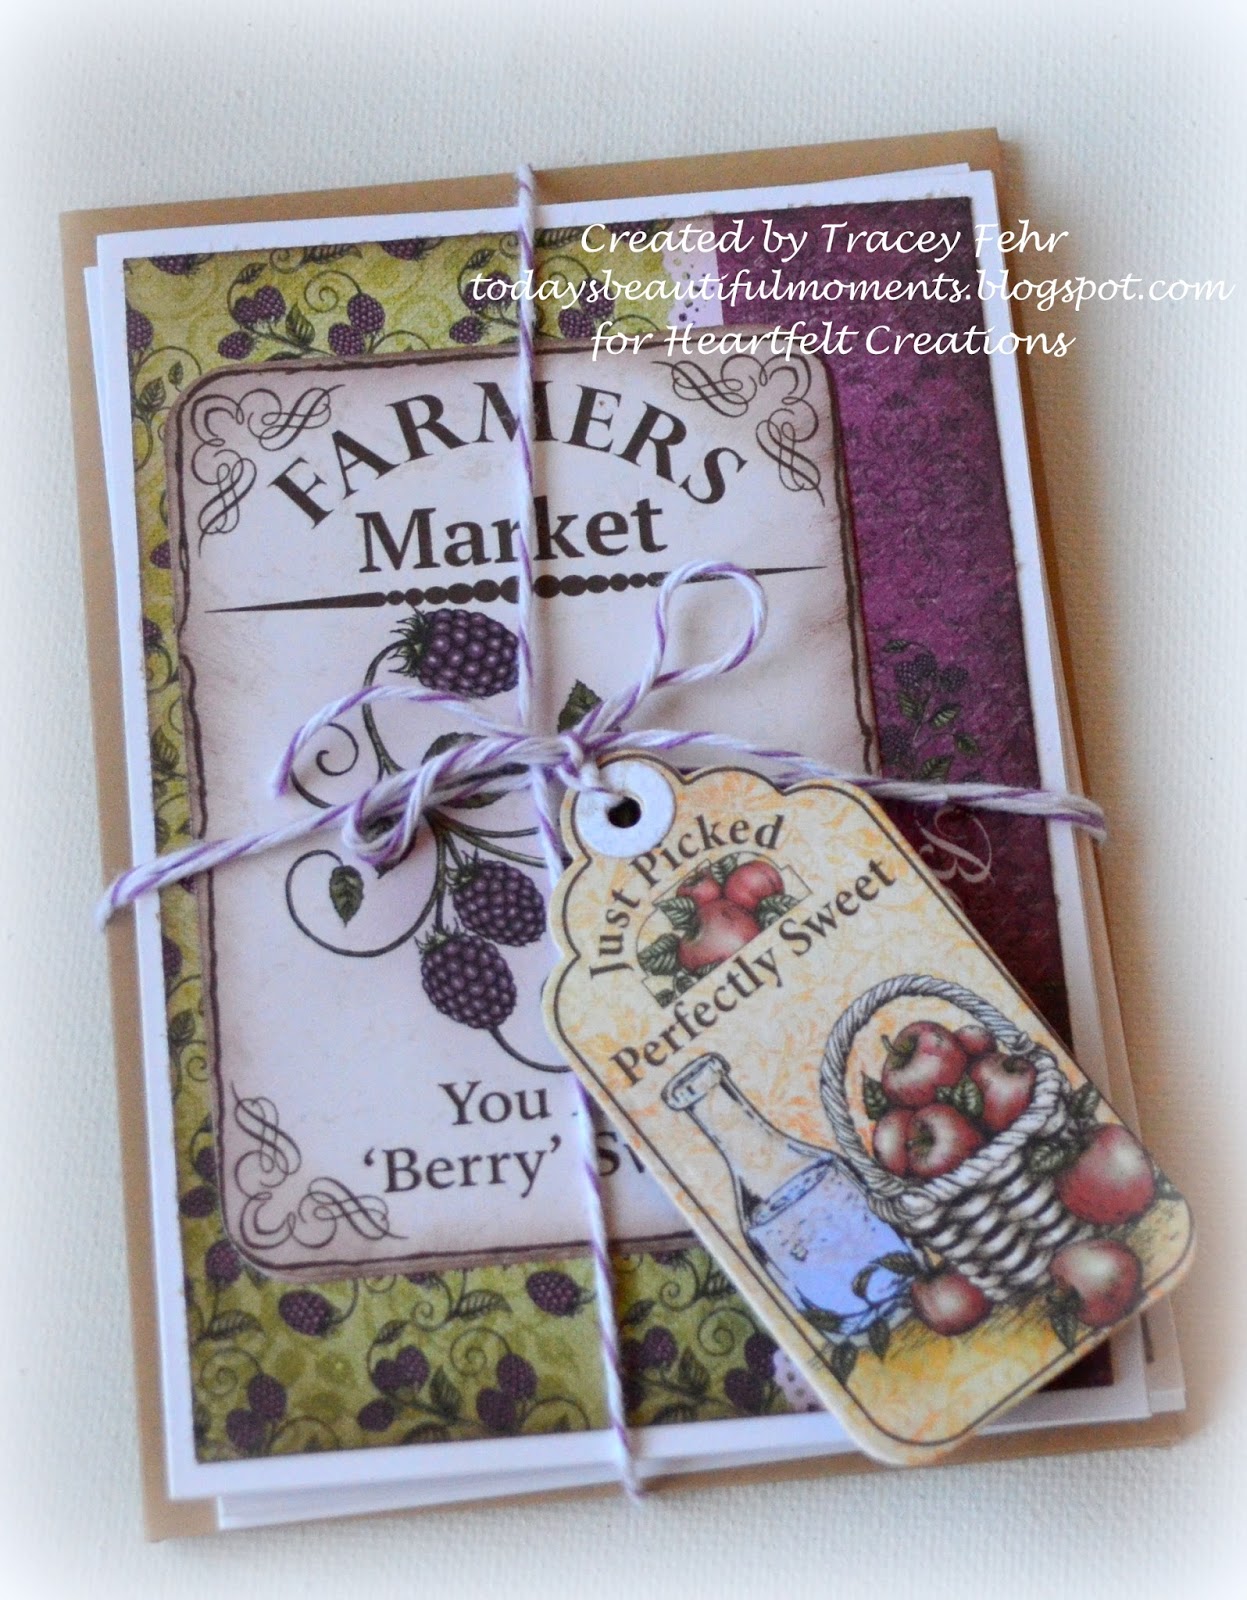
One of the ideas I had was for a Birthday Gift Set of little note cards, presented in an adorable berry basket.  I thought it would be super cute paired with a homemade jar of jam, or a nail polish that was named after raspberries. 

Well, needless to say I got the Silhouette Cameo humming and chose some of those fabulous pre made card panels that Heartfelt does so well and whipped up this little set in no time.

Here's a peek...


Wouldn't you just love to receive a little package like that!?!?
I know I sure would have fun giving a little package like that!

As you can see, I've bundled the cards together with bakers twine as well as one of the adorable tags that comes from the Farmers Market collection itself.  


And, here's a look at the three cards I've included in the gift set...


I love giving card sets as gifts...it's something that most people will use (hopefully) and are consumable rather than being more clutter that needs to be dusted, etc.  
The little premade card panels in this collection make these sweet little cards so quick and easy to make!

And who can forget those beautiful ripe raspberries on the vine!
I thought they would look perfect flowing out of the basket...


I thought some pretty lace and some moss as a finishing touch made this project adorable!
Hopefully you agree!

I do hope you've been inspired and you give this a go yourself the next time you are needing a garden party idea, or are wanting to gift a special someone who loves to garden or has a raspberry addiction!  It can be used for so many different occasions by just changing the sentiment you use on the container.  And, if raspberries is not the fruit you're calling for...Heartfelt has you covered in the apple and peach department as well in this collection!

Be sure to check out the Heartfelt Creations blog if you have not done so already today!
This collection has brought out all the extra creative juices in the design team and they have all done an amazing job with the Farmers Market products!
(P.S. Don't wait too long to purchase yours as I do believe this is gonna be extremely popular!)

That's all for me today!
Thanks for stopping in for a visit!
I'd love to hear what you think of this little project, so don't be shy...feel free to leave me a comment below!

Until next time...

Project Supplies & Instructions
 HCDP1-257  Farmers Market Designer Paper Pack
HCPC 3685  Jars and Vines Cling Stamp Set
HCPC 3689  Berries and Peaches Cling Stamp Set
HCD1-767  Jars and Vines Die
HCD1-777  Farmers Market Fruit Die
HCD1-745  Luggage and Tags Die
HCD2-750  Cut Mat Create 1B Die
HCST1-401  Deluxe Flower Shaping Tool Kit
SMP001  Rubber Stamp Mat Pad
273900  Zip Dry Paper Glue

Other Products Used:  blank note sized cards and envelopes, kraft card stock, VersaFine black ink, Silhouette Cameo electronic die cutting machine, Silhouette Design Store Design ID #30632, ruffled lace trim, bakers twine, moss, VersColor Pine Cone ink, scissors, paper trimmer, BigShot manual die cutting machine, scor tape, 3D pop dots, Spectrum Noir Pencils 107, 093, 094, 095, 097, 103, 031, 041, 042, 046, 047, 053, 058, 108. 120, Spectrum Noir blending stump and blending solution, water spritz bottle, water

Berry Basket - begin by cutting basket file with your electronic die cutting machine and kraft colored paper.  Assemble basket according to file directions. Once adhesive has dried ink all edges with a light brown ink.  Locate the image strip in the paper collection that you wish to use as the decorative edge on the basket.  Trim to size, ink all edges with light brown ink and adhere to berry basket using foam 3D pop dots.  Adhere the flat side of the  ruffled lace trim to inside of container with the ruffle facing the top of the basket.  Fill with decorative moss.  Stamp one inking of the larger raspberries image, and several of the smaller raspberry image.  Color using Spectrum Noir blendable pencils and blending solution, and then die cut using manual die cutting machine and coordinating metal dies.  Shape berries ever so slightly using deluxe flower shaping tools and a light mist of water.  Stamp several vine images, color and once again die cut using the coordinating metal die.  Shape with a light spray of water and the deluxe flower shaping tool kit.  Adhere large raspberry cluster to berry basket, allowing it to droop over to the inside as well giving them the appearance of tumbling out of the basket.  Add in several of the smaller raspberry clusters over top using foam 3D pop dots.  Add vines to berry clusters as desired.  Locate sentiment you wish to use on the gift box, trim from paper pack and ink all edges using a light brown ink color.  Adhere to gift box using foam 3D pop dots.

Cards:  Locate the three smaller pre made card panels as shown, and die cut using the Cut Mat Create die.  Choose the background paper you wish to use and trim slightly smaller than the card front to leave a small white border all the way around the background paper.   Ink edges of all card pieces with a light brown colored ink. Adhere background papers to card fronts, and then adhere small pre made card panels to coordinating card using foam 3D pop dots.  Using the Luggage and Tags die, die cut the tag you wish to use to attach to the card set.  Bundle card set using bakers twine and adhere tag.  Place cards in berry basket, and present to a special friend or loved one who is celebrating a "berry" special birthday!

Bloom Where You're Planted...

Welcome!
So glad you can stop in for a visit today!
It's Wednesday, which means it's time to enjoy a project featuring Heartfelt Creations and their newly released "Blazing Poppy" Collection.

This week I'm going to treat you to a little country theme...you know... a little burlap, some denim and how about some crackled poppies...

...and here's the "Bloom Where You're Planted" canvas...


When I came across the denim canvases at Michaels I knew that I needed to use one for this collection...and it was such a great buy at 50% off!  I so regret not having purchased more than one.

...and here's a closer peek at those beautiful poppies...


I've used several techniques to achieve the look of these finished poppies.
They have been stamped in a black ink and colored with finger daubers and several colors of Distress inks....
They have then been painted with crackle medium, and once dry have had a brushing of Pumice Stone distress stain to make the cracks appear a little more... and the finishing touch are the multi colored seed beads from the dollar store...


I loved this sentiment when I can across in in the Silhouette Design Store!
Such a great message!


To achieve the cracked look on the letters and banner in the sentiment, I've used Crackle Accents.
 For full instructions on the steps to completing this canvas, please see the end of this blog post.  

Be sure to visit the Heartfelt Creations blog as well as there are many more fabulous creations that the design team have created for your inspiration!

Until next time...


Project Supplies & Instructions
HCDP1-255  Blazing Poppy Paper Collection
HCPC-3678  Blazing Poppy Fillers Cling Stamp Set
HCPC-3675  Poppy Border and Corner Cling Stamp Set
HCPC-3674  Blazing Poppy Petals Cling Stamp Set
HCPC-3656  Delightful Daisies Cling Stamp Set
HCD1-760  Delightful Daisy Die
HCD1-764  Blazing Poppy Die
HCST1-401  Deluxe Flower Shaping Kit
SMP001  Stamp Mat Pad
TSMP707  Memento Dye Ink Pad - Bamboo Leaves
TSMP704  Memento Dye Ink Pad - New Sprout
273900  Zip Dry Glue


Other Products Used:  denim canvas, electronic die cutting machine, Silhouette Design Store Design ID #56870, BigShot manual die cutting machine, VersaColor Pine Cone ink, VersaFine Black ink, Finnabair Texture Paste - Crackled Platinum, Rangers Crackle Accents, assorted fabric washi tapes, burlap ribbon, burlap accents, green ribbon, 2 vintage style buttons, My Hueys Spray - Manila, Tim Holtz Distress Tool, blue card stock, green card stock,  glue gun, scissors, scor tape, Elmer's Spray Adhesive, Tim Holtz Distress Crackle Paint - Clear Rock Candy, Tim Holtz Burlap Stencil, craft spatula, Ranger Distress Ink Tool, 3D pop dots, finger sponge daubers, water, mist bottle, paint brush, Diamond Stickles, Stampin Up Basic Black ink, Tim Holtz Distress Ink - Festive Berries & Worn Lipstick, Tim Holtz Distress Stain - Pumice Stone, dollar store seed beads

Begin by locating the two 12"x12" papers from the paper collection shown.  Starting with the main front paper, stamp the corner poppy image in the top corner opposite the pre printed image in a green colored ink.  Using the small poppy stamp in the Poppy Filler Cling Stamp Set, stamp several around the outer edges where you would like to add some interest...ink lightly as you do not want a heavy image but rather want it to appear being printed lightly on the paper.  Remove cap from your Mr. Huey's spray mist and allow droplets to fall over the page where they land.  Using your crackle texture paste and burlap stencil, apply where you would like to have some dimension on the piece.  While texture paste is drying, cut sentiment with your electronic die cutting machine.  Moving along to the second 12"x12" page you've selected, rough up all edges using a distress tool allowing some areas to rip.  Once happy with edges, begin inking with a brown colored ink and the ink distress tool  to achieve an aged look.  Repeat for the other page as well.  Centre the background page on the canvas and adhere using a spray adhesive.  Adhere the burlap strip ribbon to the background page as shown using spray adhesive.  Mount the second page to the background paper at a slight angle.  Once again with spray adhesive, adhere sentiment to canvas.  Locate the matching paper in the paper collection to that of the front 12"x12" page.  Fussy cut pocket and appy to canvas over pre printed image using 3D pop dots.  Fussy cut several poppy and leaf images from the page you've just cut the second pocket image from.  Using pop dots apply to canvas so they appear to be growing out of the pocket.  Using black ink, stamp several of the Blazing Poppy Petals Cling Stamp Set as well as the leaves from the Delightful Daisy Cling Stamp Set.  Using several shades of red, ink the poppies using a finger dauber.  Ink a slight amount of black ink on each centre.  Use a small spray of water and your flower shaping tool kit to shape each flower and assemble.  Once you have assembled all of the flowers you wish to use, paint each flower with the clear Distress Crackle Paint and allow to dry. Once dry, paint with a thin coat of Pumice Stone distress stain and adhere seed beads to each centre.   Ink leaves using a light green ink for the centres, and then a darker green ink around the edges.  Once again using a small spritz of water and your shaping tools, shape leaves.  Using a spray adhesive apply a small burlap ribbon strip to the bottom corner of the canvas under the pre printed image.  Arrange your flowers and leaves on the canvas, and once happy with the arrangement adhere to canvas.  Cut a few very thin strips of green card stock and curl using a scissor and add among flowers to appear as decorative grass.  Add some fabric washi tape as shown.  Create a loopy burlap bow as well as a small loopy green bow and tie together.  Adhere to the top corner of the canvas using a glue gun.  Also adhere a vintage button to the centre of the bow as well as the pocket. Fussy cut a butterfly from the paper collection and bend slightly in the centre.  Adhere to canvas and with finger tip add some stickles.  Lastly, cover your sentiment with clear Crackle Accents and allow to dry.   You now have a pretty country style canvas to give to a special someone or to hang in your own porch or sunroom!  Enjoy!

This project has been shared in the following challenges...
Inky Impressions..."Summertime"
Whimsy Stamps..."Use Ribbon, Lace or Twine"
Crafting By Designs..."Summertime Fun"
Crafty Sentiments Designs..."Anything Goes"
Crafting Musketeers..."Shades of Summer"
Live & Love Crafts..."In the Garden"


Thanks for visiting!

Thanks for visiting!