Introducing the NEW Fluted Classics from Amazing Paper Grace...


Within the various collection introductions, Amazing Paper Grace has included sets that were inspired by classic sewing motifs. The Fluted Classics Collection is another wonderful layering shape set with ticking designs reminiscent of the blanket stitch on its edges! Nest the outer and inner rims with the insert to cut a tailored frame or for a beautiful background edge to any layering design. Keep it simple and you can cut a solid shape with just an outer rim. The Fluted Classics come in circle, square, oval, and rectangle shapes. We’ve also added a slimline version for those card makers who want to create an elegant and trendy silhouette.

Today's projects were created with dies provided by Becca Feeken of Amazing Paper Grace.

My Projects for Today

Today I'm sharing two projects I created with the Fluted Classic Ovals S5-474! Don't you just love nesting shapes? They allow you to create such gorgeous projects quickly and easily...and what can be more elegant than nesting ovals! They are truly one of my faves! They are perfect for mixing and matching, creating frames, and of course using for your sentiments!

I wanted to create a card and coordinating tag that would be perfect for gifting to friends or loved ones...I thought the tag would be perfect for attaching to a platter of holiday baking...and then of course a coordinating card takes totally takes it up a notch!


For the 5"x7" card, I've gone ahead and layered several of the different oval sizes onto a background I've created with some fabulous Graphic 45 patterned paper, as well as the decorative portion of the Mosaic Bracket Card Builder - die cut from gold card stock! It provided a gorgeous shimmer and shine to set off those fluted die cuts! 


Here's a close up of the gorgeous stitching on the fluted ovals...isn't it stunning! It adds such elegance to the oval shape! You'll see in this close up that I've gone ahead an matted with some gold ovals as well. A little more about those coming up in the Designer Tip section! 


You'll see that I've mimicked the same style of design here on the tag...I've just switched up my papers ever so slightly from the same Graphic 45 Collection! The finishing touch to both projects is of course those gorgeous Cinch and Go Poinsettias! They've been die cut and then inked with some Ranger Archival Ink - Red Geranium and Leaf Green. I've given them some quick shaping with a flower shaping stylus tool and have then added prill centers to give them some texture and interest!


Designers Tip: When working with the Fluted Classic Ovals, I loved adding a solid gold oval behind my fluted pieces or decorative paper. If you look closely, you'll see that I've slightly offset them because they are the same size as the piece in front of them...so only the gold peeks through on one side of the decorative ovals. I've gone ahead and alternated the sides that I've added the solid gold ovals so that it visually gives you some extra interest, but isn't super busy or overwhelming!


Fluted Classics Availability:
These dies and plates are available from Spellbinders right now! Click here: Fluted Classics Collection.

Supplies:
Stamps:  Penny Black Sentiments - Joyful Wishes and Sweetest Wishes
Paper: Graphic 45 Twas the Night Before Christmas, white card stock, gold card stock
Ink: Black Ink, Ranger Archival - Red Geranium, Leaf Green

For more Fluted Classics Collection Inspiration
Visit each Creative Team blog linked below for their take on creative paper crafting ideas using the Fluted Classics Collection!

Which Fluted Classics set would you use first?

Lastly, I do have some sad news to share today as well. Due to health issues, this will be my last project with Amazing Paper Grace for now! Once things become more stable, I hope to be back at some point! Thanks for understanding! 

Happy Holidays with Amazing Paper Grace...


 Hello and Welcome!
I'm so glad you've popped by for a visit today!

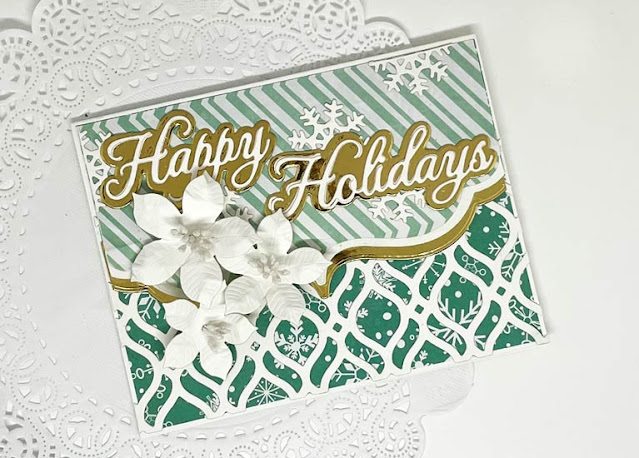
For this week's share, I am featuring the Mosaic Bracket Card Builder from Amazing Paper Grace! I love this collection of dies, and couldn't wait to try it out on an A2 sized holiday card. I so appreciate that the dies from Amazing Paper Grace are designed to work with a multitude of card sizes!

I chose to use some fun decorative papers to do a more non traditional colored holiday card! I love how the striped paper plays off the bottom snowflake design...I love how the mosaic die cut looks over top the snowflake design!

-this project has been created with dies supplied by Amazing Paper Grace-


I chose to go with some gold card stock to add an extra touch of elegance to today's design. I love how the layers on the top bracket portion turned out...what a beautiful way to break up two decorative patterned papers! I opted to die cut some snowflakes from the Silent Night Make a Scene Die Collection to tie in the with the snowflake theme on the bottom. I thought it turned out kinda cute!

And of course, I just couldn't resist adding some white poinsettias created with the Shapeabilities Cinch and Go Poinsettias! I love the subtle embossing these dies create on each petal! And don't they look awesome with glittered white flower stamens in the center!


The Happy Holiday Sentiment has been cut from white card stock twice and then layered onto the gold backing! By layering your sentiments, they have more of a presence and look a little more substantial look on your card! It's a quick and easy technique that gives a great impact...the little extra work is definitely worth it!

Well, I do hope you've enjoyed today's share! It's been great spending a few minutes with you today! I hope to see you again soon!

Until next time...

APG Supply List


Quick Holiday Inspiration with Amazing Paper Grace...


Hello and Welcome! 

I'm so glad we get to spend some time together today! 

I'm popping in with a quick holiday card I created using several dies from Amazing Paper Grace!


     -the dies for this project have been graciously provided by Amazing Paper Grace

I opted to use the gorgeous scrollwork die from the Celebrate Scrollwork Card Builder, and pair it with the Flourished Sonata Notecard. First I die cut a shaped card base using the notecard base...I chose to use it to create a slimline card shape rather than a smaller note card. I simply omitted the bar you'd put in for the fold, popped one of the long cutting edges off a piece of folded cardstock large enough to fit the card onto, and die cut it using my die cutting machine. 


Next I die cut the scrolling background...I took a slimline sized piece of white card stock, die cut one end with the scrollwork die, then realigned it to die cut the other end so that I was left with one long scrolling die cut with a diamond shape in the middle. This is the layer that I'll be adding next on top of my decorative paper. 


I then grabbed some gold card stock and die cut the decorative border from the Flourished Sonata Notecard. I love the richness the gold color lends to the card! We now have a gorgeous background ready to layer up with our sentiment and flowers!


I then die cut the petal pieces for the poinsettias! I've used the Shapeabilities Cinch and Go Poinsettia Set to create this pretty Christmas flowers! I've die cut them in a cream colored card stock to match the paper I've stamped the sentiment on...and then inked the petals with Red Geranium Archival Ink, and the leaves (which I've created using the largest poinsettia flower) in Olive Archival Ink! I decided to bling them up with some pretty pearl and rhinestone centers that I purchased from Etsy!


I then added some white accent flowers that I created using the Petite Floral Potpourri Collection! A simple glittered flower stamen in the center was the perfect finishing touch for them! Subtle and not in competition with the bold poinsettia flower centers!


I'm always so impressed how quickly and easily a card comes together with the Amazing Paper Grace dies! I do hope you've enjoyed today's share!

Until next time...

AGP Supplies

Other Products Used:
white card stock, gold card stock, cream card stock, Ranger Archival Inks - Olive, Red Geranium, Jet Black, & Leaf Green, Graphic 45 decorative Christmas paper, pearl/rhinestone flower centers, glittered white stamens, Gemini Die Cutting Machine, flower stylus


Holiday Creating with the NEW Pop Up 3D Vignette Christmas Tree Die of the Month from Amazing Paper Grace...


What a magical sight to see a beautifully decorated Christmas tree with gifts piled high around its trunk! The Pop Up 3D Vignette Christmas Tree includes a set of graduated trees for a full dimensional design, along with details of presents, bows, and ornaments to complete this set. Change up the colors for an elegant or casual look. Best of all, it folds for easy mailing. Use just the elements to work with a flat card format from A2 to A7. Detailed die cuts make it easy to personalize for the holidays. The choice is yours!

Dies for my creations today were supplied by Amazing Paper Grace.


There are 21 dies included in the Pop Up 3D Vignette Christmas Tree.
 

My Project Today using Pop Up 3D Vignette Christmas Tree.


Can you believe that this is the first time I've worked with one of the 3D vignette designs by Becca Feeken?!?! I'd been a long time admirer of them, but had just never gotten around choosing a favorite, purchasing it and creating with it! I was super impressed with how easily this whole design came together! 

I created the 3D Vignette Christmas Tree card as it was intended to be put together...but I also created a quick and easy card to show you that these elements work beautifully for traditional card making as well!

Let's start with the original version...


I decided to go with a shabby chic/Victorian kind of theme and opted to use a teal patterned paper for my main tree base...and accent it with a lighter printed patterned paper as the tree front. I've used silver foil for all of my accents...and I love the monochromatic look of the ornaments and how they match the outline of the tree!

I opted to use cream card stock to give the entire project a softer and more antiqued look to go along with the Victorian style. The base was super easy to build and holds the tree pieces in place very well! I chose to die cut the sentiment using card card stock as well, and back it with silver to match the color on the tree. 


The dimension in this design is absolutely amazing! In the photo above you can see how all the layers come together...and I love how this super dimensional card folds flat so you can still mail it!

Moving along, let's talk about the second card creation I made with this wonderful set of dies!


For my second creation I wanted to do something super simple! I chose a 6x6 card...I love how the layered tree works really well for a card front! It's a great size that you can customize for your smaller cards to all of your larger sizes!

I wanted a pretty lace like die cut to coordinate with the lace on the card panel I chose to use! The delicate die cut from the Celebrate Scrollwork Card Builder from the Holiday Medley Collection was perfect!


I wanted to do something a little different with the sentiment...so I chose to cut it into pieces and use all of the words included in the set! I thought it turned out pretty cute...especially with the cream colored buttons I added as a vintage style embellishment!


I also love that I was able to keep the tree dimensional even though I was adding it to a card front! Just think...you could use the tree in a single layer, a double layer, create a forest...the possibilities are almost endless!!!
 
Designer Tip:  Let's talk about those adorable gifts under the tree! They work beautifully when die cut in sold colors, but I wanted to give them the appearance of actually being giftwrapped...so I die cut them from some patterned papers within the collection I was using so that they would coordinate with the tree! I thought they turned out super cute!
 

Stamps: n/a  
Paper: cream card stock, silver card stock, Pink Christmas - Stamperia
Ink: n/a
 
For more Pop Up 3D Vignette Christmas Tree Inspiration
Visit each Creative Team blog linked below for their take on creative paper crafting ideas with Pop Up 3D Vignette Christmas Tree, the Amazing Paper Grace November 2021 Die of the Month!
 
 
The Amazing Paper Grace Die of the Month is available exclusively at Spellbinders Paper Arts during November 2021. Pop Up 3D Vignette Christmas Tree at the special kit club price, along with other membership perks.
 
View this month's Amazing Paper Grace Die of the Month! https://youtu.be/SDbd5BaWq8U
 
Would love to hear from you! Comment on how will you use the dies!
 

Thanks for visiting!

Thanks for visiting!