
Note: This draw has officially closed!
Thanks so much for celebrating with us!
Congratulations Debra Lovell....you are the lucky winner of the Flower Essentials Tool Kit!
Please email your details to socialmedia@heartfeltcreations.us to claim your prize!
Hello! Hello! Hello!
Are you as excited as I am!
It's Heartfelt Creations 20th Birthday and I'm over the moon that you're here to celebrate this very special company with me!

Have you ever read the story of how Heartfelt Creations began?
It's such an awesome story of having a dream and working hard to make it happen!
If you've never read the about this company's humble beginnings, you can find all the details here.
Speaking of dreams, designing cards and altered art pieces for Heartfelt Creations was a dream of mine ever since I found the company and fell in love with it! I've been so happy to have been able to have that dream come true! The dream didn't stop there though, I have been blessed to be able to write the descriptions for all of the beautiful products that come out monthly. Such exquisite collections with stunning artistry makes this more fun than work!
My hope is always that these words paint a picture for you of each collection encouraging you to fall in love with each and every one of them!


To honor this very special company we are playing musical blogs for the next week!
I hope you're ready to have some fun!
Each of the blogs included in this musical blog hop are offering a different prize to one lucky winner each day of this exciting event!
All you have to do is leave a comment on the "blog of the day" when the music stops on that blog to be eligible for the prize being offered that day!
The day that the music "stops" on my blog, this is the prize one lucky participant will win!

The Flower Shaping Essentials Kit is the perfect starter kit if you're just starting out in your flower shaping adventure! It comes with all of the basics necessary to start your flower shaping fun!
Our lucky winner will be announced the next day in the event, so please be sure to check back!
Continuing on with the celebrations...

The Flower Shaping Essentials Kit is the perfect starter kit if you're just starting out in your flower shaping adventure! It comes with all of the basics necessary to start your flower shaping fun!
Our lucky winner will be announced the next day in the event, so please be sure to check back!
Continuing on with the celebrations...
For my birthday project I chose to work with the Pampered Pooch Collection.
For this blog hop we are showcasing the Foldout Card Collection and coordinating dies and I thought the Pampered Pooch Collection would be so cute on one of these card bases!
Here's a tour of my special card honoring 20 years of art from the heart with Heartfelt Creations....

The foldout card bases make creating an exquisite card with lots of visual interest so easy!
I chose to work with a kraft colored card base as I thought it would look great with the Pampered Pooch collection!
Above you see the entire card as it would appear sitting on someone's desk or coffee table.
You can look down into the different layers somewhat, however the suspense of what lays behind those layers draws you in and flipping through an interactive card is half the fun!
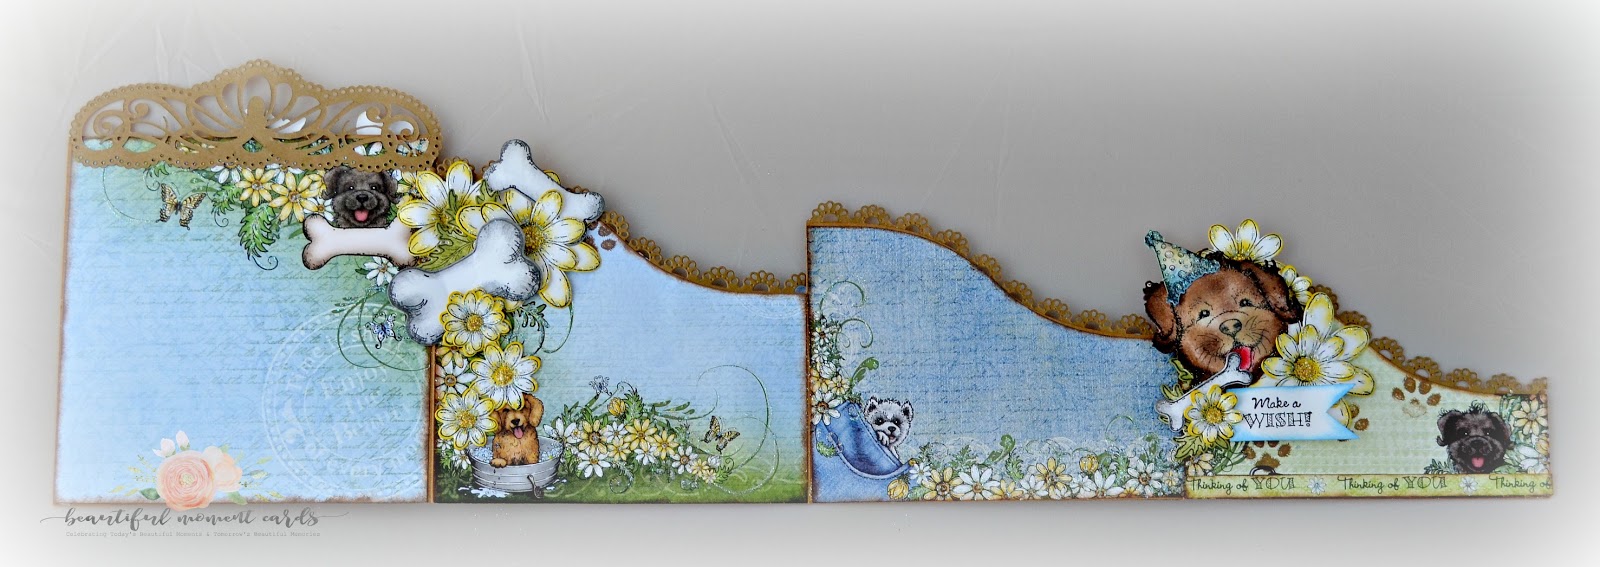
...here's how the card would appear laid out on a flat surface...

I chose to work with a kraft colored card base as I thought it would look great with the Pampered Pooch collection!
Above you see the entire card as it would appear sitting on someone's desk or coffee table.
You can look down into the different layers somewhat, however the suspense of what lays behind those layers draws you in and flipping through an interactive card is half the fun!
...here's how the card would appear laid out on a flat surface...

I love that adorable puppy face, and couldn't resist adding the birthday party hat from the collector's/limited edition stamp and die combination which coordinates with the Pampered Pooch Collection! I thought it would be cute to make it appear that he was bringing a bone as a gift to the party tucked in among all the flowers!
...here's a view of how the card looks fully opened...

...how about a close up look at some of the detailing on the panels...

I chose to use the eyelet version of the coordinating border dies to accent the cards as those pretty loops reminded me of mini pawprints! Using the coordinating dies with the foldout cards is so very easy and makes your card look so very elegant!
If you've never seen how to use these delightful borders with the foldout cards bases, Emma Lou has been so kind as to create a video showing you how easy it is!
You can find the video here!
...moving along to the rest of the foldouts in this view of the card...

...and here's the view of the backside of the card when fully opened...

You'll notice that I finished the back of the card on this project as well. I just think it always looks so nice with that back panel covered as well.
Don't you just love all those pooches that accent the foldouts of the card!
...here's a few more close ups of the backside panels as well...

I just love that happy pooch!
All of the coloring you are seeing on this card has been completed with the Stack and Store daubers!
If you haven't given them a try yet, I encourage you to order the small package to test out the beautiful detailed coloring they can do! It's so quick and easy to use them to add color straight from the ink pad! The triangular shape lets you get into all the detailed areas you wish to bring out in your coloring!
...and the last few panels on the backside of the card...

The fact that you can make these fold out cards quite dimensional allows you to add your layered flowers and embellishments throughout the card itself on the various foldouts. Here you can see that I've created one that when open has quite an floral embellishment display on the back, but has been designed so that it works with the card front as well!
I've finished off the card by glittering it all over...the flowers, the preprinted images, etc.
Dries clear glue and glitter is such a nice finishing touch and always makes your card look so professionally made with that little element of extra interest!
I wanted to give you one last view of the card from above so you could see how
the foldouts all come together to create this dynamic project!

You can see how I've added prills to the centers of the daisies in this close up. You can also see how the flowers have been layered up with a bit of dimension!
The finishing touch on this project was the fancy die cut I've added to the top of the card.
It really gives the card a wonderful height and a grand appearance...perfect for celebrating a company that has blessed us with their beautiful collections for 20 years!
I hope you've enjoyed my share with you today!
Let's keep the party going and stay in touch! Be sure to enter a comment below when the music "stops" on my blog post to be eligible for the prize, (you'll find that info in the FB event daily) and feel free to add yourself to my followers list so we can keep track of one another easily! I'd love to see what you've been creating with Heartfelt Creations Collections as well!
Remember, tomorrow is another musical blog hop share from another design team member!
You'll love what they have in store for you!
If you'd like to just keep hopping...here's the list of very talented artists participating in this hop...
Candy Slabaugh
Tracey Fehr - you are here!
Sandra Carey
Tracy McLennon
Monica Edwards
Janet Saieva
Marie Gamber
Also, be sure to stop by the Heartfelt Creations blog to catch up on special celebration savings and more party fun!
Until next time...
 Project Supplies
6"x6" Foldout Cards - Kraft, HCCF1-445-3
Classic Border Basics Die, HCD1-7119
Fleur Border Basics Die, HCD1-7120
Pampered Pooch Paper Collection, HCPC1-272
Paw-Fect Pooches Cling Stamp Set, HCPC-3760
You're Paw-fect Cling Stamp Set, HCPC-3761
Paw-fect Pooches Die, HCD1-7116
Make a Wish Stamp and Die Limited Edition Combo, HCSD1-2011
Regal Borders and Pockets Die, HCD1-779
Deluxe Flower Shaping Kit, HCST1-401
Stack and Store Daubers - Pack of 30, HCDA2-450
ColorBox Fluid Chalk Ink Pad - Dark Brown, 71035
ColorBox Fluid Chalk Ink Pad - Creamy Brown, 71036
ColorBox Fluid Chalk Ink - Prussian Blue, 71007
Memento Dye Ink Pad - Cantaloupe, TSMP103
Memento Dye Ink Pad - Bamboo Leaves, TSMP707
Deluxe Flower Shaping Kit, HCST1-401
Rock 'n Roll Prills - 12 Pack, ANC851
Dries Clear Adhesive, 159723
Metal Tip for Adhesive Bottles, 352854
Crystal Ultrafine Transparent Glitter, 85-glitter
...here's a view of how the card looks fully opened...

...how about a close up look at some of the detailing on the panels...

I chose to use the eyelet version of the coordinating border dies to accent the cards as those pretty loops reminded me of mini pawprints! Using the coordinating dies with the foldout cards is so very easy and makes your card look so very elegant!
If you've never seen how to use these delightful borders with the foldout cards bases, Emma Lou has been so kind as to create a video showing you how easy it is!
You can find the video here!
...moving along to the rest of the foldouts in this view of the card...

...and here's the view of the backside of the card when fully opened...
You'll notice that I finished the back of the card on this project as well. I just think it always looks so nice with that back panel covered as well.
Don't you just love all those pooches that accent the foldouts of the card!
...here's a few more close ups of the backside panels as well...

I just love that happy pooch!
All of the coloring you are seeing on this card has been completed with the Stack and Store daubers!
If you haven't given them a try yet, I encourage you to order the small package to test out the beautiful detailed coloring they can do! It's so quick and easy to use them to add color straight from the ink pad! The triangular shape lets you get into all the detailed areas you wish to bring out in your coloring!
...and the last few panels on the backside of the card...

The fact that you can make these fold out cards quite dimensional allows you to add your layered flowers and embellishments throughout the card itself on the various foldouts. Here you can see that I've created one that when open has quite an floral embellishment display on the back, but has been designed so that it works with the card front as well!
I've finished off the card by glittering it all over...the flowers, the preprinted images, etc.
Dries clear glue and glitter is such a nice finishing touch and always makes your card look so professionally made with that little element of extra interest!
I wanted to give you one last view of the card from above so you could see how
the foldouts all come together to create this dynamic project!

You can see how I've added prills to the centers of the daisies in this close up. You can also see how the flowers have been layered up with a bit of dimension!
The finishing touch on this project was the fancy die cut I've added to the top of the card.
It really gives the card a wonderful height and a grand appearance...perfect for celebrating a company that has blessed us with their beautiful collections for 20 years!
I hope you've enjoyed my share with you today!
Let's keep the party going and stay in touch! Be sure to enter a comment below when the music "stops" on my blog post to be eligible for the prize, (you'll find that info in the FB event daily) and feel free to add yourself to my followers list so we can keep track of one another easily! I'd love to see what you've been creating with Heartfelt Creations Collections as well!
Remember, tomorrow is another musical blog hop share from another design team member!
You'll love what they have in store for you!
If you'd like to just keep hopping...here's the list of very talented artists participating in this hop...
Candy Slabaugh
Tracey Fehr - you are here!
Sandra Carey
Tracy McLennon
Monica Edwards
Janet Saieva
Marie Gamber
Also, be sure to stop by the Heartfelt Creations blog to catch up on special celebration savings and more party fun!
Until next time...

6"x6" Foldout Cards - Kraft, HCCF1-445-3
Classic Border Basics Die, HCD1-7119
Fleur Border Basics Die, HCD1-7120
Pampered Pooch Paper Collection, HCPC1-272
Paw-Fect Pooches Cling Stamp Set, HCPC-3760
You're Paw-fect Cling Stamp Set, HCPC-3761
Paw-fect Pooches Die, HCD1-7116
Make a Wish Stamp and Die Limited Edition Combo, HCSD1-2011
Regal Borders and Pockets Die, HCD1-779
Deluxe Flower Shaping Kit, HCST1-401
Stack and Store Daubers - Pack of 30, HCDA2-450
ColorBox Fluid Chalk Ink Pad - Dark Brown, 71035
ColorBox Fluid Chalk Ink Pad - Creamy Brown, 71036
ColorBox Fluid Chalk Ink - Prussian Blue, 71007
Memento Dye Ink Pad - Cantaloupe, TSMP103
Memento Dye Ink Pad - Bamboo Leaves, TSMP707
Deluxe Flower Shaping Kit, HCST1-401
Rock 'n Roll Prills - 12 Pack, ANC851
Dries Clear Adhesive, 159723
Metal Tip for Adhesive Bottles, 352854
Crystal Ultrafine Transparent Glitter, 85-glitter


