Planner Embellishments Tutorial...

Welcome, and Happy Friday!

Today I'm bringing you a fun tutorial which is for the ever growing and popular “Planner Community”.  Planners have made a real comeback in the last while with the twist of now decorating in them.  Some are used as actual planners for appointments, etc. and some people choose to use them for memory keeping.  “Planner kits” have also become all the rage and today’s tutorial is to show you how you can create your own kit embellishments with decorative papers and stamps that you already own.  So if you're one of the many planner girls out there, I hope I can inspire you to create some original embellies for your planner using bits and pieces from your stash!  Today I will be using the "Berry Cafe" Collection by Heartfelt Creations!

Let us begin with the creating of your very own sticky note pads.  These cute and highly sought after items are easily created with stamps and dies that you will already have in your craft room!
Begin by stamping the image that you would like to use for your sticky notes in a light colored ink onto a good quality copy paper.  I’ve used a light grey ink on this adorable ice cream themed version.  (Don’t ink with a heavy hand as you still want to be able to write some notes over the image!)


Proceed to color your images ever so lightly using colored pencils. 
Next you will want to die cut all of these images.  Using a little washi tape, adhere the die to the image and die cut using your manual die cutting machine.  


For our next step, let’s give our sticky notes a little elegance by adding some glitter to the whipped topping on the cold treat!


 Moving along to our next step, once the glitter has dried adhere some repositionable adhesive to the top of the back side of the image and then stick the image with adhesive to the top of one of the other images.


Continue layering the images in this manner until you have a nice little pad of sticky notes!
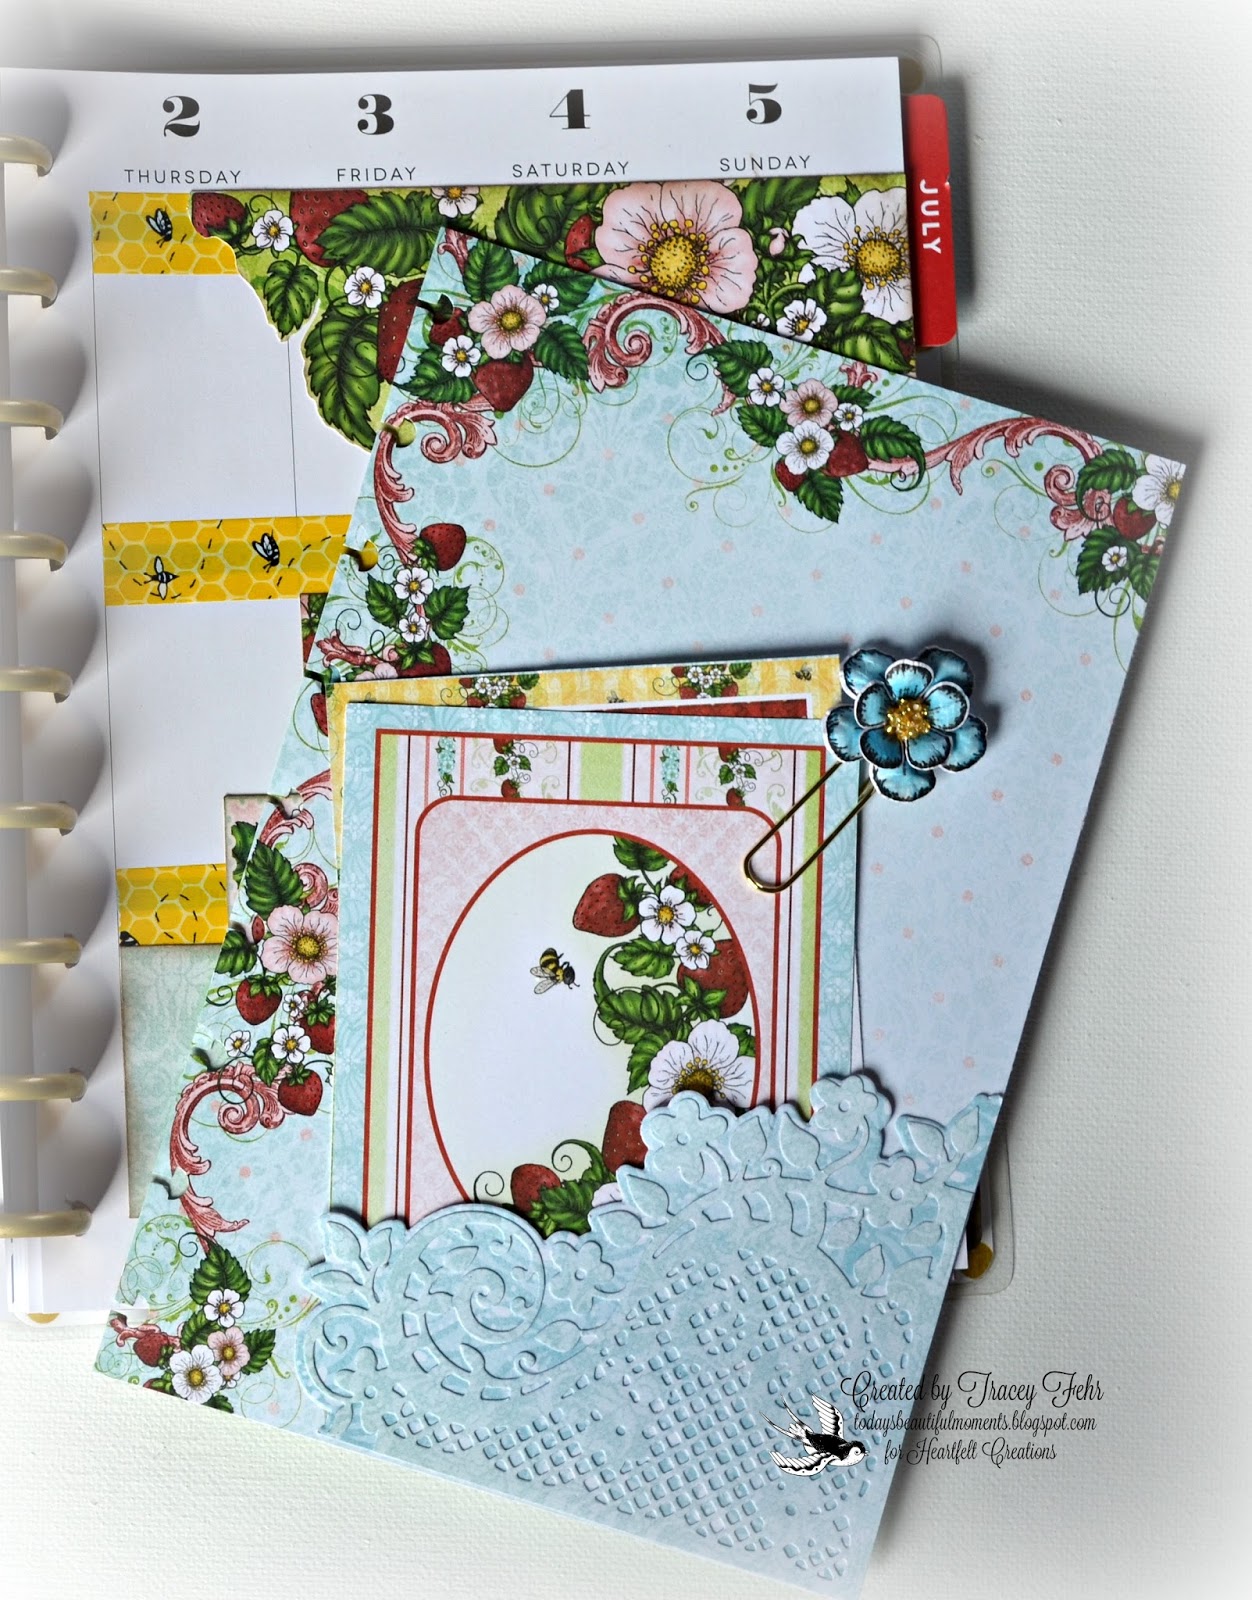
Of course a planner would not be complete without a dashboard on which to place the sticky notes so they are  readily accessible…as well as some cute paper clips!
For your dashboard, select a piece of double sided decorative paper that has the images you would like to use for both the front and the back and measure your planner to find the size you want to make your dashboard.  I cut mine slightly smaller than the pages in my Happy Planner.  The great part is that you get to design your dashboard any size you want.
  In this first image, I have chosen the paper with the fun strawberry filled pocket because the reverse side had a subtle pattern that worked for the second side beautifully.  I’ve added a sentiment strip along the side for some additional visual appeal.  Be careful not to layer too much onto your dashboards as it does become difficult to laminate.  Another thing to keep in mind when decorating your dashboard  is where the addition of  holes will be placed for adding to your planner!


 …and here’s the opposite side!  I have fussy cut a decorative piece from another decorative paper and added a sentiment strip to this side as well.


(We’ll finish off the dashboard lamination further on in this tutorial along with the paper clip lamination.)
To begin preparation for the paper clips, die cut three images from the paper collection that coordinate with the dies in the collection.  Then choose a lightly patterned paper and die cut a second piece to match the images you’ve chosen.  Collect some paper clips.  (I love to use gold colored paper clips because I think they provide such an elegant look!)


 Next, grab your dashboard and all of the paper pieces for your clips and slip them into a laminating pouch and laminate.  (I just have a cheap laminator from Walmart and it works great!)


Once you’ve run them through the hot laminator and let them cool a bit, it’s time to grab a pair of scissors and start trimming.  I follow the outline of the lamination lines close to the items.


(You can also punch the holes into your dashboard at this time!)
Now it’s time to break out the hot glue gun.
Place glue where you want to adhere the paper clip to the laminated image.  Check the front once you’ve positioned the clip to make sure that it appears straight and looks the way you want it to.  Then adhere the second plain die cut to the back of the paper clip image so you have a clean look from the back as well.  This simple step is what will keep your pages in your planner from getting damaged.  


Now don’t you just love those adorable clips?  (If you find that these images are too large for your planner, you can always fussy cut from the paper collection as well!)  

Lastly here’s a picture of all these fun embellishments being put to use in my memory keeping Happy Planner!


I hope you've enjoyed this little tutorial!  If you're a planner girl I hope I've encouraged you to try creating some of your own embellishments from paper crafting stash that you already have tucked away in your craft room!  If you missed the planner spread earlier this week that I created to coordinate with this tutorial, be sure to check that post out here.  (You'll find the instructions in the previous post to create the planner pocket page shown here on the right!)

 Until next time...

Project Supplies
HCDP1-265 Berry Café Paper Collection

 Other Products Used:  higher quality copy paper,  Derwent colored pencils, Staples Arc hole punch, Staples repositionable adhesive, scor tape, scissors, paper trimmer, BigShot die cutting machine, laminator, gold paper clips, MAMBI Happy Planner

Perfectly Sweet...

Good Morning, Afternoon or Evening depending on where you are!
I'm so glad you could join me today!

As you know, it's another Heartfelt Creations Wednesday...and I'm here to share with you another project completed with the Berry Cafe Collection.  

This project is a super quick card as I've used the pre printed images from the paper collection!
I love that Heartfelt Creations has come up with this idea to print images onto the paper sheets that you can easily and quickly die cut for those times that you don't have time to stamp and color!

Let's move along and take a look at my step card creation for the week...


I had so much fun designing this adorable card!
I've 3D decoupaged the milk shake topping so that it stands out and above the glass.  
Aren't those children adorable sitting back there enjoying their sweet treat together?  
I've die cut and shaped the vining berries along the side.
The only stamping I've done on this creation is the flowers, which I've colored slightly in the center and then added prills.  
Of course the whole thing is topped off with lots of sparkle and both the large milkshake image as well as the smaller one in the background scene have been covered with Glossy Accents to give them the appearance of glass.  

Here's a closer peek...


I hope you've enjoyed my "perfectly sweet" creation today!
The instructions are included below and I do hope you'll give this card a try!
And, if your sweet tooth still has a hankering for some more "berrylicious" inspiration, be sure to check out the Heartfelt Creations blog!  All the sweet treat viewing you can handle without the calories!  LOL  Also, while you're there be sure to check out the new design team announcement!  Many of your favorite designers are returning, and the new members are full of fresh and amazing creative talent!  Be sure to take time to give them a warm Heartfelt welcome! 

Until next time...

Project Supplies and Instructions 
HCDP1-265 Berry Cafe Paper Collection
HCPC-3731 Berry Blossoms Cling Stamp Set
HCD1-793 Berry Blossoms Die
HCD1-794 Berry Cafe Die
HCST1-401 Deluxe Flower Shaping Kit
159723 Art Institute Glue - Dries Clear
352854 Metal Glue Tip - Art Institute
85-glitter Crystal Ultrafine Transparent Glitter
ANC852 Bright Ideas Prills

Other Products Used: BigShot Die Cutting machine, white card stock, VersaColor Pine Cone Ink, VersaFine Black Ink, pop dots, Glossy Accents, Spellbinders Card Creator Step Card Die, paper trimmer, ruler, scissors, yellow watercolor pencil, water, spritz bottle

Create card base using Spellbinders die and manual die cutting machine.  Choose patterned papers to use as matting basics for each of the steps and main card panel, measure and trim to desired size and ink all edges with a brown colored ink.  Adhere to card base as shown.  Trim sentiment strip from paper collection, ink all edges with brown ink and adhere to card as shown.  Locate one of the papers within the collection that has all of the pre printed images that coordinate with the dies.  Die cut one pre printed image of the children at table, two milkshake images and one of the strawberries on the vine.  Adhere the table image to the back step of the card.  Shape berry image slightly and adhere to side of card as shown.  Using pop dots, adhere one of the milkshake images to card as shown.  Using scissors, fussy cut the whipped topping image from the top of the other image you've already die cut.  Shape slightly and adhere overtop main image using pop dots.  Stamp several images from the Berry Blossoms Cling Stamp Set onto white card stock using black ink.  Color the centers of the flowers yellow and die cut using coordinating die.  Shape using a spritz of water and flower shaping tools.  Adhere flowers to berry image as well as second step on card as shown.  Add prills to flower centers.  Apply glitter to flower tips, whipped topping on ice cream treats (both large and small) and glossy accents to large milkshake glass, as well as the shared treat.    

You're the Berry Best...

Happy Wednesday!
Are you ready for another "berry" special treat?

I'm back this week with another project featuring the Berry Cafe Collection by Heartfelt Creations.


For this week's project, I decided I would create a little scene with a few of the different stamps in the collection.  I love white picket fences, so I couldn't resist using the stamp paired with the sweet little girl who has been picking in the berry patch!  I wonder if she was picking as I always did...one for the pail and two for me!  Always have to taste test the product, right?

I fussy cut the bee hive border from one of the square premade card panels in the paper collection and adhered it to the top of the decorative die cut.  I then stamped the strawberry cluster image, fence and little girl and then water colored them.  They've all been popped up off the base to give the card some dimension.

...and here's a closer look at that berry cluster...these berries are not quite ready for picking as they are not quite all the way ripe...


I stamped the flower and bee image as well, and just die cut the bee to use on the card!

...and who can resist this sweet little gal with her overflowing basket of strawberries...


I did spend some time watercoloring on this project...but I did want to share a little tip with you this time as well.  Did you know that you can duplicate this same card with all of the printed images from within the paper collection itself...no coloring necessary....with the exception of the flower centers.   Heartfelt Creations has now started adding preprinted images that are ready to be die cut with the coordinating dies in the paper pack!  Talk about making a super fast card when you don't have time to do all of the stamping, coloring and detail work!

I hope you've enjoyed today's share!  I'd love to hear what you think of it, so don't be shy...feel free to leave a comment below!

Until next time...

Project Supplies and Instructions
HCDP1-265 Berry Cafe Paper Collection
HCPC-3735 Sweet as Honey Cling Stamp Set
HCPC-3734 Berry Cafe Cling Stamp Set
HCPC-3732 Blooming Berries Cling Stamp Set
HCPC-3731 Berry Blossoms Cling Stamp Set
HCD1-795 Sweet as Honey Die
HCD1-794 Berry Cafe Die
HCD1-793 Berry Blossoms Die
HCD1-731 Decorative Leafy Frame Die
HCST1-401 Deluxe Flower Shaping Kit
ANC852 Bright Ideas Prills
237 Lichen Glitter
159723 Art Institute Glue - Dries Clear
352854 Metal Glue Tip - Art Institute

Other Products Used: BigShot die cutting machine, VersaFine Black Ink, VersaColor Pine Cone Ink, pop dots, Derwent Watercolor Pencils, Glossy Accents, paper trimmer, scissors, white card stock, water, spritz bottle

Begin with a white 5"x7" card base.  Next locate the paper in the paper collection as shown in the photo to create a  base mat just slightly smaller than the card base itself.  Ink all edges with a brown colored ink and adhere to card base.  Using a light green patterned paper, die cut one cut of the Decorative Leafy Frame.  Also trim a red polka dotted mat for the frame just slightly larger than the die cut.  Ink all edges of both pieces using a light brown ink.  Adhere frame to red mat.  Locate the smaller hanging bee hive image from the paper collection and fussy cut hive along with all the foliage attached. Ink all edges with a brown ink and then adhere over top frame so hive is positioned in the center circle of the frame.  Now adhere frame portion of card to base of card using dimensional pop dots.  Stamp one image of the hanging berry cluster, one little girl image, one bee, one small berry blossoms image and one fence image onto white card stock using black ink.  Color using watercolor pencils, and then die cut using coordinating dies.  Adhere fence image and little girl to card as shown using pop dots.  Using a spritz of water and your deluxe flower shaping tools, shape hanging stawberry image, small blossoms, as well as bee and adhere to top corner of card as shown.  Cut out sentiment, ink all edges with brown ink and apply to card as shown using pop dots.  Apply glitter to leaves of all berry images, including around fence and berry basket.  Add glossy accents to all strawberries, and prills to flower centers. 

Watercolor Fun...

Hello!
I'm popping in with a quick blog post today!
I had been experimenting with watercoloring techniques for a little while now...and I'm hoping that practice will start making more perfect!  However, I wanted to share with you a card I created today featuring a no line water technique.  Don't be too critical...I am by no means saying that I'm awesome at this type of coloring...but I did think this one was good enough to show off and give to one of my daughters friends mom!  She has always been so gracious with helping out with picking my daughter up, taking her to events, etc. if I've been away teaching classes, etc.  

Let's take a peek...


The stamp set I've used is a new one from a stamp company that I've just discovered called The Ton...this stamp set is called "Happiest of Peonies".  The sentiment is also from the same stamp set!
I've simply matted the image to a pink piece of card stock using adhesive foam and then adhered that to a black piece of card stock.  The entire card front has then been added to the card base with adhesive foam as well.  

I have to say I really enjoyed this style of image coloring, and will have to keep up practicing as I'm hoping that more practice will make more perfect!
I've tucked a Tim Hortons gift card in as a small token of appreciation, and will deliver the card in the next few days!

Thanks for stopping by!

Until next time...

Berry Cafe Planner Spread...

Hello Again!
I cannot believe another week has flown by and it's Wednesday once again!
Have you been enjoying the Berry Cafe postings from the Heartfelt Creations design team?
I think they've all done a "sweet" job bringing new inspirations your way!

This week I wanted to bring a little something different to the table.  This weeks posting is for all the planner girls out there!  The planning world has really taken off in the last while, and I too have jumped on that bandwagon.  I have a Happy Planner that I use as a memory keeping planner, and a Carpe Diem that I use for my real task oriented planner.

If you browse the internet looking for planner ideas, you will see very quickly that you are bombarded by all sorts of Etsy shops offering stickers, monthly kits, etc. And, while I do indulge in these once in awhile...I find it can really get expensive!  So...I've made myself a deal that I will start using from my stash to create my very own "kits" that I can use weekly or monthly!
I decided that the Berry Cafe Collection would make a fun kit to decorate June...the first month of summer!

Here's how my planner spread turned out...


As you can see, it's a great way to use up little bits and pieces from other projects.  I've also created my own stickers using some stamps from the collection and some white sticker paper.  I've die cut a preprinted ice cream image from the paper collection and added it to the bottom corner of the first page in the spread.  I've fussy cut the bee hive image from a scrapbook page in the collection for the second page of the spread.  The berry images on the bottom of the pages are the handmade stickers I created, as is the lone berry in the center of the first page.   

Of course you always need a pocket page to keep memory keeping journaling cards, extra stickers, etc. organized.  So I created a pocket as well as a berry blossom paper clip to keep all those loose extras together...


I hope you've enjoyed the tour of my memory keeping Happy Planner today!  I hope I've inspired all of you planner girls out there to dig into your stash and create your own version of a planner kit!
Also, don't forget to stop by the Heartfelt Creations blog to see the beautiful creations the rest of the design team have created for your inspiration!

Also, be sure to check back here Friday for a "berry" special tutorial involving more planner items for this "berry" special planner kit idea!

Until next time...

Project Supplies and Instructions
HCDP1-265 Berry Cafe Paper Collection
HCPC-3732 Blooming Berries Cling Stamp Set
HCPC-3731 Berry Blossoms Cling Stamp Set
HCD1-794 Berry Cafe Die
HCD1-793 Berry Blossoms Die
HCD1-778 Fleur Borders and Pocket Dies
HCST1-401 Deluxe Flower Shaping Kit
159723 Art Institute Glue - Dries Clear

Other Products Used:  white sticker paper, Black Versafine Ink, VersaColor Pine Cone Ink, paper trimmer, scor tape, Spectrum Noir Markers - DR4, DR5, DR6, DG1, DG2, DG3, gold seed beads, gold paper clip, hot glue gun, washi tape, scissors, white card stock, water, spritz bottle, BigShot die cutting machine

Watch this video to learn how to shape flowers with the Deluxe Flower Shaping Kit.

Planner Spread: Select bits and pieces of left over paper from the Berry Cafe Collection. Adhere washi tape to planner as desired.  Measure and cut paper pieces to size that you wish to use in your planner, and work with design before adhering to planner pages.  Fussy cut large bee hive image from one of the scrapbook pages and position to where you would like it to appear on your layout.  Locate sentiment strips, trim to size you desire and notch out one end on each with scissors to create banners.  Die cut a preprinted ice cream image from the paper collection using the coordinating die, and fussy cut any other small paper elements you wish to use in your planner spread.  Ink all edges of each of the items you are using with a soft brown colored ink.  Arrange as desired (or as shown) and adhere to planner spread. 

Stickers: Using a permanent black ink and white sticker paper, create your own strawberry stickers by stamping each of the images from the Blooming Berries Cling Stamp Set, color using markers and then die cut using coordinating dies.  Snip apart with scissors as needed to use in the areas you wish to apply a sticker.

Paper Clip: Stamp one image of the largest blossoms from the Berry Blossoms Cling Stamp Set onto white card stock.  Color using markers and then die cut using the coordinating die.  Using the largest flower and the next size down, shape using a mist of water and shaping tools.  Adhere one to the other to create a double blossom.  Using a hot glue gun, apply glue to back of flower and adhere paper clip.  Then take one of the left over blossoms that has been die cut and place over glue on back to finish the backside of the clip.  Adhere gold seed beads to center of flower. 

Planner Pocket Page: Select patterned paper you wish to use to create a planner pocket page.  Using the Fleur Borders and Pocket Dies, cut one large pocket from coordinating patterned paper.  Using scor tape, apply pocket to page as shown.  Cut several card panels from paper collection, back each with white card stock and place in pocket to use as memory keeping journaling cards.

Berry Delicious Gift Set...

Welcome, Welcome, Welcome!
I'm so glad you're here!
Will you take a quick trip with me...down winding country roads, the warm sun shining on your face and the smells of summer reminding you it's great to be alive!  Do you see it?  It's at the end of the farmer's lane over there...it's a berrylicious sight...a fresh fruit stand flaunting the most heavenly display of beautiful overflowing berry baskets,  berry flavored cupcakes and cool, refreshing strawberry lemonade!  Let's stop and see the wares!

Heartfelt Creations has a new release today...and if you haven't guessed yet, its going to be filled with divine strawberry images and gorgeous patterns.  

Let me share a little more...

Warm breezes blow, busy bees buzz from blossom to blossom, and perfectly shaped, ripe berries beckon you as you catch a glimpse of them through the vines winding their way up the rickety old picket fence in the picture perfect garden patch.  Bring back fond memories of strawberry picking while the early morning dew still lingered on the vines with the new release by Heartfelt Creations.  The Berry Cafe Collection will have you reminiscing of filling pails until overflowing while playing the game of "two for me" and "one for the pail", which always led to the task taking a tad longer. Travel back in time to the days of your childhood where you shared your first strawberry milkshake, or float at the local ice cream parlor with that special someone you so adored. Filled with sweet illustrations of vining strawberries, adorable children, elegant blossoms, old fashioned strawberry stands as well as delicately patterned papers featuring eyelet prints, soft checks, ornate borders and delicious clusters of strawberries nestled among flowers, you are certain to find yourself warming in the berry patch and hankering for a cold strawberry treat. Happy hues of pinks, reds, yellows, blues and greens create a cheerful color palette that is sure to make your heart sing the songs of summer.  Five extraordinary cling stamp sets allow you to recreate all of the memories of strawberry picking and enjoying the fruit from the vine.  Color and shape your way to a lush and productive garden plot where blossoms and fruit abound, being careful to avoid the ever busy bees.  After all of the toiling and care, reap your rewards, head on over to the fruit stand where anxious passerby’s will be ready to invest in your delicious crop...and once the day is done, grab a friend and treat yourselves to that special strawberry flavored treat with a generous helping of whipped topping! We present to you the ideal collection to welcome summer!

For this weeks project, I decided to decorate a mason jar that I thought could possibly be sitting on a Farmers Market table or at the end of a farmer's driveway on a fresh produce stand.  I think decorating a mason jar like this would be wonderful if you were gifting homemade strawberry jam, or filled with packets of garden seeds for someone special who loves to garden...or even a teachers gift filled with strawberry scented hand lotions, lip balms and candies!

I also decided that it would be fun to create a shaped card using the fruit stand image from within the collection.  

Allow me to share with you...


This idea actually came to me as I was browsing through Michaels Craft Store and later the local dollar store.  Mason jars wrapped with a strip of lace seem to be all the rage at the moment.  Well, I thought I could certainly build on that theme as I have a ton of unused mason jars at home sitting in the pantry at the moment!  LOL

Here's a closer peek at the jar itself...


As you can see, I've also added a small tag to the jar, along with lots of glitter and blossoms filled with gold colored seed beads.  

Here's a view from the top...


I've used a piece of patterned paper to place under the lid to make it decorative.  The fun flower patterned material comes from my mom...it's got to be 50 years old or so, as it was purchased when she was in 4H as a young child for a sewing project!  I've tied on the tag with some raffia to give the project a country feel!

Moving on to the note card...


I think shaped note cards are so much fun, don't you!
I thought this would be the perfect size to include along with the mason jar and together they would make such a cute gift set!  I've used my Derwent water color pencils to color the main image and the vines and berries have been colored using Memento Inks. 

Well, that wraps things up for me!
 I hope you've had a "berry" good time visiting with me today!
There are more "berrylicious" creations up on the Heartfelt Creations blog, so do take time to wander on over there for a visit as well!

Until next time...

Project Supplies and Instructions
HCDP1-265 Berry Cafe Paper Collection
HCPC-3731 Berry Blossoms Cling Stamp Set
HCPC-3732 Blooming Berries Cling Stamp Set
HCPC-3734 Berry Cafe Cling Stamp Set
HCD1-793 Berry Blossoms Die
HCD1-794 Berry Cafe Die
HCPC-3354 Classic Message Cling Stamp Set
HCST1-401 Deluxe Flower Shaping Kit
TSMP300 Memento Dye Ink Pad - Lady Bug
TSMP704 Memento Dye Ink Pad - New Sprout
TSMP707 Memento Dye Ink Pad - Bamboo Leaves
85-glitter Crystal Ultrafine Transparent Glitter
159723 Art Institute Glue - Dries Clear
352854 Metal Glue Tip - Art Institute

Watch this video to learn tips, tricks and techniques on how to create a shaped card.

Other Products Used:  white card stock, BigShot Die Cutting Machine, Derwent Water Color Pencils, water brush, mason jar, raffia ribbon, piece of fabric, gold seed beads, water, mist bottle, VersaFine Black Ink, wide lace, hot glue gun, Distress Marker - Black Soot

Mason Jar:  Adhere wide lace to center of mason jar using hot glue gun and set aside to dry.  Stamp multiple images of the Blooming Berries Cling Stamp Set as well as the Berry Blossoms Cling Stamp Set onto white card stock using black ink.  Color images using finger daubers and ink.  Die cut with coordinating dies.  Shape each element using a spritz of water and the Deluxe Flower Shaping Tool Kit.  Using a hot glue gun, adhere vining berries around the entire center of the mason jar over lace.  Trim apart sections to use as fillers for areas needing more fullness.  Locate a piece of patterned paper you wish to use as a jar topper, and trim to fit inside lid.  Fussy cut tag from paper collection, stamp partial sentiment by inking stamp with black marker and attach to jar using some raffia ribbon. Adhere gold seed beads to centers of flowers, and a touch of glitter to berries and leaves as desired.

Notecard:  Stamp berry stand image onto a white, folded piece of card stock, making sure the top of your stamp is slightly off the fold.  Using the coordinating die, cut using your manual die cutting machine.  Color using water color pencils.  Stamp one inking of the Blooming Berries Cling Stamp Set, as well as the Berry Blossoms.  Using a finger dauber, apply color to images.  Die cut using coordinating dies, shape and adhere to card forming a cluster to top corner as shown.  Adhere gold seed beads to flower centers and glitter to fruit cluster as well as any elements desired on the image itself. 

This project has been shared in the following challenges...
A Place To Start..."Upcycle a Household Item"
Crafty Cardmakers..."Shaped Card"
 

Have a Beautiful Day...

It's so great to "see" you today!
Thanks for stopping by my small corner of the world to check in on what's going on!
As you know, it's Wednesday which means it's another Heartfelt Creations share!
Today is my last project with the Winking Frog Collection!
It's such a great collection perfect for any age and really any occasion!

I decided that I wanted to create a marsh scene and thought an easel card would be fun to make and I would have tons of room to create the scene with a bunch of elements from the collection!
The square pre made card panels made it so easy to start designing!

 Let's take a look at how the project turned out...


I decided to give the piece a touch of elegance by adding the ornate die cuts to both the top and bottom of the card.  

Here's a closer view of the little scene I created on the card front...


...here's a closer peek at the bottom portion of the card...


...and of course we need to have a closer look at the lily pads and water lilies that act as the stop on the bottom of the card base...


As you can see I've used an number of stamps and dies on this creation, done some die cutting and some fussy cutting from the paper collection as well.  I've also added a touch of glitter here and there to add to the interest of the piece.  I've added the sentiment strip to the top of the card as I thought it just summed up what these fun and care free frogs would be trying to tell us!

I hope you've enjoyed your trip to the marsh today and have enjoyed seeing all the fun the Winking Frogs have been having!  Be sure to check out the Heartfelt Creations blog for some more amazing inspiration...and if you haven't had a chance to check out the sneak peek of the new collection being released in April, it's there for you as well!  I'm sure you'll be "berry" impressed!

Wishing You a Beautiful Day!

Until next time...

Project Supplies and Instructions
 HCDP1-264 Winking Frog Paper Collection
HCPC-3730 Froggy Hangout Cling Stamp Set
HCPC-3728 Winking Frogs Cling Stamp Set
HCPC-3725 Water Lily Cling Stamp Set
HCPC-3729 Leaping Frogs Cling Stamp Set
HCD1-792 Leaping Frogs Die
HCD1-791 Flirting Frogs Die
HCD1-790 Water Lily Die
HCD1-779 Regal Borders and Pocket Dies
HCST1-401 Deluxe Flower Shaping Kit
TSMP708 Memento Dye Ink Pad - Olive Grove
TSMP707 Memento Dye Ink Pad - Bamboo Leaves
TSMP704 Memento Dye Ink Pad - New Sprout
TSMP602 Memento Dye Ink Pad - Teal Zeal
2pnk Pink Gala Glitz
85-glitter Crystal Ultrafine Glitter
159723 Art Institute Glue - Dries Clear
352854 Metal Glue Tip - Art Institute

Other Products Used:  white card stock, BigShot die cutting machine, scissors, paper trimmer, scor tape, Stickles - Yellow, Ranger Distress Markers - Forest Moss, Bundled Sage, Peeled Paint, Black Soot, Scattered Straw, Spun Sugar and Worn Lipstick, pop dots, VersaFine Black Ink, VersaColor Pine Cone Ink, Memento Dye Ink Pad - Angel Pink, water, spritz bottle

Watch this video to learn how to shape the lily pads and flowers.
 
Begin with a 6"x6" white card base.  Fold the top portion of the card down in half to meet the fold line to create the easel portion of your card. Die cut the decorative edge into the bottom portion of the card as shown.  Cut the same decorative edge as a separate piece and set aside to be added to card later.  Locate the 6"x6" decorative premade card panels for the bottom and main portions of the card.  Ink all edges using a brown colored ink.  Adhere preprinted card panel to bottom of card base as shown.  Cut a white 6"x6" piece of white card stock, adhere separate decorative die cut to top and then second preprinted card panel over that.  Fussy cut floral corners as shown on the bottom of the main image card panel.  Ink all edges with a brown colored ink and adhere to bottom corners of main image card panel.  Fussy cut sentiment strip, and die cut preprinted toadstool image from paper collection using coordinating die. Ink all edges with brown ink and add to top of card.  Using white card stock and black ink, stamp one of the leaping frogs images, one of the winking frogs on vine, one inking of the water lily and lily pads cling stamp set and one dragonfly.  Color using distress markers, die cut using coordinating dies and then shape each embellishment using a spritz of water and the deluxe shaping tool kit.  Using pop dots, adhere leaping frogs and frogs on vine to main card panel as shown.  Adhere main card panel to easel portion of card and determine where to place lily pads with water lily so card is able to remain standing when open.  Adhere lily pads and water lily as shown.  Adhere dragonfly to floral cluster.  Fussy cut varying sized dragonflies from the paper collection, ink all edges with a brown colored ink and adhere to card as shown, making the largest in the upper corner dimensional by adding a second shaped dragonfly over top.  Add small shaped flowers to the vine where frogs are playing.  Adhere pink Gala Glitz to flower centers, glitter to flower tips and any other flat elements on the card you desire, and yellow Stickles to lightning bugs.

Thanks for visiting!

Thanks for visiting!