Showing posts with label hibiscus. Show all posts

Happy Father's Day...

Welcome Everyone!
We're celebrating Father's Day today!
The kids and I have planned a little surprise for their dad...we've rented a cabin and next weekend will be taking him on a Father's Day Fishing Getaway!  The kids are so excited because the cabin has a loft bedroom and have been making plans to play and sleep up there...and they've been begging me to rent the hot tub for the weekend!  LOL  I told them it would depend on what the forecast looked like!  Hopefully there will be some good fishing, as we've never been to this place before.  

Now, I did want to share with the you the Father's Day card I created for my dad!
I chose to use the Under the Sea Collection by Heartfelt Creations this year!
We've been having such dull, cloudy and rainy weather again, I thought this collection would bring some brightening to dad's day!  I didn't want to go over the top floral for his creation...as I know he's been getting his fill of the real thing lately as he and mom have been designing some flower beds and doing quite a bit of planting this year!  

I chose a fun shaped card file from the Silhouette Design Store to work with and set to work!

Are you ready?


That's right...I just couldn't resist doing a Hawaiian shirt with the floral cut outs and of course all the beautiful hibiscus prints from the Under the Sea paper collection!  

As you can see, I've created a small shaped boutonniere just from fussy cutting a hibiscus cluster straight from the paper collection, and added one of the premade sentiments from the collection as well...and of course a touch of glitter! 

Here's a bit of a closer peek...


I also wanted to add a scenic pattern to the bottom of the shirt as some of these "tacky" shirts do!
I once again fussy cut a portion of a scene from the paper collection and trimmed it to fit on the bottom of the shirt.

Here's a little closer peek at that portion of the card...


Again a touch of glitter and those bright orange buttons, I thought it came together really well!

The one thing I will tell you about my dad though is that he would never wear a shirt like this!  LOL But, I'm sure he'll find the humor and fun in the piece and enjoy it just the same!

So dad, I hope you have a great Father's Day!  Thanks for always being willing to pick up the kids from school when I can't make it there due to other obligations, for taking them to places they need to go when I can't, and for always making sure that the kids tummies are full of extra special treats you've picked up for when you know they're coming to visit...and even sharing with me!  LOL
And of course, for always listening and giving advice along the way!

Until next time...

It's Beach Time...

The temperatures have finally started warming up, the days are getting longer and I know pretty soon that hot summer sun will let us know it's beach time...and the one thing you can never forget at home is your
 jam packed full beach tote! 
Am I right?
It houses the towels, the sunscreen, the bug spray and of course if you have kids the ever important snacks, water supply and the masses of beach toys!
 We haven't had a trip to the beach lately as we've been experiencing days and days of rain here right now...but that didn't stop me from thinking about the beach when creating my newest creation for Heartfelt Creations featuring their spectacular Under the Sea Collection. 

I hadn't been sure about what type of altered art project I'd been wanting to create with this super fun collection until I spotted the designer paper that boasted nothing but the lovely hibiscus flowers.  
It reminded me of a beach tote!
So online I went and SVG Cuts did not let me down....I found a wonderful beach tote cutting file.

Here's how it turned out...


I just loved the tassel included in the cutting file...and there were other embellishments in the files to create some simple charm dangles...but I opted to use two of the tags from the paper collection instead.  I loved the look of the fish up there on the corner.  Of course if we're thinking tropical beach we need to include a hibiscus!  No other flower screams beach more!

Here's a closer look at the details...


Of course the pocket on the front of the tote gift bag just begged to have a note card added to it...so I obliged!  I made it super simple by creating just a smaller note card with some quick matting and a partial premade card panel that makes creating so fast and easy!  A fun sentiment stamped from the Under the Sea Collection stamped sideways and voila...it was done in just minutes!

Here's a closer peek...


I wanted to give you a quick visual of what the card will look like tucked into the pocket as well!
(Sorry, I know we're on the verge of calling this a picture heavy post!  LOL)


Well, I hope you feel like you've been able to soak up a little sun here today!
Remember to pop on over to the Heartfelt Creations blog to take a look around at the other projects the rest of the design team have created for your viewing pleasure.  And, if you haven't already seen next months release "The Botanic Orchid", be sure to take a tour of the preview!

Until next time...

Project Supplies and Instructions
HCDP1-266 Under the Sea Paper Collection
HCPC-3740 Heartfelt Wishes Cling Stamp Set
HCPC-3736 Tropical Hibiscus Cling Stamp Set
HCD1-796 Tropical Hibiscus Die
HCST1-401 Deluxe Flower Shaping Kit
TSMP400 Memento Dye Ink Pad - Rose Bud
TSMP707 Memento Dye Ink Pad - Bamboo Leaves
ANC852 Bright Ideas Prills
159723 Designer Dries Clear Adhesive
352854 Metal Tip for Adhesive Bottles
273900 Zip Dry Paper Glue

Other Products Used:  Silhouette Cameo Electronic Die Cutting Machine, SVG Cuts File - Luxury Handbags Beach Tote,  BigShot manual die cutting machine, VersaFine Black Ink, gold cord, scor tape, scissors, paper trimmer, 3"x 4.5" small blank white notecard  and matching envelope, Glitter Ritz Transparent Glitter, white tissue paper, eight blue brads, white card stock, sponge daubers, button

Watch this video https://www.youtube.com/watch?v=84Re1-gaq1o for shaping tips and techniques on the hibiscus flowers.

Choose the patterned papers you wish to use for the various pieces of the beach tote SVG files.  Cut with electronic die cutting machine and assemble according to instructions included with file.  Before adhering the front pocket to the tote, ink all edges with a light bown ink, then adhere as shown.  Locate the full page in the paper collection with the "Remembering Beautiful Moments with You" image along with the swirling hibiscus image on the top of the page.  Fussy cut sentiment image as well as image on upper corner, ink all edges on both pieces using a light brown colored ink.  Adhere to tote as shown.  Cut two small tags from the paper collection and adhere to handle along with tassel.  Using black ink and white card stock stamp one inking of the hibiscus flower.  Color, die cut, shape and assemble a double blossom using a large flower and a smaller flower.  Add prills to center and adhere to beach tote as shown.  Choose a small premade card panel, along with a paper to use as a mat and cut down to fit small sized note card.  Ink all edges with a light brown color, stamp sentiment onto card front using black ink, assemble and adhere to card base.  Add a touch of glitter to card front as well as tags on tote.  Adhere button to tote pocket. 

A Father's Day Creation...

Hello Again! 
Nice to "see" you!

It's Wednesday, so you know what that means...it's another Heartfelt Creations project share!
This week I have a Father's Day card to share with you!  The holiday is quickly approaching here in Canada and the U.S. so here's a bit of an early heads up to prompt you to get your cards done early!

I decided to mix elements from the "Under the Sea" Collection and the "Everyday Heroes" Collection.  

Here's how the card turned out...


I love the sail boat image from the Everyday Heroes Collection and knew that I wanted to incorporate it into a creation with the Under the Sea Collection as soon as I saw the sunken porthole!
And of course I had to have that anchor sitting right beside it surrounded by all those lovely seashells and that adorable fish checking out the surroundings...

...and how about a closer look at that sunken porthole...


If you look very closely on the top of this photo you will also see that I've melted some embossing powder onto the card to give it an aged appearance and a little bit of texture.
When the card was assembled and completed I thought these two collections worked together very well to create a masculine card!
 So, I encourage you to merge Heartfelt Creations collections together for even more stunning creating opportunities!

For more inspiration and to continue your underwater sea adventures, be sure to check out the amazing cards, layouts and altered art pieces the rest of the uber talented design team members have created for you this week on the Heartfelt Creations blog!

Until next time...

Project Supplies and Instructions
HCDP1-266 Under the Sea Paper Collection
HCPC-3736 Tropical Hibiscus Cling Stamp Set
HCPC-3738 Coral Reef Collage Cling Stamp Set
HCD1-796 Tropical Hibiscus Die
HCD1-798 Coral Reef Collage Die
HCPC-3740 Heartfelt Wishes Cling Stamp Set
HCDP1-253 Everyday Heroes Paper Collection
HCPC-3662 My Anchor Cling Stamp Set
HCD1-761 Everyday Heroes Die
HCST1-401 Deluxe Flower Shaping Kit
159723 Designer Dries Clear Adhesive
352854 Metal Tip for Adhesive Bottles

Other Products Used:  BigShot die cutting machine, VersaFine Black Ink, VersaColor Pine Cone Ink, Embossing Powder - Verdigris, heat tool, Viva Ferro Paint - Copper and Graphit, black card stock, pop dots, Spectrum Noir Markers - CR1, CR2 CR4, CR5, CR6, TN3, TN4, TN5, TN6, DG1, DG2, DG3, BT5, GB1,GB7, IB1, IB2, IB3, BG3, BG4, BG5, CT1, CT2, BT2, BT3, BT4, OR1, OR2, OR3, water, spritz bottle, pop dots, black card stock, paper trimmer, gem flower center, washi tape, MISTI, white card stock, Spellbinders Standard Circle

Create a 6"x6" card base using black card stock.  Locate the 6"x6" background panel as shown from the Under the Sea Collection. Trim slightly smaller than card base and ink all edges with a brown colored ink.  Adhere to card base.  Locate main image panel as shown from within in the Everyday Heroes paper collection.  Ink all edges with a brown ink.  Mask off areas on the main panel where you do not want the image to overlap when stamped and then stamp ship image using black ink.  Stamp sentiment.  Adhere to a black mat that is slightly larger than image panel.  Roll opposite top and bottom corners slightly to give the corners a touch of a bend.  Adhere to card base using pop dots.  Using black ink, stamp porthole, hibiscus, shells and corner accent pieces onto white card stock. Color using alcohol markers.  Die cut all pieces using coordinating dies.  Shape hibiscus and leaf using a spritz of water and shaping tools. Add gem to flower center.  Adhere corner accent and hibiscus to card as shown.  Die cut center of porthole using Spellbinders Circle die.  Adhere center circle to card as shown, and add porthole to card using pop dots.  Add in anchor and sea shells around porthole.  Apply Ferros metals using fingertips to porthole and anchor.     

This card has been shared in the following challenges..
Creative Card Crew..."Masculine"
 Scrap Creations..."Father's Day/Masculine"
Pinspirational Challenge Blog..."Anything Goes"
Through the Craft Room Door..."Anything Goes"
Di's Design Challenge Blog..."For the Boys"

Under the Sea...

It's another exciting Wednesday, and I'm so happy you're here to share it with me!
Heartfelt Creations has released their new collection "Under the Sea" and it is divine!

Allow me to take you on a little journey where we will make magical underwater discoveries and leave our worries and stresses behind...

Take a walk along the edge of the deep blue sea, feel the warm sand between your toes and breathe in the salty air.  Balmy breezes tousle your hair and toy with the exotic hibiscus flower behind your ear as you stoop to snatch a lustrous seashell that has been swept onto the beach with the incoming tide. Cares and worries melt away because life really is better at the seaside.  The cool, crystal clear water lapping at the shoreline beckons you and you cannot resist the sudden urge to dive right in.  Before you know it you have been submerged into a magical underwater world where you find yourself settling on a jagged reef surrounded with burnished coral, glassy seashells and mystical sea creatures more beautiful than your imagination could ever conjure.  A peek behind the coral and waltzing seaweed finds you nose to nose with a school of fish gliding every so gently with their long, graceful flowing tails and glistening scales decorated with an abundance of shimmering and alluring colors.  Delicate sea horses and magnificent jelly fish dart and flit among the dancing aquatic plant life as to entertain you with a glorious underwater show being performed just for you.  Welcome to “Under the Sea”, the newest collection by Heartfelt Creations.  This water themed assembling of magnificent papers, stamps and dies will have you creating ravishing underwater scenes perfect for documenting your seaside vacations, ocean themed altered art pieces or salt water card creations.   The tranquil color palette of calming blues, greens and teals, paired with golden yellows, subtle shades of pinks, purples, corals and reds are sure to soothe your soul.  Creating projects with a tropical flair that will “make a splash” has been made simple with decorative papers boasting mesmerizing patterns of sea shells, florals, delicate swirls and alluring hibiscus blossoms.  The intricate, detailed stamp illustrations of underwater sea creatures, glistening seashells, and exotic hibiscus flowers are sublime for shaping and creating dimensional elements adding a realistic touch to any underwater themed paper craft design.  We invite you to take the plunge and come along with us on an underwater adventure as we explore Under the Sea!

Let's start off with a peek at my project boasting this new underwater adventure...I do wish the lighting had been better when taking this picture because the colors are much more vibrant and than they appear here...


The beautiful images in this collection really did make it hard to know where to start this time!  I opted to use the large seashell which can be shaped so exquisitely.  Paired with the gracefully flowering seaweed and divine sea horse I knew that I wanted to create somewhat of an underwater scene.  I chose one of the square premade card panels and decided to layer from there.  I found a smaller preprinted card panel that I thought would make a beautiful backdrop to the dimensional images I had chosen to work with.  I decided to use the Thank You sentiment stamp from the collection, and also added some dew drops to the side of the card to mimic air bubbles within the water.  
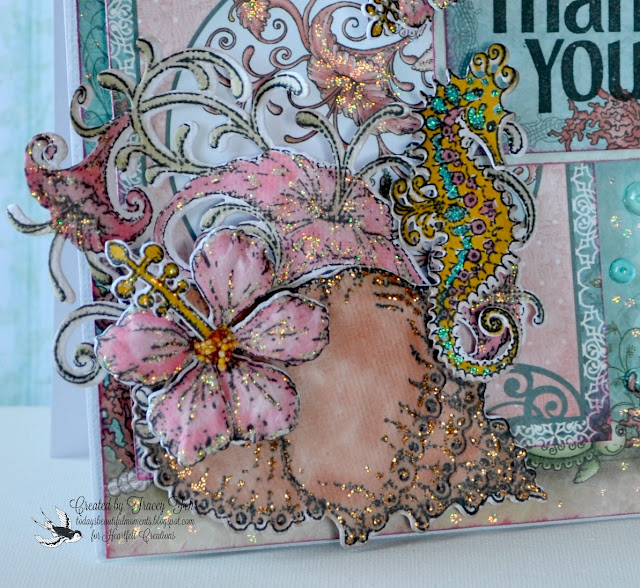

I've added some beautiful hibiscus flowers with some fun multicolored prills in the centers, and I think they add such a romantic and dreamy touch.  All of the stamped images have been colored using my Spectrum Noir markers...funny that I've used those because when I teach classes and people ask me if I usually color using markers, my answer is always no...but for this collection the colors seemed right being a tad bolder.  

Also, as you can see I've added tons of sparkle to this card.  There's something magical about pictures from Under the Sea don't you think...and I wanted this card to feel magical as well.  

Well, that's all for me today!  I hope you have enjoyed a little break in you day while you were here, and I hope you will stop by again!  To continue on your underwater adventures, be sure to swim on over to the Heartfelt Creations blog where there are many more dynamic designs for you to take in!

Until next time...

Project Supplies and Instructions
 HCDP1-266 Under the Sea Paper Collection
HCPC-3736 Tropical Hibiscus Cling Stamp Set
HCPC-3737 Under the Sea Coral Cling Stamp Set
HCPC-3738 Coral Reef Collage Cling Stamp Set
HCPC-3740 Heartfelt Wishes Cling Stamp Set
HCPC-3739 Under the Sea Cling Stamp Set
HCD1-796 Tropical Hibiscus Die
HCD1-797 Under the Sea Coral Die
HCD1-798 Coral Reef Collage Die
HCD1-799 Under the Sea Die
HCST1-401 Deluxe Flower Shaping Kit
TSMP400 Memento Dye Ink Pad - Rose Bud
311070 Water Dew Drops
159723 Art Institute Glue – Dries Clear
352854 Metal Glue Tip – Art Institute
ANC851 Rock N' Roll Prills
196 Lions Mane Glitter

Other Products Used: BigShot manual die cutting machine, VersaFine Black Ink, Stickles - Diamond, Spectrum Noir Markers - CR1, CR2 CR4, CR5, CR6, TN3, TN4, TN5, TN6, DG1, DG2, BT5, GB7, pop dots, white card stock, water, spritz bottle, VersaColor Pine Cone Ink, MISTI stamping tool

Begin by creating a 6"x6" card base from white card stock.  Locate the same sized background panel as shown on card.  Ink all edges with a bright colored pink ink.  Adhere to card base using pop dots.  Next locate the smaller premade card panel as shown.  Ink all edges with pink ink once again and using pop dots adhere to card front.  Locate the small  paper image where sentiment will be stamped.  Ink all edges with a pink ink and stamp sentiment and set aside to dry.  Cut a light colored piece of patterned paper just slightly larger and mat behind sentiment.  Ink all edges of sentiment mat.  Adhere sentiment to card using pop dots.  Stamp one image of the sea horse, floating hibiscus, large shell and also one stamping of the hibiscus flower cling stamp set onto white card stock using black ink.  Color using alcohol markers, and cut using coordinating craft dies.  Ink edges on all embellishment pieces with a light brown ink.   Next, using your Deluxe Flower Shaping Kit and a spritz of water, shape the shell and floating hibiscus flowers.  Slide the floral die cut through the shell slightly to bring some of the cut out image  in front of the shell.  Using pop dots adere to card front.  Next adhere sea horse to card as shown using pop dots.  Using your Deluxe Flower Shaping tool and a spritz of water, shape flowers.  Adhere mid and small sized flowers to card as shown.   Add dew drops to side of card where sentiment sits, starting from the bottom working up to the top to simulate bubbles.  Apply glitter to shell, flowers, and sea horse.  Lastly apply prills to flower centers and dots of Stickles randomly to background.    

Thanks for visiting!

Thanks for visiting!