Garden Daydreaming...

Hello and Welcome once again!
It's another Heartfelt Creations Wednesday...and once again I was late to the party and didn't get my project added to the HC blog in time!  LOL
Hopefully you all find me here on my little blog and get to take a peek at my creation anyway!

As you will recall, we've been creating and sharing projects with the Backyard Blossoms Collection this month! While I was creating this card yesterday, the sun was shining...but the wind was blowing out of control and there was nothing but dust hanging in the air as it has been so dry here this spring.  Actually, pretty much all of our province is under a complete fire ban...it's that dry...and of course there are already wildfires going that need to be controlled!  

Well, I got to thinking about backyard blossoms and pretty flower beds and decided I would create a fun summer scene to forget about the one that is taking place outside my door.  

Here's what I came up with...


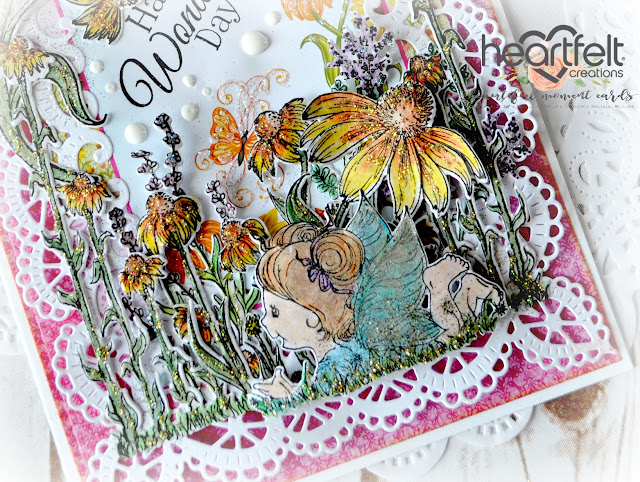
I stamped, die cut and shaped my paper flower garden and then decided I needed to have a little daydreamer enjoying the view! The little fairy from the Wildwood Cottage Collection was perfect!


She's so cute nestled there in those flowers! I love creating fairy gardens at our campsite and in my flower bed, and this just reminded me of those special little finds as you gaze among the flowers!
Her wings have been accented with the Nuvo Sparkle Pen...it really does shimmer, however on the photo it doesn't do it justice as the sparkle kinda presents as gold when it's more of a clear glitter.
I've added a bunch of glitter to give this card an extra magical feel!

The little flower garden has been created with the accent flowers found within the Backyard Blossoms Collection.  I've mixed and matched sizes and colors to give it some interest.  I've also matted a premade card panel in the window of the frame for the card.  All of the stamped and die cut pieces have been colored using my Spectrum Noir Blendable Pencils and Gamasol Solution.  I love how quick and easy it is to color and then blend with these pencils. 


The sentiment I've used has come from the Heartfelt Love Collection...perfect for an any occasion card!  I love how those larger coneflowers bent over to frame out the sentiment! I've added some white Nuvo Drops around the sentiment and up into the empty corner of the card to give is kind a daydreaming feel....like the fairy's thoughts are just floating.  

Here's a closer peek at the large coneflower die cut that frames out the sentiment...


Well, that's my share today! 
I hope you've enjoyed the little garden tour of my card and my whimsical little daydreamer!
It's not my usual style to create a scene, but I'm not disappointed in how it turned out...it's just a little more busy than usual!

Be sure to pop on over to the Heartfelt Creations blog to take in the creativity from the rest of the design team members!  Be sure to leave them some love on their blogs and on FaceBook to let them know they've inspired you!

Until next time...

Introducing the Backyard Blossoms Collection...

Hello and Welcome!
It's wonderful to visit with you today!
Today is another Heartfelt Creations Wednesday...and we're announcing the release of the Backyard Blossoms Collection!

Here's a little more info about this beautiful summer collection...

Summer brings with it the excitement of a new gardening season, lounging in the open expanse of the backyard and enjoying the beauty of favorite perennial blossoms dancing gently in the warm summer breeze! Among those returning favorites are the attractive, butterfly loving coneflower! Bright and colorful, these pretty flowers come dressed in a wide variety of hues and quietly display their domed centers and soft delicate petals against the backdrops of ornamental grasses and other decorative backyard plantings! Come along with us as we welcome back the summer season with a walk through the Backyard Blossoms Collection by Heartfelt Creations! Brilliantly hued, and filled with a good dose of summer sunshine, the fabulous paper collection showcases happy shades of bright yellows, pretty pinks, luscious lavenders and glorious greens and showcases lovely lace like patterns, elegant swirls and bountiful coneflower blossoms! Included in this jubilant and cheerful assembling are three exquisitely illustrated cling stamps sets with coordinating dies ideal for all of your summer themed paper craft creations! From large coneflower images, ornamental grasses, to smaller backyard blossom accents, these dynamic illustrations are ideal for creating your very own dimensional flower gardens as focal points on card fronts or as accents on scrapbook layouts! So grab your lounge chair, slather on the sunscreen and join us as we kick back and relax in the backyard enjoying our favorite backyard blossoms!

It's been awhile since I've had a project to share with you it seems!
(I've been super busy writing up descriptions for upcoming releases!)
I love coneflowers, and I just knew I wanted to spend a little time in the craft room getting inky with this newest collection! While I didn't get it completed in time to post to the Heartfelt Creations blog, I do hope you don't mind popping in here to see the particulars! 

Well, enough chatter....here's how my card turned out...


As I mentioned earlier, coneflowers are among my favorite flowers to put into my flower bed and container gardens. I love browsing through all of the different varieties and color combinations in the greenhouse! In the paper collection I was drawn to the beautiful orange and yellow florals...perhaps because it was a cloudy and dreary day outside and I was needing a dose of sunshine! LOL

I opted to use the rectangle layering dies released with the Frame a Card Dies to create my layers quickly and with ease! They work so well for achieving perfect layers...and I'm a fan of not having to measure!  LOL

I chose a preprinted card image that I wanted to work with, die cut the oval out with the Oval Dies (I opted to die cut it with a larger oval die so I would have a yellow border around it...I then stamped my sentiment onto the oval), die cut an the mid sized eyelet rectangle so I could use it as a framing element behind the sentiment panel and used the remaining preprinted card panel that I cut the oval from as my first layering piece. I've cut a white card stock mat and the next layering mat from the decorative paper in the collection which coordinated with the outlining pattern on the preprinted card base. Both of these mats were cut quickly and easily using my Geminin die cutting machine and the Eyelet Rectangle and Basics Die. Following these cuts, I found the large scrapbook page in blue and green hues with the coneflower borders and cut that to create a mat for a 5" x 7" card base. I adhered the large mat to the card base and then using pop dots added the main focal assembling. 


I then got busy stamping and die cutting my coneflower images!
I opted to use the rounded corner image as well as the double stampings of each of the other single cone flower images within the collection.  I stamped all of the flower images using Ranger Archival Ink - Coffee and then proceeded to color them using Stamp and Store Daubers. The flowers have been inked with Ranger Archival Ink - Monarch Orange and Buttercup. The foliage have been inked with Ranger Archival Ink - Fern Green and Leaf Green. I've used my Deluxe Flower Shaping Kit to add some dimension to the die cuts. I've added the spreading coneflowers around the sentiment oval. The single coneflowers I've snipped off the foliage, cut into the petals so that they will be able to be shaped individually and have then added them into the coneflower arrangement for added dimensional interest.


I've added some seed beads that I purchased years ago to the cone of the echinecea flowers, and have also added Lions Mane Transparent Glitter to accent each of the petals. 

I thought a butterfly from the Butterfly Dreams Collection would be the perfect finishing touch to this creation! I stamped the butterfly image in Ranger Archival Ink - Forget Me Not twice, and then colored the center of each of the insects with the same color, then some Leaf Green and the tips of the wings Ranger Archival Ink - French Ultramarine.

  
I've left one stamping of the butterfly in tact, and have snipped the tails off of the second image. I've then shaped and layered the butterfly bodies together. As you can see I've added a ton of glitter to the butterfly as well.  This was the first time I used the Blue Rain Ultrafine Transparent Glitter, and I cannot tell you how beautiful it is.  If you have not already added it to your glitter stash, I highly recommend it! It will fast become one of your favorites!

Well, that's all from me today!
I do hope you've enjoyed my share today!
Be sure to head on over to the Heartfelt Creations blog as well to take in the stunning inspiration the rest of the design team have come up with for your viewing pleasure!

Until next time...
Project Supplies
HCDP1-290 Backyard Blossoms Paper Collection
HCPC-3826 Blossoming Coneflower Cling Stamp Set
HCPC-3828 Garden's Edge Coneflower Cling Stamp Set
HCD1-7180 Blossoming Coneflower Die
HCD1-7182 Garden's Edge Coneflower Die

Other Products: white card stock, Versafine Black Ink, paper trimmer, Gemini Die Cutting Machine

For more inspiration using the Backyard Blossoms Collection see this video

Thanks for visiting!

Thanks for visiting!